Quantcast
Channel: DisplayLag
Viewing all 126 articles
Browse latest View live

OLED, 4K, and more 2014 Input Lag Results

$
0
0

 
I have another large update for everyone today, continuing my testing of 2014 displays. There are 31 new additions to the input lag database, featuring 4K, 240hz, Plasma, OLED, and many others! Also, you should totally check out the new 2014 Sony KDL-55W950B HDTV, as it is the first HDTV from this year to break our excellent category for input lag! This means it will be suitable for everything you throw at it, whether it’s competitive or casual gaming.

Clicking the links below will send you to their respective product pages on Amazon. Alternatively, you can also visit our input lag database to compare these to other tested displays.


The post OLED, 4K, and more 2014 Input Lag Results appeared first on Display Lag.


BenQ BL3200PT Review: 32″ Large WQHD Monitor

$
0
0

About The Review:

This BenQ BL3200PT monitor was provided by BenQ for review purposes. I will be reviewing the build construction, picture quality, and overall technical performance of the BL3200PT, including input lag performance.


Display Details

Size: 32″ Panel: 10-bit
Resolution: 2560 x 1440 Dynamic Contrast Ratio (ASCR): 20M:1
Aspect Ratio: 16:9 Panel Type: VA
Response Time: 12ms, 4ms (GTG) Viewing Angle: 178/178
Display Colors: 1.07 Billion Color Gamut: 100% sRGB


Inputs, Features, & MSRP

Inputs/Outputs: HDMI D-Sub DVI DisplayPort
Inputs/Outputs (Cont.): Headphone Line-In 2x USB 3.0 SD Card Slot
Features & MSRP: 5W x 2 Speakers under $799 on Amazon - -


BenQ BL3200PT Amazon


  • The BenQ BL3200PT, At A Glance:

BenQ’s latest offering is quite a departure from their usual gaming monitors. The BL3200PT is an impressively-large screen, coming in at 32-inches, rivaling most entry level HDTVs in size. This monitor is primarily designed for the CAD/CAM industry, with features that enhance perception of detail, while offering comfort for long hours of work. The good news is, the premium features on this monitor should also be considered by any enthusiast looking to jump into the high resolution game. Offering a 2560 x 1440 resolution with a VA screen capable of producing 10-bit color, it’s certainly no slouch for anyone looking to upgrade their setup.


The BenQ BL3200PT features one of each major input used today.


In terms of connectivity, you can expect every major input present. This includes DVI, HDMI, DisplayPort, and D-Sub to handle your video connections. A pair of USB 2.0 and 3.0 ports are also available, for a total of 4 USB downstream ports. An SDXC Card reader is located on the side of the display, which is where the two USB 3.0 ports are located for convenient access. For those that aren’t keen on using an external audio system, a pair of stereo speakers are integrated into the BL3200PT, each powered by a 5W speaker. Additional cable purchases aren’t necessary either, as the BL3200PT comes standard with DVI, HDMI, D-Sub, DisplayPort, and line-in cables in the box.


The OSD controller allows tactile operation of the OSD, if the touch sensitive buttons aren’t your preference.


An extra cool inclusion by BenQ is the OSD controller for the BL3200PT. This circle-shaped device connects via a dedicated mini-USB port located behind the monitor, and allows you to operate the OSD without using the dedicated touch buttons. It is extremely useful for those that end up using the OSD often, without having to search for the right buttons to press. The controller includes a directional pad to navigate the menus, and also features 3 separate buttons to quickly switch between different picture modes. You don’t have to worry about misplacing the OSD controller either, as the stand includes an insert to rest the OSD controller when not in use.

The monitor’s bezel is about average in size, measuring approximately 1.3cm thick from the edge of the display. While not the slimmest one around, it’s not thick enough to be distracting. Like most premium monitors, the BL3200PT features a fully height-adjustable stand, that can also be rotated into portrait formation for those that require it. Due to the large screen size, the display needs to be tilted upward in order to rotate it properly. This is a breeze as the BL3200PT also features full tilt-control. The overall build quality of the materials is superb; ranging from the metal stand to the OSD controller.


It’s not super slim, but it’s far from gaudy. The bezel on the BL3200PT fits the profile just right.


  • Panel Specs:

Being a 32″ display, its massive size would be considered a little too large for standard 1080p resolution at close viewing distances. The great news is, this monitor features a 2560 x 1440 WQHD resolution, with an advertised 4ms GTG response time. The 10-bit VA panel operates at a 60hz refresh rate, with a native 3000:1 contrast ratio (20M:1 dynamic). The 10-bit panel allows the monitor to display a wider color gamut, specifically 1.07 billion colors. In contrast to IPS, VA panels are known for their ability to reach deeper black levels than most other display types.


  • Buttons:

No physical buttons here. The BL3200PT features a very slick touch interface that illuminates as you draw your finger towards it. Upon tapping, the OSD appears on the display itself. I’ve always been a fan of BenQ’s OSD, as it allows seamless operation regardless of your ambient lighting conditions. I’ve encountered too many monitors that were simply a pain to navigate in the dark, so it’s great to see this kind of forward-thinking from BenQ. I can’t find any major faults in the menu operation that’s present on the BL3200PT. For those that do not appreciate touch inputs, you can always resort to the included OSD controller for a more tactile method of control.


The touch sensitive buttons light up when your finger is in proximity, and perform very responsively.


  • Viewing Angles & Uniformity:

The viewing angles on the BL3200PT are specified to be 178/178 by BenQ, and in practice, don’t exhibit any glaring flaws when moving your head from side to side in most scenarios. There is, however, inherent color shift when you move slightly off center (a disadvantage of VA technology). This is most noticeable during darker scenes, where moving your head a little bit to the side may cause some blacks to look a bit grayish. You can reduce the appearance of this phenomenon once your backlight is calibrated according to your ambient lighting. During most viewing sessions, this is hard to notice and doesn’t detract much from the overall quality of the monitor.

BL3200PT luminance results. Click to enlarge.

In terms of panel uniformity, it looks very solid overall. Using the ‘User’ mode, I calibrated the BL3200PT to achieve near-6500k color temperature and 100cd/m² luminance for dark rooms. Without using a custom ICC profile, we’re looking at approximately -14cd/m² maximum deviance from the center for luminance, and approximately -64k maximum deviance from the center for white point. The calibrated settings used later in this article resulted in a color temperature of 6505k without ICC profile compensation. In real world testing, outside of the typical VA shifting, the monitor looks quite uniform. It certainly outperforms most monitors I’ve encountered, which frequently suffer from backlight bleed, lack of uniformity, and other issues.

BL3200PT white point results. Click to enlarge.


  • Menu Items and Features (OSD)

With a focus on designing, it is imperative for the BL3200PT to feature a vast amount of customization options. It certainly doesn’t disappoint. There are 11 picture mode presets to choose from, including sRGB, CAD/CAM, Animation, Presentation, Standard, Low Blue Light, Movie, Photo, Eco, M-book, and User. You can also configure Brightness, Contrast, Sharpness, Gamma, Color Temperature, Hue, Saturation, and AMA (response time overdrive). Some of these settings are locked out unless you use the ‘User’ preset mode for maximum configuration. There is also an advanced menu that allows scaling and color format configuration. Outside of display configuration, ECO and Ergonomics menus allow you to enable automatic backlight dimming and the proximity sensor for detecting your presence. Enabling the proximity sensor allows the monitor to automatically turned off in 40 seconds to save power.


  • Black, White, and Color Output:

With the abundance of calibration options available, it’s possible to correct almost any inaccuracies you may find using the default out of the box settings. The first change I ended up making in order to achieve proper calibration results was to change the HDMI RGB PC range from 16~235 to 0~255. This allowed me to correctly set the RGB values in order to achieve 6500k. Using the black level test pattern on Lagom, I was able to discern each black square without issue using dark room settings. It is important to note that there is a lack of independent black level control, similar to the ASUS VN279QL I reviewed last month. Perhaps a side effect of VA monitors? Either way, it’s a non-issue as the black level is correctly set out of the box. Similarly, contrast was set correctly out of the box (for ‘User’ mode), though this control does have the ability to be configured. The default setting was good enough to resolve all of the contrast test squares on Lagom, without any noticeable clipping. The brightness setting was adjusted in order to achieve 100cd/m² luminance for a dark room.

Once calibrated, the BL3200PT is certainly a joy to experience content on. One advantage that VA panels have over IPS panels is their ability to achieve a really dark black level, which enhances the depth of all other colors. Running 2560 x 1440 at this screen size is a sight to behold; anyone that wants a pretty screen should take a look at the BL3200PT. As mentioned earlier, I was able to calibrate the BL3200PT to achieve a color temperature of 6505k without using an ICC profile. However, I highly recommend using the custom ICC profile supplied in this review, along with these settings, to bring the most out of the monitor with proper color and gamma adjustments:


  • Brightness: 17 (100cd/m² for dark rooms. Increase if too dim.)
    Contrast: 50
    Sharpness: 5
    Gamma: 3
    Color Temperature: User Define (R: 99, G: 97, B: 96)
    Hue: 50
    Saturation: 50
    AMA: High or Premium
    Overscan: Off
    Display Mode: Full
    HDMI RGB PC Range: 0~255

    Note: These settings were achieved using an i1 Display Pro, along with X-Rite’s i1 Profiler software. The GPU used on the test computer is an Nvidia GTX 670 using stock settings. These settings require an additional ICC profile for accuracy. The ICC profile for the BenQ BL3200PT can be downloaded here. Use these settings at your own discretion, as they may look different on your display.


If you have yet to experience 2560 x 1440, you’re missing out.


  • Scaling:

The scaling options available on the BL3200PT are among the very best available. In addition to Full, Aspect, and 1:1 modes, the BL3200PT has the ability to scale the image to mimic different screen sizes, from 19″ all the way to 30″. Once using a custom scaling mode, you are able to use BenQ’s Smart Scaling option to fine-tune the image according to your needs. For example, once you select the 19″ screen option, you can increase the image size in small increments using Smart Scaling. This allows you to completely fine tune the display’s presentation according to your needs. Nobody should have any problems with the scaling options present on the BL3200PT.


  • Measured Input Lag:

So how does the BL3200PT hold up when it comes to gaming? Above average, but not quite amazing. I tested the BL3200PT using both 720p and 1080p lag testers, and both returned identical results. Input lag was found to be identical in all picture modes, which is good news for those that want to game on a specific picture mode. Setting the AMA to ‘Premium’ resulted in a 1ms reduction on the values returned from the lag testers. This won’t make a difference you can feel, but it’s good to know regardless. The measurements were recorded as follows:

  • Top: 20.1ms
  • Middle: 27.5ms
  • Bottom: 34.8ms

Averaging out these measurements results in an average input lag rating of approximately 28ms (rounded to nearest millisecond). This display is fast enough for the majority of gamers that are in the market for such a display, but not as fast as some other VA offerings, such as the ASUS VN279QL.


The BenQ BL3200PT clocks in with an average input lag of 28ms, with 720p and 1080p sources.


  • Gaming Performance:

Taking it one step further, I did some hands on testing using Ultra Street Fighter IV to see if I could notice the input lag. For those that don’t know, Ultra Street Fighter IV introduced a new option into training mode that allows you to add latency frame-by-frame for online play simulation. This is an incredibly useful feature, as it allows you to add latency to an otherwise lagless display, to get a feel of what the other (presumably laggy) monitor feels like. While I already presented measured results above, sometimes it’s good to feel the difference.

I used my BenQ RL2455HM monitor as the control display, and disabled sound on both monitors in order to force myself to use visual cues only. Switching on the fly between the RL2455HM and BL3200PT, I noticed a slight difference in terms of timing. The RL2455HM has an average input lag of 10ms, whereas the BL3200PT is averaging 28ms. To compensate, I added 1 frame of input lag using the network simulation feature in Ultra Street Fighter IV, and noticed the timing to become more even between both monitors. 1 frame of lag is approximately 16.7ms, so the difference I felt definitely lines up with the measurements taken above. Based on this testing, I feel that the BL3200PT is not fit for gamers that demand frame-perfect accuracy in their games. If this is your priority, I recommend checking out either the RL2455HM or RL2460HT to suit your needs. This will be most noticeable in 60 FPS (frames per second) games with fast paced action, and much less so in 30 FPS games. However, if you’re a semi-serious gamer that wants a responsive monitor, but do not need frame-perfect accuracy, the BL3200PT will serve you just fine. This monitor is still one of your best options when it comes to low input lag with a higher-end display.


Ultra Street Fighter IV features an incredibly useful lag simulation mode, allowing frame-by-frame testing of input lag.


  • Motion Blur:

With an advertised 4ms GTG response time, the BL3200PT should theoretically be fast enough for the majority of users that choose to purchase this display. You have to engage the AMA function, as setting it to ‘Off’ results in very noticeable motion blur that is extremely distracting. The default setting of ‘High’ is fast enough to remove most of the blur, but anyone that views fast-paced content at 60 FPS may still notice some blur present. Setting AMA to ‘Premium’ removes almost all noticeable motion blur, though it ends up presenting motion blur artifacts that trail the image. I recommend trying the ‘Premium’ setting first to see if the artifacts distract you, otherwise stick to ‘High’ if you find them uncomfortable to view. This will vary based on your individual tastes. Unfortunately, there isn’t one setting that will cater to everybody’s needs. You can view the pictures below to see the difference between the modes.


Testing was performed through Test UFO using the ghosting test, operating at 1920 pixels per second.

AMA Off

AMA Off

AMA High

AMA High

AMA Premium

AMA Premium


_______________________


BenQ BL3200PT Amazon


The post BenQ BL3200PT Review: 32″ Large WQHD Monitor appeared first on DisplayLag.

BenQ XL2720Z Review: 144hz 3D Monitor for Demanding Gamers

$
0
0

About The Review:

This BenQ XL2720Z monitor was provided by BenQ for review purposes. I will be reviewing the build construction, picture quality, and overall technical performance of the XL2720Z, including input lag performance.


Display Details

Size: 27″ Panel: 6-bit
Resolution: 1920 x 1080 Dynamic Contrast Ratio: 12M:1
Aspect Ratio: 16:9 Panel Type: TN
Response Time: 1ms GTG Viewing Angle: 170/160
Display Colors: 16.7 Million Color Gamut: 72%


Inputs, Features, & MSRP

Inputs/Outputs: HDMI x2 D-Sub DVI DisplayPort 1.2
Inputs/Outputs (Cont.): Headphone 3x USB 2.0 Inputs - -
Features & MSRP: under $499 on Amazon 3D Ready - -


BenQ XL2720Z Amazon


  • The BenQ XL2720Z, At A Glance:

BenQ’s latest offering targets gamers that value more than 60hz in their displays. Boasting a maximum refresh rate of 144hz, this allows gamers to yield extremely high frame rates, provided that their hardware is capable of doing so. The XL2720Z is a 27″ 1080p display that also supports Nvidia 3D Vision, allowing you to experience compatible 3D titles in their glory. You can also expect the usual BenQ features, such as a customizable OSD, Low Blue Light, and an extremely useful feature called Motion Blur Reduction.


Plenty of inputs for most modern devices are available, including 2x HDMI, DVI, D-Sub, and DisplayPort.


Nobody should find the input selection lacking. The XL2720Z features dual HDMI inputs, DisplayPort, D-Sub, and DVI. A headphone jack is also available to connect your headphones or speakers to the monitor. Unfortunately, the monitor does not feature any built in speakers. It shouldn’t be a deterrent to the majority of people interested in this monitor, however. Three USB 2.0 ports are present to connect your USB peripherials, a welcome addition to those running out of motherboard ports. It would have been nice to see USB 3.0 ports instead, as the popularity of USB 3.0 devices are increasing by the day.


The S. Switch allows you to operate the OSD without using the touch-sensitive buttons.


For those of you that checked out my BL3200PT review, you read about the inclusion of an OSD controller to simplify monitor control without resorting to the OSD buttons. BenQ has included a similar device with the XL2720Z, which does an excellent job controlling the monitor efficiently. Called the S. Switch, it features a scroll wheel that acts as a selection button, along with keys for return and three dedicated gamer profile buttons. These buttons allow you to quickly select one of the three custom gamer profiles that BenQ includes in most of their monitors today. The S. Switch makes OSD operation a smooth, efficient process. I highly recommend utilizing it if you purchase this monitor.

While not the slimmest of bezels, the XL2720Z’s bezel compliments the overall look of the monitor nicely. I’m assuming the bezel couldn’t be razor thin due to the inclusion of touch sensitive buttons along the side of the casing. The stand is a premium upgrade from the design that was fitted on the RL2455HM. It features tilt, portrait rotation, height adjustment, and also allows you to rotate the monitor horizontally, which is perfect for multi-screen setups. Its construction is composed of hefty plastic, and it does a great job keeping a firm hold on the monitor.


Not too slim, not too thick. The bezel is about as standard as it gets.


  • Panel Specs:

BenQ’s XL2720Z is a 27-inch monitor with a native 1080p (1920 x 1080) resolution. It features a TN-based panel, with an advertised 1ms GTG response time. To make the most out of its TN panel, BenQ offer a maximum 144hz refresh rate, although its still capable of handling 60hz and 120hz content just fine. Its native contrast ratio is pegged at 1000:1, with a dynamic contrast ratio of 12M:1. Bear in mind that this monitor is designed for 16:9 aspect ratios, so for those looking for more vertical screen estate, you would have to check out 16:10 monitors to satisfy that requirement. TN panels are known mostly for their fast response times and low input lag, which give it an advantage over most other panel types.


  • Buttons:

The XL2720Z features an assortment of touch sensitive buttons located on the right side of the monitor’s bezel. They are very similar to those found on the BL3200PT and PG2401PT monitors from BenQ, although they are now stacked vertically. While they do a decent job at navigating menus, I preferred using BenQ’s older physical menu buttons with the OSD used on the XL2720Z. For some reason, these touch buttons aren’t quite as responsive as the ones found on the BL3200PT and PG2401PT with their respective OSDs. I found myself having to press more than once on rare occasions to get the interface to register. Thankfully, you can avoid using them altogether due to the inclusion of the OSD controller. The buttons do work well enough, but the control offered by the OSD controller is far superior and quicker.


The XL2720Z’s buttons are touch-sensitive, and are located on the right side of the bezel.


  • Viewing Angles & Uniformity:

Being a TN panel, I was expecting the worst when it came to viewing angles and uniformity. I was actually pleasantly surprised in this regard, as the viewing angles aren’t nearly as bad as I feared them to be (when compared to other TN panels, that is). Moving your head up and down at extreme angles does exhibit the natural TN darkening/gamma shifting we’ve come to expect, but slight movements don’t detract too severly from the optimal viewing angle. Slight horizontal movements exhibit less variance in gamma than vertical movements. The monitor is specified to have a viewing angle of 170/160. This won’t best IPS and VA panels by any means, though when compared to other TN panels, it does a fairly good job at providing adequate viewing experiences.


XL2720Z luminance results. Click to enlarge.


After calibration, you can expect a maximum deviance of 140K from the center when it comes to white point, towards the right of the screen. I managed to achieve a calibrated color temperature of 6503K without using an ICC profile, which goes as high as 6642K depending on which part of the screen you measure. Similarly, the monitor is brightest at its center for luminance. Calibrating the luminance to approximately 120 cd/m² yielded a maximum deviance of -16 cd/m² on the top left of the screen. Fairly solid uniformity overall, especially for a TN panel.


XL2720Z white point results. Click to enlarge.


  • Menu Items and Features (OSD)

The XL2720Z inherits its OSD from the RL2455HM, with some key differences. If you read my review on the RL2455HM, you may have noticed that I praised its ability to offer versatility with configuration, along with some great features that separate it from your typical OSD found in most monitors. Like the RL2455HM, it can be operated with ease in dark rooms, working in conjunction with the illuminated touch buttons. The main menu of the OSD can be configured to feature a variety of functions, so if you value configuration of Blur Reduction, volume, and changing inputs over being able to scale the image, you can configure the OSD to label these options without digging through menus to access them. In terms of what’s available, you can freely configure Brightness, Contrast, Low Blue Light, Black eQualizer, Blur Reduction, Color Temperature, Hue, Saturation, AMA, Instant Mode, Sharpness, and Gamma. The advanced menu features additional options to configure scaling preferences. Keep in mind that some of these options are locked out in some picture modes, and accessible in others. An audio menu is present to set the volume and/or mute your external speakers. Finally, BenQ also offers three custom Gamer profiles, allowing you to set specific settings to each picture mode. Combined with the OSD controller, this allows you to quickly select between different custom presets at the tap of a button.


  • Black, White, and Color Output:

The menu options feature almost every configuration option you would need to fine-tune the picture. The color temperature options feature 3 presets, limited to Normal, Bluish, and Reddish settings. There is also a User Mode preset that allows you to individually configure RGB values to achieve proper color accuracy. Brightness and Contrast controls are available, however the Brightness setting only controls the backlight intensity; there isn’t a specific setting to calibrate the black level of the monitor, so you will need an ICC profile to adjust it if necessary. Using the controls provided, I was able to calibrate the XL2720Z with relative ease. These settings result in a calibrated color temperature of 6503K without the use of an ICC profile. You may use the ICC profile supplied to further improve the color accuracy.

Upon calibration, I was quite pleased with the performance of the monitor. Combined with the adjustable stand, it’s not too difficult to maintain eye level with the monitor to prevent large shifts in gamma and color accuracy.


  • Picture Mode: Standard
    Brightness: 28 (119cd/m² for dark rooms. Increase if too dim.)
    Contrast: 40
    Low Blue Light: 0
    Blur Reduction: Off
    Color Temperature: User Mode (R: 100, G: 94, B: 93)
    AMA: High
    Instant Mode: On
    Sharpness: 5
    Gamma: 3
    Overscan: Off
    Display Mode: Full
    HDMI RGB PC Range: (16~235)
    Smart Focus: Off

    Note: These settings were achieved using an i1 Display Pro, along with X-Rite’s i1 Profiler software. The GPU used on the test computer is an Nvidia GTX 670 using stock settings. These settings require an additional ICC profile for accuracy. The ICC profile for the BenQ XL2720Z can be downloaded here. Use these settings at your own discretion, as they may look different on your display.


  • Scaling:

Like the RL2455HM, the XL2720Z allows for a myriad of scaling customization. Along with the usual 1:1 and Full options, you can force the image into specific screen sizes and aspect ratios. For example. if you know that you’re going to be using a 24″ monitor in a tournament, you can force the XL2720Z to display the image at a 24″ screen size (with black borders surrounding the empty space), so that you can get accustomed to that size accordingly. This works best for 16:9 sources, though there should be enough customization present for almost any source you throw at the XL2720Z.


There is an abundance of scaling options available, more than you would probably need.


  • Measured Input Lag:

The main selling point of this monitor is its gaming performance, including its ultra low input lag for serious gamers. Input lag values were identical using both 720p and 1080p testers via HDMI, and all picture modes yielded the same input lag results. Good news for those that choose to stick to a specific picture mode, as input lag is the same across the board. There are, however, certain requirements that need to be met in order to achieve the lowest input lag possible from the XL2720Z.

The XL2720Z included a feature called “Instant Mode” that is designed to minimize input lag as much as possible. This mode was present in the RL2455HM, however through testing, it didn’t seem to change the input lag values at all. This is not the case with the XL2720Z, as the Instant Mode makes a substantial difference with input lag depending on whether or not it’s engaged. These are the input lag values with Instant Mode disabled:

  • Top: 19.4ms
  • Middle: 27.0ms
  • Bottom: 34.4ms

Enabling Instant Mode creates a much more pleasing scenario:

  • Top: 2.6ms
  • Middle: 10.0ms
  • Bottom: 17.5ms

With Instant Mode enabled, averaging out the three tested areas results in an average input lag of 10ms. There is almost no reason to leave Instant Mode disabled, as it doesn’t prevent any of the monitor’s main features from being utilized. The lower input lag values will make a difference in games that require fast reflexes and pinpoint timing, such as fighters and first person shooters. The XL2720Z features a mode called Blur Reduction, which enables the strobing backlight to reduce motion blur typically found in most LCD based monitors. This can make a noticeable difference in your gaming experience when engaged, as it will reduce motion blur at the cost of some backlight brightness. These are the input lag values when Instant Mode and Blur Reduction are enabled:

  • Top: 6.7ms
  • Middle: 15.0ms
  • Bottom: 23.3ms

While it does increase the input lag slightly, it shouldn’t affect the majority of users, including those that play games with precision requirements. It does reduce the peak brightness significantly, which may be too dim for very bright rooms. The brightness reduction shouldn’t affect viewers in moderately-dim or completely dark environments. It is important to note that these tests were conducted at 60hz. If you’re planning to use this monitor for its 120hz or 144hz refresh rate capabilities, you can expect even lower input lag than what was reported above. This is because input lag is reduced at higher refresh rates, and increased at lower refresh rates.


The XL2720Z offers extremely low input lag with Instant Mode enabled. When utilizing refresh rates higher than 60hz, you can expect even lower numbers than the 10ms pictured above.


  • Gaming Performance:

Using Ultra Street Fighter IV as my preferred testing benchmark, I tested how the input lag differences with Instant Mode and Blur Reduction affect the actual feel of the game. Upon disabling Instant Mode, I immediately felt slightly weightier controls due to the increased input lag. To get a feel for precisely how much, I used the network simulation function to add input lag frame by frame. With Instant Mode and Blur Reduction disabled, the timing felt almost identical to having Instant Mode enabled + 1 frame of input lag using the simulation feature in Ultra Street Fighter IV. Not utilizing Instant Mode definitely affected my timing in a negative way, though the difference is very hard to notice for most users. Still, as mentioned earlier, there isn’t a real reason to keep Instant Mode disabled.

With Instant Mode enabled as well as Blur Reduction, I was pleasantly surprised to not feel any significant difference in timing between Blur Reduction on and off. While there is a numerical difference (input lag with Instant Mode is 10ms, and engaging Blur Reduction results in 15ms), I was able to hit all combos, even the tightest 1-frame links, with Blur Reduction enabled. Switching on the fly with the feature didn’t affect my timing at all. If you game in an area that isn’t overly bright, I highly recommend enabling Instant Mode with Blur Reduction to take advantage of the XL2720Z’s strobing capabilities. If you must have the lowest input lag possible, not having Blur Reduction enabled won’t significantly affect your gaming enjoyment, as the default AMA setting of High does a great job at keeping blur at a minimum.


Ultra Street Fighter IV features an incredibly useful lag simulation mode, allowing frame-by-frame testing of input lag.


  • Motion Blur:

Due to the variety of refresh rates possible with the XL2720Z, your perception of motion blur will largely depend at the refresh rate you spend the most time on. Users that have the ability to take advantage of 120hz+ will notice significantly lower motion blur with moving objects as opposed to 60hz users. The monitor features BenQ’s signature AMA setting that allows you to choose between Off, High, and Premium. Like most other BenQ monitors, I recommend leaving the default setting of High, as Premium results in significant artifacts/glowing of trails behind moving objects, and Off is simply too blurry to be enjoyable for most users. While the pictures do not show this, using Blur Reduction with a 120hz or 144hz refresh rate offers excellent motion clarity. Using your own eyes to track the speeding UFO appears much clearer with Blur Reduction enabled at 120hz+ refresh rates. The strobing backlight functionality is a welcome addition, and I really hope to see this feature used in more displays.

Testing was performed through Test UFO using the ghosting test, operating at 1920 pixels per second.

AMA Off 60hz

AMA Off 60hz

AMA High 60hz

AMA High 60hz

AMA Premium 60hz

AMA Premium 60hz

AMA High 120hz

AMA High 120hz

AMA High 144hz

AMA High 144hz

AMA High 60hz (Blur Red. ON)

AMA High 60hz (BlurR)

AMA High 120hz (Blur Red. ON)

AMA High 120hz (BlurR)

AMA High 144hz (Blur Red. ON)

AMA High 144hz (BlurR)


BenQ XL2720Z Amazon


The post BenQ XL2720Z Review: 144hz 3D Monitor for Demanding Gamers appeared first on DisplayLag.

ASUS PB287Q Review: 4K for the Masses

$
0
0

About The Review:

This ASUS PB287Q monitor was provided by ASUS for review purposes. I will be reviewing the build construction, picture quality, and overall technical performance of the PB287Q, including input lag performance.


Display Details

Size: 28″ Panel: 10-bit (8-bit w/FRC)
Resolution: 3840 x 2160 (4K) Dynamic Contrast Ratio: 100000000:1
Aspect Ratio: 16:9 Panel Type: TN
Response Time: 1ms GTG Viewing Angle: 170/160
Display Colors: 1073.7M (10bit) Color Gamut: sRGB


Inputs, Features, & MSRP

Inputs/Outputs: 2x HDMI/MHL DisplayPort - -
Inputs/Outputs (Cont.): Headphone Jack Line-In - -
Features & MSRP: under $650 on Amazon - - -


ASUS PB287Q on Amazon


  • The ASUS PB287Q: At A Glance

ASUS unveiled the PB287Q at CES 2014, an event that was packed with new 4K displays from every manufacturer. The key difference between this monitor and others was its affordability, fitting an MSRP well under $1,000. Running content natively at 4K (which is presently governed with a resolution of 3840 x 2160) allows us to take advantage of four times the resolution of Full HD (1080p) content. The increase in pixel density will be most noticeable at closer ranges, typically the ranges that are mostly viewed on computer monitors. Since its debut, the ASUS PB287Q has seen a price reduction to $650 (and can be found even lower on Amazon), making it one of the best choices for entry level 4K. Find out more about the ASUS PB287Q in the review below.


ASUS favors modern digital inputs with the PB287Q, including dual HDMI/MHL and DisplayPort.


ASUS strongly favors an all-digital input selection with the PB287Q, featuring dual HDMI ports and a DisplayPort. Users of D-Sub and DVI will be disappointed to know that the monitor only features those three inputs for sources, so choose your adapters and converters accordingly. I’m sure the reasoning behind this was to use connections that can fully take advantage of 4K. Both HDMI ports support MHL devices, for those that may require it. A Line-in port and headphone jack are present for your audio needs, and can be configured within the OSD depending on your audio sources. ASUS has also included speakers built inside the PB287Q, which is a nice convenience for those that want some sound without hooking up external speakers. The quality of the sound is very basic with no bass, so don’t expect much from them. The volume was plenty sufficient using the volume setting, and it is unlikely that you will need to max out the volume, unless you are in a large area. I managed to test the headphone jack using my V-Moda M-100 headphones, and found the volume output to be fairly decent. It is important to note that sending a 4K signal via HDMI on this monitor will result in a maximum refresh rate of 30hz. In order to experience 4K resolution at 60hz, you will need to utilize DisplayPort.


The bezel does a good job at complimenting the PB287Q’s aesthetic design.


ASUS has been very minimalist when it comes to a lot of their monitor designs, and the PB287Q doesn’t stray from this path. No fancy styling here; you’ll be looking at an all-black casing free of distractions. The monitor comes with an input cover attached by default, which can mask the heads of the connections you connect to the PB287Q. In my opinion, this should be attached after connecting the cables, as it can be a little hard to find the right inputs with the cover attached. The stand certainly lives up to expectations, offering considerable weight to keep the monitor stable on most surfaces. It features vertical height adjustment, tilt, as well as portrait and lanscape orientations. The stand is also able to swivel the whole monitor, allowing users of triple monitor setups ease of placement. The overall build quality of the PB287Q is solid, and I can’t think of any major problems during my time with it.


Placement is not an issue with the PB287Q, as the stand allows complete height and tilt configuration.


  • Panel Specs:

The PB287Q features a 28″ TN panel with a 3840 x 2160 (4K) resolution. Its refresh rate maxes out at 60hz, and it is capable of displaying 10-bit color. The main advantage of a TN panel is the presence of low response time, and this monitor features a 1ms GTG response time in that regard. The monitor’s dynamic contrast ratio, labeled as ASUS Smart Contrast Ratio, is pegged at 100000000:1. The monitor is designed primarily for 16:9 content, so for those interested in more vertical screen estate, you will have to pursue a 16:10 monitor instead.


  • Buttons:

The buttons on the ASUS PB287Q are extremely similar to the last ASUS monitor I reviewed, the VN279QL. The physical buttons are purely tactile, and are placed behind the monitor on the bottom-right portion of the casing. To this date, ASUS have some of the most responsive button operation available on monitors today. There was no noticeable lag present when operating the OSD menus, allowing me to quickly and efficiently configure the monitor without much trouble.


The physical buttons are nearly identical to the VN279QL, offering quick and smooth operation.


  • Viewing Angles & Uniformity:

There isn’t much to say about the viewing angles on the PB287Q. If you have used TN monitors in the past (and there is a strong chance you have), this monitor’s viewing angles won’t particularly blow you away in any regard. There will be gamma shifting when your head is tilted too far in one direction, so maintaining an eye-level with the monitor is a must. The good news is, most manufacturers have equipped very robust stands with their monitors, and you can utilize the stand to fine-tune the appearance of your display. ASUS is no exception in this regard, as the stand on the PB287Q allows you to position the monitor adequately for your needs.


ASUS PB287Q luminance results. Click to enlarge.


The calibration results show the variance among different parts of the screen. The monitor was configured to be as close as possible to 120 cd/m² in terms of brightness. The luminance report shows slight variation from the center, with a maximum deviance of -24 cd/m² on the top left portion of the screen. Without the aid of an ICC profile, I managed to calibrate the PB287Q to a white point setting of 6488K, just shy of the recommended 6500K for computer monitors. In terms of white point, you can expect a maximum deviance of approximately -74K on the top left portion of the screen as well. Overall, I didn’t experience any drastic uniformity issues with the PB287Q, and it should be acceptable to the majority of the users that are in the market for this screen.


ASUS PB287Q white point results. Click to enlarge.


  • Menu Items and Features (OSD)

The PB287Q features a refresh of the OSD we’re used to seeing on most ASUS monitors. Pressing any of the buttons brings up a menu that allows you to select between Menu, QuickFit, Input Select, Brightness, and Splendid options. Splendid allows you to select various picture mode presets that can be further calibrated on selection. There is an option for more customization options by pressing the Menu key, which brings an additional set of options. In this menu, you can configure Splendid, Color, Image, Sound, PIP/PBP, Input Select, System Setup, and Shortcut settings. Some options aren’t available for configuration in certain picture modes, though this is a common practice in most monitors nowadays. Under the Color settings, configurable options include Brightness, Contrast, Saturation, Color Temperature, Skin Tone, and Smart View. The Image menu allows us to configure Sharpness, Trace Free, Aspect Control, VividPixel, and ASCR (dynamic contrast). As mentioned earlier, ASUS’ OSD is one of the best available on monitors today, offering nearly instantaneous response at the push of a button.


The OSD is an enhanced version of previous ASUS menu systems, retaining the quick navigation from earlier models.


  • Black, White, and Color Output:

Getting the most out of the PB287Q requires you to select the right picture mode for calibration. The available picture modes are Scenery, Standard, Theater, Game, Night View, sRGB, Reading, and Darkroom. I personally found Standard to offer the most accuracy once configured, though keep in mind it will lock out your Saturation, Skin Tone, Sharpness, and ASCR settings (not that you would really need them for a calibrated picture). The Brightness setting controls the backlight of the monitor, whereas the Contrast controls the white level, which will impact your contrast ratio. Using only the menu controls, I was able to get a calibrated white point of 6488K for the center, which is very close to the recommended 6500K setting. For further accuracy, I recommend using the ICC profile supplied in the settings below. After using the ICC profile supplied below along with these picture settings, the ASUS PB287Q managed to score a perfect 6500K through the white point test.


  • Splendid Mode: Standard
    Brightness: 33 (119cd/m² for dark rooms. Increase if too dim.)
    Contrast: 80
    Color Temperature: User Mode (R: 100, G: 94, B: 93)
    Smart View: Off
    Trace Free: 60
    Aspect Control: Full
    VividPixel: Off

    Note: These settings were achieved using an i1 Display Pro, along with X-Rite’s i1 Profiler software. The GPU used on the test computer is an Nvidia GTX 670 using stock settings. These settings require an additional ICC profile for accuracy. The ICC profile for the ASUS PB287Q can be downloaded here. Use these settings at your own discretion, as they may look different on your display.


  • Scaling:

Scaling shouldn’t be an issue for anyone that requires monitor scaling, as the monitor offers Full, 4:3, 1:1, and OverScan modes depending on your input signal. I generally advise against using monitor scaling if the option to use GPU scaling is available, however as this is a 4K monitor, it is not possible for the majority of devices to scale 1080p sources to 4K on their own just yet. Thankfully, the PB287Q does a pretty good job at scaling 1080p sources to 4K. You will experience a significantly softer picture in doing so (regardless of GPU or monitor scaling), and it is recommended to always match the native resolution of the display whenever possible.


  • Measured Input Lag:

I have tested several 4K displays within the last year, and the most disappointing thing about them is their dramatic increase in terms of input lag over 1080p sets. Where the average HDTV was scoring 25-50ms with input lag tests, 4K HDTVs were scoring anywhere between 40-102ms, with the majority of them hovering above 70ms once set to game mode. This is honestly unacceptable performance for any gamer that has experienced input lag, significantly hampering the enjoyment of several games that require any form of timing. A quick glance at our input lag database gives you an idea of the amount of input lag present in the most recent displays.

The ASUS PB287Q does not suffer from this. I was expecting the worst when it came to input lag, however I was extremely surprised at the results. Using both 720p and 1080p lag testers across all picture modes resulted in nearly identical results. While I was unable to measure input lag using a 4K source natively, there is almost no chance that the input lag would be any higher if tested with a 4K source. It may actually be lower, as the monitor wouldn’t have to do any scaling to compensate. The PB287Q’s input lag measurements are as follows:

  • Top: 3.2ms
  • Middle: 10.6ms
  • Bottom: 18.2ms

Using the average of all three measurements through a 1080p source, we receive an average input lag rating of 11ms, once rounded to the nearest millisecond. This is an exceptional result, and goes to show that manufacturers can achieve low input lag at with 4K displays, even with lower resolution sources. The current landscape for 4K HDTVs isn’t very bright when it comes to input lag presently, and it’s refreshing to see ASUS still cater to gamers that care about input lag with the PB287Q.


The ASUS PB287Q features an average input lag rating of 11ms, making it the fastest 4K display we’ve tested.


  • Gaming Performance:

To measure the actual feel of input lag, I use the Xbox 360 version of Ultra Street Fighter IV as my preferred benchmark, as I’m very seasoned with the intricacies of the game. While switching back and forth on the fly between my BenQ RL2455HM and the ASUS PB287Q, I was trying to see if I could spot any differences with my timings. I am happy to report that both monitors felt identical when it came to input response, which makes sense considering that the PB287Q yielded 11ms in our input lag test. The RL2455HM was tested to be 10ms when I first reviewed it. The 1ms difference will not be noticeable, as it takes approximately 16.7ms to produce 1 frame of lag. To further test the gaming performance of this monitor, I also booted up the PC version of Ultra Street Fighter IV, as the PC version is capable producing higher resolutions than 1080p. Testing from 1280 x 720 all the way to 3840 x 2160 resulted in no difference of timing that I could detect.


This image was captured from Far Cry 3 running at 4K, with an off-screen camera zoomed in. Notice the smoothness of the gun, even at such a close range. Anti-aliasing was disabled.


While not a scientific test, I personally feel that the PB287Q has an excellent scaler that doesn’t produce any significant lag when scaling sources below 4K resolutions to its native resolution. This is a great achievement from ASUS, as some users of this monitor may want to use it for their Xbox One and PlayStation 4 consoles, as well a 4K-capable device such as a PC. Another thing worth mentioning is the actual benefit of 4K resolutions. If you’re currently a PC gamer, I feel that 4K is more beneficial through a monitor than a HDTV. This is because we naturally sit close to our monitor, which would allow us to see individual pixels at lower resolutions, if viewed within a few feet. Running a game natively at 4K is truly a sight to behold, as it allows you to run a game without any anti-aliasing, due to the pixel density being so high at 4K. During my gameplay sessions with Far Cry 3 and Crysis 3, I was able to zoom my face into the monitor far beyond comfortable viewing limits, and was surprised to see how sharp the image remained. I still wasn’t able to count individual pixels.


  • Motion Blur:

One advantage of TN-based panels is their low response times when compared to IPS, VA, and other technologies. The ASUS PB287Q features an advertised 1ms GTG response time, which is as low as it gets currently for TN panels. The overdrive function of the monitor is handled through a setting called Trace Free, which comes with six different settings, ranging from 0-100. Out of the box, Trace Free is set to 60, and I recommend keeping it at that setting for most of your use. Setting it to lower amounts tends to exaggerate the blurring, whereas setting it above 60 causes noticeable artifacts in fast moving objects. I found 60 to be a good compromise of fast response time, without noticeable artifacts. You can view the gallery below to see the comparison of Trace Free settings. All images were captured at 4K resolution running at 60hz via DisplayPort.

Testing was performed through Test UFO using the ghosting test.

Trace Free 0

Trace Free 0

Trace Free 20

Trace Free 20

Trace Free 40

Trace Free 40

Trace Free 60

Trace Free 60

Trace Free 80

Trace Free 80

Trace Free 100

Trace Free 100


ASUS PB287Q on Amazon


The post ASUS PB287Q Review: 4K for the Masses appeared first on DisplayLag.

Destiny: Lag Factor Review

$
0
0


  • Destiny was released on September 9th, 2014 on the PlayStation 3, PlayStation 4, Xbox 360, and Xbox One video game consoles. It was developed by Bungie and was published by Activision. Our Lag Factor review analyzes the visual fidelity and gaming performance of Destiny, in relation to various types of input latency. This Lag Factor analysis was performed on the PlayStation 4 version of the game.


  • About Destiny:

Destiny is the latest video game developed by Bungie, known throughout the world for developing the legendary Halo series. While the series now sits with Microsoft’s own 343 Studios and remains an exclusive title, Destiny was designed as a multi-platform title from the start. Releasing on the PS3, PS4, Xbox 360, and Xbox One insures that Destiny will reach a very sizable audience. Having already made $325 million within the first five days of the game’s launch, how does it stack up on a technical level? Read on to find out.


  • How Destiny Looks:

This is Bungie’s first foray into the latest generation of consoles, and the improvement in graphical fidelity certainly shows. While the beta version of Destiny had resolution differences among the PlayStation 4 and Xbox One (the Xbox One version was rendering at 1600 x 900), Bungie has managed to bring both versions to parity on resolution. Both the PlayStation 4 and Xbox One versions of the game run at a native 1080p (1920 x 1080) resolution for the final retail release. One thing that impressed me about the beta version was how consistent the frame rate was during gameplay. The same holds true with the final retail version, with the game running at a locked 30 frames per second. The action on the PS4 version rarely encounters any major hiccups when engaging in battles with the Fallen. I certainly do wish this game ran at 60 frames per second, as several game studios have expressed interest towards achieving higher frame rates with the newer consoles. With that said, I’d much rather take a locked frame rate over one that struggles to stay consistent; I’m sure Bungie felt the same way with Destiny in order to achieve a consistent experience among all platforms. The game does feature a form of post-processed anti-aliasing, which I have mixed feelings for. While the post-processed anti-aliasing serves as a low-footprint method of anti-aliasing most modern games, it has a tendency to blur the image slightly, resulting in a softer picture. I didn’t really mind it much in the previous generation of games, as most of them were sub-720p resolution anyway, so a little extra blurring to clear up jaggies didn’t hurt. However, with many of this new generation’s games running natively at 1080p, the inclusion of this type of anti-aliasing lessens the impact of running at a native 1080p resolution. I would’ve liked to see Bungie include an option to disable this form of anti-aliasing, as some other developers have started to offer some graphical customization options within their recent console releases (The Last of Us: Remastered comes to mind).


Destiny’s textures are noticeably more detailed over last generation consoles.


Anti-aliasing quirks aside, Destiny is one pretty game. The color palette varies based on the locations traveled in Destiny, so the game isn’t dominated by shades of gray and brown. Moving between the outer and inner areas of the missions allows you to really enjoy the contrast ratio of your HDTV (or hate it, depending on how well your display handles black level). The outer areas vary among desert, snow, lunar, and other types of terrain, whereas several of the inner locations are darker and more atmospheric. The quality of textures within Destiny‘s worlds are impressive, showcasing quite a bit of detail as you traverse through different terrain while taking down your enemies. An effect I particularly enjoyed was the melee attack, now featuring a white flash upon impact, which creates a nifty dissipation effect if the enemy doesn’t survive it. No doubt the addtional RAM and forced HDD storage of these new consoles play a role in the texture detail of Destiny. This game is a fine example to show what the newer consoles are capable of graphically.


Lighting effects are present throughout the worlds, particularly during the indoor areas.


  • How Destiny Feels:

Destiny stays true to the foundations of the FPS genre, and doesn’t do much to mask itself as something else. The game functions on the basic mechanics of shooting, reloading, seeking cover when it gets tough, and pushing forward when momentum is on your side. Bungie brought sandbox-style shootouts to the mainstream audience when they released Halo, and Destiny tries to evolve the combat that made the Halo series popular through their leveling system. As you progress through the game, your level determines the upgrades you unlock, including jetpacks, grenades, and various super abilities depending on the class you have selected at the beginning of the game. Most of Destiny’s mechanics are present in several shooting games that have released in the last decade, so there are no surprises in terms of how the game controls. It is, however, important to discuss how your HDTV will affect your performance and enjoyment with Destiny.


Engaging multiple enemies will require faster movement with a low latency display.


As mentioned earlier, Destiny runs at an almost fully-locked 30 frames per second on the PlayStation 4. This means that the game is going to have a minimum of 100ms latency present regardless of the display you are playing Destiny on. Translating to frames, this would result in anywhere from 6-8 frames of latency that is fixed into the game itself. This is because one frame lasts on screen for approximately 16.67ms. The good news is, Destiny doesn’t suffer from an erratic frame rate, so your controller latency will remain relatively constant throughout your time with the game. To compensate for this, Bungie has added fairly generous auto-aim into Destiny‘s engine, which helps aim your weapon more precisely during intense battles, to reduce the amount of time it takes for you to manually target the game’s enemies. Your skill (and your display) affect your battles depending on where you decide to aim your reticle on your enemies. Destiny differs from many other FPS games in this regard, as your ability to kill enemies depends on your character level, weapon, and your ability to consistently land headshots. The game displays points depending on which part of the enemies you manage to hit, with headshots being displayed prominently as yellow colored points. Mastering headshots is the key to success in Destiny, as headshots do far more damage than any other type of shot on the enemies. Most enemies will not die with simply one headshot, and require several in succession to do the most damage. To test the importance of input lag towards the game’s handling, I set my Sony KDL-65W850A HDTV to several different picture modes while playing Destiny, as input lag varies between them. My KDL-65W850A tested to be 18ms with game mode engaged, being one of the fastest HDTVs in our input lag database. This mode gives me comparable performance to many fast gaming monitors in my input lag database, such as the ASUS MX279H (which also earned our excellent input lag rating). Setting my Sony HDTV to other picture modes yielded anywhere between 70-100ms of latency, which is a very noticeable increase over game mode’s 18ms input lag.


Failing to capitalize on headshots can force you into bad situations.


The biggest difference noted upon enabling game mode in my display was the speed of aiming the reticle. The game’s auto-aim allows you to quickly aim at targets regardless of your display’s speed. However, being able to aim with precision was an entirely different matter. Destiny encourages you to accumulate as many headshots as possible, and failing to do so can be the difference between recharging your shield, or being stuck on the respawn screen. During the game’s later levels, it is not uncommon to fight Hives, Fallen, and other types of enemies simultaneously. Certain enemies like the Hive are much faster than more power-oriented ones such as the Fallen. When using my HDTV’s Photo picture mode, which has an input lag rating of approximately 70ms, it was difficult to dispatch enemies with efficiency, as my ability to land quick headshots was neutered over using the much faster game mode.

Aside from the shooting mechanics, Destiny controls admirably on almost any HDTV you play it on. This is due to the locked frame rate and auto-aim, so anything in the game that doesn’t require twitchy reactions will fare just fine. However, based on my experience with Destiny so far, I feel that playing the game on an HDTV rated great or excellent in our input lag database will enhance your experience with the game.


Recommended Display for Destiny:

Sony KDL-50W800B (Check Amazon)

Sony KDL-55W900A

Click here  for reviews and pricing from Amazon

The post Destiny: Lag Factor Review appeared first on DisplayLag.

BenQ GW2765HT Review: 1440p IPS Monitor

$
0
0

About The Review:

This BenQ GW2765HT monitor was provided by BenQ for review purposes. I will be reviewing the build construction, picture quality, and overall technical performance of the GW2765HT, including input lag performance.


Display Details

Size: 27″ Max Brightness: 350 cd/m²
Resolution: 2560 x 1440 (WQHD) Dynamic Contrast Ratio: 20M:1
Aspect Ratio: 16:9 Panel Type: IPS
Response Time: 4ms GTG Viewing Angle: 178/178
Display Colors: 1.07 Billion Color Gamut: 100% sRGB


Inputs, Features, & MSRP

Inputs/Outputs: HDMI DisplayPort DVI D-Sub
Inputs/Outputs (Cont.): Headphone Jack Line-In - -
Features & MSRP: under $450 on Amazon - - -


ASUS PB287Q on Amazon


  • The BenQ GW2765HT: At A Glance

Part of BenQ’s recent business strategy has involved venturing beyond the typical TN-based gaming panels they have build a reputation for. Earlier this year, I reviewed their PG2401PT and BL3200PT monitors, which featured both IPS and VA panels. Those panels are known for their increased color accuracy and black level performance over traditional TN technology. The GW2765HT is BenQ’s latest addition to their IPS line of displays, featuring a WQHD resolution (2560 x 1440), a welcome addition to those that have had their fill of 1080p content, and possess the hardware to push higher resolutions. With 4GB of VRAM quickly becoming the norm in GPUs, thanks to the newly-released Nvidia GTX 970, it has never been a better time to take advantage of higher resolution displays.


The BenQ GW2765HT features a singular input for every major connection. From left to right: DVI-D, HDMI, DisplayPort, D-Sub, Line-In, Headphone


Connectivity options are present for most modern hardware, including singular HDMI, DVI, D-Sub, and DisplayPort connections. It’s nice to see BenQ offer the D-Sub port, as the push for all digital connections is becoming increasingly commonplace among some monitors being released. Headphone and Line-in jacks are included to connect your external audio equipment. I gave my V-Moda M-100’s a test run using the built in headphone jack on the GW2765HT, and was pleased with the sound output. It seemed to drive the headphones relatively well, including the lower bass frequencies. Just make sure you set Windows to output full range audio to the speakers if you’re planning to use some decent headphones on the monitor. The volume can be configured via the OSD, though I imagine setting it between 80-90 should be sufficient for most users. The GW2765HT does include built-in stereo speakers, though don’t expect them to do anything special. Still, it’s good to see BenQ include them on the GW2765HT, as you never know when they’ll come in handy.


The bezel is glossy, and prone to fingerprints. It’s advisable to keep a cloth around.


The bezel on the GW2765HT is glossy, and it definitely catches your fingerprints, so expect to keep a cloth in the vicinity to wipe it clean on occasion. Personally, I would have preferred if BenQ stuck with the matte bezels as most of their other monitors, as they require less upkeep. The stand on the other hand, is completely matte and functions adequately. Height adjustment is present, as well as the ability to tilt the screen vertically. Portrait orientation is also supported for those that require it for graphic design or other purposes. While monitor rotation is not supported, the base of the stand is circular, so you shouldn’t have any issues rotating the whole monitor to accommodate a triple monitor setup. The stand is well built and feels solid to the touch. Outside of the glossy bezel, I didn’t have any issues regarding the aesthetics of the GW2765HT. It should service most users just fine.


The stand has a solid construction, and supports vertical tilting, portrait orientation, and height adjustment.


  • Panel Specs:

BenQ’s GW2765HT features a 27″ IPS panel with a resolution of 2560 x 1440, adhering to the WQHD standard. The refresh rate is capped at 60hz. This IPS panel has a rated response time of 4ms (GTG), which can vary when engaging the AMA function. The dynamic contrast ratio is measured to be approximately 20M:1, with a static contrast ratio of 1000:1. Thanks to the IPS panel, it has the ability to display up to 1.07 billion colors, which is a noticeable increase from what TN panels typically offer. This resolution supports 16:9 ratio, which is suited for most media content, including gaming consoles and HD movies. The GW2765HT features BenQ’s Flicker-Free technology, designed to eliminate Pulse Width Modulation (PWM) that can cause eyestrain or discomfort among some individuals. The monitor does feature a light anti-glare coating, which wasn’t very noticeable unless you actively try to look for it. It’s certainly much less than certain monitors, like the ASUS PA248Q.


  • Buttons:

BenQ have made some noticeable changes from their usual button layout. Their gaming monitors featured hard buttons that were conveniently located right next to the dots indicating their presence, whereas their higher-end graphic design monitors opted for sensitive touch-based illuminated buttons. The GW2765HT features a redesigned set of 6 hard buttons that are now located behind the monitor, instead of on its side. They are very tactile and provide great confirmation when pressed, and still feature the dots to serve as a guide. Excluding the power and menu buttons, the top 3 buttons can be reassigned to a variety of functions, depending on what you want to do most. Want to set easy access to the volume and input controls? That can easily be arranged using the custom key functions in the OSD. It’s a great feature available on many of BenQ’s monitors that allows you to access your most used settings with relative ease, instead of digging through menus to find them. The advantage of having variable buttons really comes into play in dimly-lit environments, as you don’t have to guess on which button you’re pressing. The OSD options appear on the screen itself.


Hard buttons on the GW2765HT offer a nice, responsive feel. Navigating the OSD was a breeze.


  • Menu Items and Features (OSD)

The OSD, too, has seen a complete overhaul from what BenQ usually use in their monitors. It operates similarly to their RL2460HT and RL2455HM gaming monitors, though now the OSD features a more rounded and cleaner look. By default, pressing any of the side buttons reveals settings for Low Blue Light, Input, Volume, Menu, and Exit. The first three options can be changed out for a variety of different custom keys, which can be configured within the OSD. Picture customization options include Brightness (backlight), Contrast, Sharpness, Gamma, Color Temperature, Hue, and Saturation. There is an advanced picture menu that allows you to configure Picture Mode, Senseye Demo, Dynamic Contrast, Overscan, Display Mode, Color Format, and HDMI RGB PC Range. The Audio menu allows you to control volume and mute functionality of the internal speakers. The System menu features OSD Settings, Custom Keys 1/2/3, DDC/CI, DP Auto Switch, HDMI Auto Switch, Auto Power Off, Resolution Notice, Information of the source, and DisplayPort version. Finally, the ERGONOMICS menu allows you to set the Smart Reminder setting.


BenQ revitalized the OSD in the GW2765HT, bearing a resemblance to their earlier designs. The new design features a newer font and rounded corners.


  • Viewing Angles & Uniformity:

One significant benefit in favor of IPS technology is its wide viewing angles, and the GW2765HT certainly doesn’t disappoint. Moving my head around considerably showed very few immediate signs of gamma or color shifting, being noticeable mostly in extreme angles. The advertised viewing angle is 178°/178°. Backlight uniformity was also equally impressive, showing a maximum deviance of only -18cd/m², after reaching the calibrated target of 120cd/m².


BenQ GW2765HT luminance results. Click to enlarge.


The white point was a different matter, however, which showcased a maximum deviance of -183K on the bottom left corner of the screen. While it’s not a drastic deviance, I’ve measured lower on some other screens I’ve tested. I was able to achieve a calibrated white point of 6532 K without the use of an ICC profile, so expect better accuracy while utilizing one. I was satisfied with the color accuracy of the GW2765HT even without the use of a profile, with the viewing angle and overall uniformity playing a big role towards that.


BenQ GW2765HT white point results. Click to enlarge.


  • Black, White, and Color Output:

The GW2765HT offers several preset picture modes, though not all customization options are available on several of them. The included picture modes are Standard, Low Blue Light, Movie, Game, Photo, sRGB, Eco, and User. Brightness (backlight), contrast, gamma, color temperature, hue, and color saturation can also be modified, with some of these options only able to be tweaked under the User preset mode. Upon calibrating the GW2765HT using iProfiler, I was able to achieve a white point of 6532K without using a separate ICC profile, which looked excellent based on my time with the monitor. This will be useful information for those that plan to use this monitor with sources incapable of using ICC profiles, such as video game consoles or Blu-Ray players.

After OSD calibration with an ICC profile, I was able to achieve a black level of 0.16 cd/m², with the lowest possible black level being 0.09 cd/m² if the backlight was set to 0. The 0.16 cd/m² was measured with the backlight set to 16. With the recommended dark room brightness setting of 120 cd/m², this resulted in a static contrast ratio of 745:1 after applying the ICC profile listed below. Post calibration, the color accuracy and overall picture quality was very impressive. Coupled with the WQHD resolution, users are in for some real eye-candy.


  • Picture Mode: User
    Brightness: 16 (120cd/m² for dark rooms. Increase if too dim.)
    Contrast: 50
    Sharpness: 5
    Gamma: 3
    Color Temperature: User Define (R: 93, G: 94, B: 100)
    Hue: 50
    Saturation: 50
    Overscan: Off
    Display Mode: Full
    HDMI RGB PC Range: RGB (0~255)
    AMA: High

    Measured Black Level (Brightness 0): 0.09 cd/m²
    Measured Black Level (Brightness 100): 0.49 cd/m²
    Measured Black Level (Brightness 16): 0.16 cd/m²
    Measured Contrast Ratio: 745:1
    Measured White Point (without ICC profile): 6532 K
    Measured White Point (BenQ GW2765HT ICC Profile): 6505 K

    Download BenQ GW2765HT ICC Profile

    Note: These settings were achieved using an i1 Display Pro, along with X-Rite’s i1 Profiler software. BasICColor was used to validate the black level and static contrast ratio. The GPUs used on the test computer are Nvidia GTX 970s running in SLI configuration, using stock settings. These settings require an additional ICC profile for accuracy. Use these settings at your own discretion, as they may look different on your display.

BasICColor validation results after applying ICC profile.


  • Scaling:

While this monitor doesn’t feature BenQ’s abundance of Smart Scaling options, the three options offered here should suffice for the majority of users. When sending a non-native source to the monitor, users have the option to select between Full, 1:1, and Aspect scaling options. Full should come in handy for those looking to upscale 720p or 1080p content to the native resolution of the screen. The scaler does a good job too, without compromising the 1080p image too much when upscaled. 720p users, such as those with PlayStation 3 systems, can also use the Full option to scale the image to fit the whole screen, though you will notice a decent amount of upscaling blur as a result. I’d advise sticking to native resolution if possible, though 1080p isn’t a bad option at all if your device can only output that high.


  • Measured Input Lag:

I was excited when I received the GW2765HT, as BenQ’s track record for input lag has been favorable so far, offering fast input lag response usually below 30ms for non-TN panels. I was a bit perplexed when I measured the input lag on the GW2765HT, as I couldn’t measure an exact reading using our dedicated lag testing device. For some reason, the numbers would oscillate between a fixed low and high value on all three measurement bars. As a result, I decided that the best way to calculate the input lag was to take the average of all numbers presented on each of the flashing bars. The input lag range measured as follows:

  • Top: 18.4ms – 34.4ms
  • Middle: 25.4ms – 41.7ms
  • Bottom: 32.9ms – 49ms

Averaging out each of the numbers resulted in the following calculations:

  • Top: 26ms
  • Middle: 33.5ms
  • Bottom: 41ms

From there, averaging out all 3 measurements results in an average input lag of approximately 34ms, after rounding to the nearest millisecond. This is a significantly higher number than most monitors today, which is a bit of a letdown considering how low input lag is usually measured on screen sizes below 30″. It would have been very beneficial to see BenQ add their “Instant Mode” setting to reduce input lag, alas it is not present in the GW2765HT. In terms of how it should feel, most gamers still won’t notice the latency present in this monitor, as it still falls under our “great” rating, which is acceptable for most gamers based on feedback I have received. However, if you are very sensitive towards input lag, and specialize in fighting, rhythm, or shooting games, I would be cautious towards this monitor if latency is a big deal to you.


The BenQ GW2765HT would oscillate in my input lag test, so I calculated the average of the measurements. The average input lag is approximately 34ms.


  • Gaming Performance:

Taking it one step further, I decided to test the GW2765HT using my preferred benchmark for input latency, Ultra Street Fighter IV. USFIV features an option to add input latency by the frame, allowing me to discern if the input latency within the GW2765HT is a serious concern. I decided to test with the Xbox 360 version of the game outputting a 1080p signal, which was upscaled to 2560 x 1440 using the monitor’s built-in scaler. Off the bat, I noticed that the timing wasn’t as smooth as faster gaming monitors that typically hover around 10ms of input lag. To get a relatively precise feel of how much latency was present, I proceeded to connect the Xbox 360 to my BenQ RL2455HM gaming monitor, which features an average input lag of 10ms.

Setting the game’s network simulation function to 1 frame while playing on the RL2455HM still felt slightly better than playing on the GW2765HT, though setting the network simulation to 2 frames felt laggier than the GW2765HT. USFIV unfortunately does not let you set latency in 0.5 increments, so there isn’t a way for me to verify. Still, 1.5 frames of latency should equal approximately 25ms, and when combined with the input latency inherent within the RL2455HM, we reach a similar conclusion to the one presented above. I also tested the PC version of USFIV running natively at 2560 x 1440, and it felt almost identical to using the Xbox 360 version upscaled. I don’t think the scaler is causing any additional latency, rather it’s the screen itself and its general processing. Bottom line, even with these results, the GW2765HT still feels rather good considering that you’re getting a 2560 x 1440 IPS panel, and most gamers should be happy with how their games look and feel on this monitor.


Ultra Street Fighter IV features an incredibly useful lag simulation mode, allowing frame-by-frame testing of input lag.


  • Motion Blur:

IPS panels aren’t known for their fast response times, though the GW2765HT manages a respectable 4ms GTG response time, according to BenQ’s official specifications. The AMA function on this monitor allows you to control panel overdrive, and select between OFF, High, and Premium settings. This is one of the first monitors I’ve tested where engaging the AMA function isn’t necessary for a pleasant experience. Setting it to High does clean up the blur a bit, without introducing noticeable artifacts. Setting it to Premium however does introduce a trailing glow on fast moving objects, and ultimate isn’t worth engaging. The High setting should be sufficient for most users.


ASUS PB287Q on Amazon


Testing was performed through Test UFO using the ghosting test.

BenQ GW2765HT AMA OFF.


BenQ GW2765HT AMA High.


BenQ GW2765HT AMA Premium.


The post BenQ GW2765HT Review: 1440p IPS Monitor appeared first on DisplayLag.

BenQ XL2430T Review: 144hz Gaming Monitor

$
0
0

About The Review:

This BenQ XL2430T monitor was provided by BenQ for review purposes. I will be reviewing the build construction, picture quality, and overall technical performance of the XL2430T, including input lag performance.


Display Details

Size: 24″ Max Brightness: 350 cd/m²
Resolution: 1920 x 1080 Dynamic Contrast Ratio: 12M:1
Aspect Ratio: 16:9 Panel Type: TN
Response Time: 1ms GTG Viewing Angle: 170/160
Display Colors: 16.7 Million Color Gamut: 72% NTSC


Inputs, Features, & MSRP

Inputs/Outputs: HDMI 1.4 x2 DisplayPort 1.2 DVI D-Sub
Inputs/Outputs (Cont.): Headphone Jack Microphone Jack USB 3.0 x2 -
Features & MSRP: under $399 on Amazon - - -


BenQ XL2430T on Amazon


  • The BenQ XL2430T: At A Glance

The newest monitor to grace our presence is BenQ’s XL2430T, an upgraded version of the previous XL2420T monitor. This monitor’s key usage relies on its gaming performance, featuring a native 144hz refresh rate, which is currently the highest usable native refresh rate available on monitors today. The 144hz refresh rate not only allows much smoother motion clarity, but also reduces input lag if your PC is capable of handling it. How does the XL2430T fare when compared to other monitors we’ve reviewed, such as the XL2720Z ?


The BenQ XL2430T has enough inputs for almost all of your sources. You will find a DVI, D-Sub, DisplayPort, and two HDMI connections.


One of the strongest points of the XL2720Z was the plethora of connectivity options, and the XL2430T carries over the XL2720Z’s legacy in this regard. As one of BenQ’s premium gaming monitors, the XL2430T comes equipped with DVI, D-Sub, DisplayPort, and two HDMI ports. It also comes with a mini-USB connector to connect the S-Switch, two microphone jacks, a headphone jack, and two USB 3.0 ports located along the side. Finally, there is a retractable headphone hook located above the USB ports; a very clever addition for those that use headphones. With this monitor, you will most certainly need a pair, as there are no speakers built into the XL2430T. It would have been nice for BenQ to include basic speakers, similar to the ones that are present in their other monitors. I gave my V-Moda M-100 headphones a test drive on the XL2430T, and the monitor was able to power them with decent volume when set to 100. If you are planning to use relatively decent headphones with a high impedance, I highly recommend utilizing an external amplifier to boost audio quality and provide sufficient volume.


The S-Switch allows easy control of the OSD, and was my preferred method of configuring the monitor.


The XL2430T also includes a redesigned S-Switch, which was one of my favorite features of the previous XL2720Z gaming monitor that I reviewed. This circular device connects to the monitor’s mini-USB port and acts as a controller for quick OSD operation and configuration. I absolutely love the fact that BenQ designed a groove into the monitor’s stand to properly seat the S-Switch, preventing it from lingering around your desk if you’re picky about keeping things neat. The new design feels very mouse-like; it features a scroll wheel button that’s no bigger than the ones found in most mice on the market. There are 5 buttons on the S-Switch: Back/Return, Auto Mode, and three buttons to select the Gamer 1, 2, and 3 preset picture modes. The greatest benefit of using the S-Switch is the improved responsiveness of the OSD; making selections feel quick and tactile, allowing you to make adjustments a lot quicker than using the buttons located on the monitor’s bezel.


The aluminum stand certainly stands out from the typical plastic construction seen in most monitors today.


The star of the monitor’s aesthetics is the completely new aluminum stand that BenQ has fitted onto the XL2430T. It feels very premium and solid when compared to most plastic stands, even the heaviest ones used on larger monitors. There is absolutely no wobble unless you go to extreme lengths, and the stand allows complete height adjustment, tilt, horizontal and vertical rotation, for those that require portrait orientation. The stand has a curved design to it, separating it from the typical straight stands you see outfitted on most monitors. The base is made of hard plastic, unlike the stand itself, but remains equally sturdy. The base is designed to allow free rotation of the monitor, without moving the base itself. A dust cover is also included for those that want to keep their monitor dust-free when not in use.


  • Panel Specs:

BenQ’s XL2430T is a 24-inch monitor that features a 1920 x 1080 (1080p) resolution, with a maximum refresh rate of 144hz. The advertised response time is 1ms GTG. The native contrast ratio of the monitor is 1000:1, with a dynamic contrast ratio of 12M:1. The TN panel allows for the best response time and lowest input lag values possible on a LCD, however it this comes at the cost of color accuracy and viewing angles. Being a 1080p monitor, the XL2430T features a 16:9 aspect ratio, which is the most common aspect ratio across modern displays. More specifications can be found on the chart at the beginning of this review.


  • Buttons:

It seems like there is always a new set of buttons available on every BenQ monitor I receive for review. The XL2430T features classic tactile round buttons on the right side of the monitor, which bring up BenQ’s classic OSD when any of them are pressed. The buttons are made of the same hard plastic as the bezel, and feel very sturdy upon first touch. They are responsive and it is unlikely that you will encounter any accidental presses when utilizing them. If the buttons aren’t to your liking, you always have the option to resort to the included S-Switch, which allows faster OSD operation. I have no complaints against the buttons during my time with the XL2430T.


The buttons are circular and perform well enough when navigating the XL2430T’s menus.


  • Menu Items and Features (OSD)

For those that have used the RL2455HM and RL2460HT gaming monitors, you will be extremely familiar with the OSD, as it’s a modified version of the same design. Most of the modifications are a result of the new features present in the XL2430T. The first menu tree consists of Blur Reduction, Picture Mode, Display Mode, Menu, and Exit functions. Like most of BenQ’s monitors, you are able to change three of these options to other quick presets, such as volume control, or a quick key to access Low Blue Light. Going into the Menu options reveals 4 main options: Game Settings, Picture, Display, and System. The Game Setting menu allows adjustment of Blur Reduction, Black eQualizer, Color Vibrance, Low Blue Light, Instant Mode, and Auto Game Mode. The picture menu allows you to tweak the appearance of your content, including settings for Picture Mode, Brightness, Contrast, Sharpness, Gamma, Color Temperature, AMA, and Dynamic Contrast. The Display menu allows you to change inputs, configure scaling options, set the RGB range, and configure overscan. Finally, the System menu allows you to set headphone volume, assign custom keys, and view input source information.


The OSD functions very similarly to previous BenQ monitors, such as the RL2455HM.


  • Viewing Angles & Uniformity:

The XL2430T is outfitted with a TN-panel. While excellent in keeping response times and input lag very low, one of the biggest drawbacks of the technology is darkening of the screen when viewed at various angles. This isn’t really a big issue horizontally as it is vertically, so moving your head above and below eye level will result in dark angles, which are present in every TN-based monitor. The good news is, most viewing angle issues can be resolved when using the height adjustment of the stand. The viewing angles based on my objective time with the XL2430T aren’t worse than any other TN-based monitor on the market, as long as you keep your expectations realistic. The advertised viewing angle of the XL2430T is 170/160.


BenQ XL2430T luminance results. Click to enlarge.


I went through a series of calibrations on the XL2430T to achieve an approximate 6500 K color temperature, and took some measurements of panel uniformity. The measurements were taken with a brightness setting of approximately 120cd/m², which is suitable for most dark/dimly-lit rooms. The backlight uniformity is very solid overall, with a maximum -17cd/m² deviance towards the bottom of the screen. The brightness measures at approximately 103cd/m², which is a very minor deviance from the calibrated 120cd/m²


BenQ XL2430T white point results. Click to enlarge.


The white point also saw its maximum deviance towards the bottom of the screen, approximately -178K from the center white point. This falls under normal expectations of TN-panel technology, as the XL2720Z had a similar amount of deviance towards the right side of the screen. In normal day-to-day use, the deviations in both backlight and color temperature uniformity shouldn’t affect your enjoyment of the screen.


  • Black, White, and Color Output:

As the XL2430T is primarily designed for gaming, the majority of the picture modes available on the monitor cater to that purpose. To run down the list of available picture modes, the monitor features FPS1, FPS2, RTS, Gamer1, Gamer2, Gamer3, Movie, and Standard. Most of these picture modes don’t adhere to any specific picture standards, though they do lock out some adjustment options in a few of them. For calibration, I decided to stick to the “Standard” picture mode, as it allowed full customization of all available options. As shown above, I was available to calibrate the XL2430T close to 6500 K without using a separate ICC profile, specifically 6532 K.

There is one setting new to the XL2430T that I changed in order to improve the black level of the monitor. By default, the “Standard” picture mode has a setting called “Color Vibrance” which essentially controls color saturation. The default value set by BenQ is 10, which resulted in a slightly washed out image after calibration. It retained a rather high black level of 0.48cd/m², which was simply too bright to enjoy dark scenes. By turning down the “Color Vibrance” setting to 9, I was able to achieve a much lower black level of 0.13cd/m², which enhances picture quality quite noticeably. There is one drawback of doing this, however, in that some of your darkest blacks will be crushed (specifically squares 1-3 on the Lagom black level test). This is still a better alternative to the washed out blacks that are present at the default value. Black level perception on TN panels is highly dependent on viewing angle, and unfortunately, most TN panels have you choosing between washed out black levels or black crush. The black crush on the XL2430T is actually very minimal compared to most TN monitors on the market. Most users shouldn’t have issues with it.

To get the most out of the XL2430T’s color accuracy, I created an ICC profile after configuring the monitor through OSD controls. There actually wasn’t much adjustment necessary in this regard; I simply reduced the red and blue values by one tick to 99, and left the green value at 100. The native contrast ratio of this monitor is advertised to be 1000:1. When I initially started configuring the monitor, I wasn’t able to achieve nearly as high as that contrast ratio at first, which puzzled me a little. However, after making the change to the “Color Vibrance” setting above, I was able to achieve a far closer contrast ratio rating to the advertised rating. Utilizing the OSD adjustments and an ICC profile, I was able to score an impressive contrast ratio of 946:1. The measured black level at a brightness setting of 22 was 0.13cd/m². After applying the ICC profile, the color temperature measured 6495 K, just 5 points shy from the standard 6500 K. For a TN panel, I really enjoyed the picture quality of the XL2430T. It’s color fidelity won’t be able to match more premium panel types like IPS and VA, but it definitely holds its own against other TN offerings.


  • Game Settings:

    Blur Reduction: OFF
    Black eQualizer: 0
    Color Vibrance: 9
    Low Blue Light: 0
    Instant Mode: ON
    Auto Game Mode: OFF

    Picture Settings:

    Picture Mode: Standard
    Brightness: 22
    Contrast: 50
    Sharpness: 5
    Gamma: Gamma 3
    Color Temperature: User Define (R:99, G:100, B:99)
    AMA: High
    Dynamic Contrast: 0
    Display Mode: Full
    HDMI RGB PC Range: RGB (0~255)
    Overscan: OFF

    Measured Black Level (Brightness 0): 0.04 cd/m²
    Measured Black Level (Brightness 100): 0.43 cd/m²
    Measured Black Level (Brightness 22): 0.13 cd/m²
    Measured Contrast Ratio: 946:1
    Measured White Point (without ICC profile): 6532 K
    Measured White Point (BenQ XL2430T ICC Profile Final): 6495 K

    Download BenQ XL2430T ICC Profile

    Note: These settings were achieved using an i1 Display Pro, along with X-Rite i1 Profiler and BasICColor software. The GPUs used on the test computer are Nvidia GTX 970s running in SLI configuration, using stock settings. These settings require an additional ICC profile for accuracy. Use these settings at your own discretion, as they may look different on your display.

BasICColor validation results after applying ICC profile.


  • Scaling:

BenQ always featured a full suite of scaling options in their gaming line of monitors, and the XL2430T definitely continues the tradition. On top of the usual Full, Aspect, and 1:1 scaling options that are present in most monitors, BenQ goes one step further and offers emulation of various screen sizes. There are presets for 17″, 19″, 19″W, 21.5″, 22″W, and 23″W available within the Display Mode options. Most users will want to stick with either Full, Aspect, or 1:1, though it’s nice to see BenQ offer additional customization for those users that wish to emulate 4:3 or 16:10 aspect ratios as well.


Scaling options present on the BenQ XL2430T.


  • Measured Input Lag:

BenQ’s XL gaming monitors have been a consistent favorite of mine when it comes to input lag, as they typically measure some of the lowest numbers on the market. Like the XL2720Z we reviewed earlier this year, the XL2430T offers a native 144hz refresh rate, which will reduce input lag even more over 60hz sources. Of course, you would need a PC capable of outputting a native 144hz refresh rate to take advantage of lower input lag values. However, even at 60hz, the XL2430T proves to be a formidable force when it comes to input latency.

For those that read our review on the XL2720Z, we mentioned a special mode that BenQ has included in some of their gaming monitors, labeled as “Instant Mode”. On the XL2720Z, and now the XL2430T, it is imperative that you enable this function to get the best gaming performance out of the XL2430T. Activating “Instant Mode” significantly reduced input lag values over leaving it disabled. The differences can be seen below:

Instant Mode disabled:

  • Top: 19.2ms
  • Middle: 27.0ms
  • Bottom: 34.5ms

Instant Mode enabled:

  • Top: 2.4ms
  • Middle: 10.0ms
  • Bottom: 17.4ms

Like the XL2720Z, there doesn’t seem to be any real drawback to using “Instant Mode”, so all users of the XL2430T should leave it enabled by default. Doing this will ensure that you are getting the fastest possible response time from the monitor. The average input lag of the XL2430T with “Instant Mode” enabled is approximately 10ms, falling under our “excellent” category for fast gaming monitors. One key feature of this monitor is the included “Blur Reduction” mode, which activates the strobing backlight functionality of the XL2430T. This feature drastically reduces motion blur that is commonly associated with LCD displays, with a noticeable decrease in backlight as a cost to utilize it. Enabling “Blur Reduction” also increases input lag slightly. Below are the input lag numbers if you engage “Blur Reduction”:

  • Top: 7.8ms
  • Middle: 16.2ms
  • Bottom: 24.5ms

Most users will not be able to actually feel the difference between the two modes, though the brightness reduction means that you will probably have to set the brightness to 100 in a dark room to compensate. Even with “Blur Reduction” enabled, the XL2430T still falls under our “excellent” category for input lag, as it’s under 20ms. These tests were conducted at 1920 x 1080 resolution running at 60hz. If you are buying this monitor to utilize the full 144hz refresh rate, you can expect even lower input lag than the numbers reported above. Unfortunately, there isn’t a way for me to currently quantify the amount of input lag at refresh rates greater than 60hz.


The XL2430T is one of the best monitors available on the market today for gaming, with an average input lag of 10ms.


BenQ XL2430T on Amazon


  • Gaming Performance:

Taking it one step further, I gave the XL2430T a rigorous amount of testing over the past week using Ultra Street Fighter IV as my preferred testing benchmark. I typically use this game to get a feel for the amount of lag a monitor has, as I’m very seasoned with it, and it features a very useful network simulation setting. This setting allows you to add input lag to the game in 1 frame increments, useful when used with a control monitor that features low input lag. The great news is, I didn’t have to engage this setting at all, as the XL2430T felt every bit as responsive as my tried and true BenQ RL2455HM gaming monitor, a favorite of mine for playing Ultra Street Fighter IV. Just make sure “Instant Mode” is enabled to keep input lag at its lowest.

What I feel did require testing though, was input lag with both “Instant Mode” and “Blur Reduction” engaged. As mentioned earlier, enabling “Blur Reduction” will increase input lag slightly, averaging out to approximately 16ms, instead of 10ms if left disabled. I wanted to see if the 6ms increase in input lag would affect the actual playability of Ultra Street Fighter IV. I’m happy to report that engaging both modes didn’t result in any increased perception of input lag. I was able to hit all of my links and combos with the same timings as if “Blur Reduction” was disabled. For users that game mostly in the dark, the strobing backlight is an attractive option if LCD motion blur bothers you, though the XL2430T is fast enough even without it, thanks to its 1ms response time.


Ultra Street Fighter IV features an incredibly useful lag simulation mode, allowing frame-by-frame testing of input lag.


  • Motion Blur:

The main draw of TN panels, outside of their low input latency, is their ability to handle motion. They are still the best option for LCD-based displays on the market, and usually feature very low response times of 1-2ms. The XL2430T is advertised to have a 1ms GTG response time, and the native support of 144hz and a strobing backlight ensures that you will have very few complaints about motion resolution. IPS and VA panels have yet to match the quickness of TN panels. The XL2430T has an AMA option that handles panel overdrive, and like other BenQ monitors I’ve reviewed, I recommend keeping the default setting of “High”. Setting AMA to “Off” prevents all overdrive artifacts, however the picture exhibits a noticeable amount of motion blur during any kind of fast paced movement, which will be a nuisance to most users. The “Premium” setting results in an ample amount of artifacts that trail fast-moving objects, and quite honestly, is unnecessary to engage. I found the default “High” setting to be a great middle ground between “Off” and “Premium” For those that wish to reduce blur further, I recommend engaging the “Blur Reduction” function to enable the strobing backlight. This will noticeably increase motion resolution, without causing overdrive artifacts.


Testing was performed through Test UFO using the ghosting test.

BenQ XL2430T AMA OFF.


BenQ XL2430T AMA High.


BenQ XL2430T AMA Premium.


The post BenQ XL2430T Review: 144hz Gaming Monitor appeared first on DisplayLag.

LG, Samsung, Sony Input Lag Results (4K & More)

$
0
0

Just in time for the holidays and Black Friday, I managed to test several new LG, Samsung, and Sony displays for input lag. This update in particular will feature several 4K HDTVs that weren’t previously featured in our input lag database. An important note: some of Samsung’s 4K HDTVs reported very high input lag timings in my tests earlier this year. Some of these models received a firmware update that reduced input lag ratings by nearly half. One series that benefited from this update is Samsung’s 4K HU9000 series, once upgraded to the latest firmware. This firmware update drops the input lag down to 39ms.

Clicking the links below will send you to their respective product pages on Amazon. Alternatively, you can also visit our input lag database to compare these to other tested displays.


The post LG, Samsung, Sony Input Lag Results (4K & More) appeared first on DisplayLag.


Low Input Lag HDTVs for Gaming: Holiday 2014 Edition

$
0
0

Earlier this week, I made an update to our input lag database with several new HDTVs, just in time for the holiday/Black Friday sales. I felt an updated guide was in order, as several new HDTVs have hit the market, including a plethora of 4K options. With the Xbox One and PlayStation 4 seeing some tempting price drops and bundle deals, it only makes sense to pair them with a new low-latency display. Tired of what you’re currently gaming on? Then read on to find out our top picks for this fall!


Sony KDL-65W950B

It should be no surprise to anyone to see Sony once again claim the top spot for one of the best gaming HDTVs on the market. Sony has been offering incredibly low input lag timings in their main HDTVs since 2013, once set into the “Game” scene mode, bringing average input lag values as low as 17ms. This makes the HDTV responsive enough for almost any kind of gaming genre you throw at it, whether it’s twitch-based shooting or frame-perfect fighting games. I personally own a 2013 KDL-65W850A, tested to be approximately 18ms of input lag, and it feels wonderful for everything I throw at it. The W950B also features Sony’s strobing backlight technology, labeled as Motionflow Impulse. Enabling this mode drastically increases motion clarity, at the cost of display brightness. Enabling this function will provide similar motion clarity to an old-school CRT display. The W950B series comes in both 55-inch and 65-inch sizes, with identical input lag ratings across both. While not a 4K set, its 1080p resolution will be relevant for several more years before 4K becomes a true standard. It’s definitely a set to consider if input lag is a big priority for your gaming needs. Click here for reviews and current pricing from Amazon


Samsung UN65HU8550 title=

This is a really hard category. Unfortunately, unlike 1080p sets, there isn’t a clear-cut winner when it comes to 4K gaming sets. The best ones all hover in the same 40ms input lag range, a consistent trend since 4K’s big debut this year. The best sets I had tested at the time were Sony’s line of XBR sets, with everything else testing over 60ms of input lag. The story changed a bit this year, particularly with Samsung. Samsung issued a firmware update to several of their 4K sets, such as the HU9000 series, which cut input lag numbers by nearly half. The input lag of Samsung 4K HDTVs are now very comparable to Sony’s lineup of 4K HDTVs, literally within 1-2ms of each other. The HU8550 series is one of the 4K models that achieved this lower input lag rating, with an input lag rating of 40ms under “Game” mode. I personally feel that the HU8550 achieves the best balance of picture quality and input lag. Some of Samsung’s higher-end 4K sets also have the same input lag rating, but are cost-prohibitive, venturing into the $5,000+ price range. Several of them also feature curved screens, which aren’t for everyone. On the opposite end of the spectrum, entry level sets such as the Sony X850B and Samsung HU7250 may lack the kind of quality you expect at the $2,000 price range. After all, 4K capability still carries a premium for being a new standard. The HU8550 series features local dimming, a 120hz refresh rate, and the Smart TV features you’ve come to expect from modern Samsung HDTV. Four HDMI 2.0 inputs, as well as component and composite inputs, are available to connect almost every device you’d need to connect. It does support HDCP 2.2 to maximize the compatibility of 4K content. Click here for reviews and current pricing from Amazon


  • VIZIO P552ui-B2 title=

    There is another 4K HDTV that must be considered, as it features the lowest recorded input lag in a 4K display. I haven’t tested this HDTV personally, but there is enough evidence submitted to me by readers that a specific VIZIO model, the VIZIO P552ui-B2, features an excellent average input lag rating of 18ms under “Game” mode, using the HDMI 5 input. A video posted by AVSForum user buzzard767 documents the latency when these conditions are met, which greatly exceeds any other 4K set on the market. This HDTV is also capable of accepting a native 1080p@120hz signal from a PC under the HDMI 5 input, which VIZIO dubs as “High Velocity” mode. VIZIO is currently the only manufacturer on the market that officially support native 120hz input via HDMI, which does wonders for PC gamers and reducing input lag. Some other HDTVs also have this capability, though it requires unofficial workarounds and tweaks to get it working. If you must have a 4K HDTV with the lowest possible input lag, then the VIZIO P552ui-B2 is currently the only 4K HDTV on the market that can offer it. Click here for reviews and current pricing from Amazon


LG 42LB5600

Almost certain to fly over everyone’s radar, I tested this little gem earlier this week and found it to have one of the lowest input lag numbers available in its screen size. It’s one of LG’s most basic displays, featuring a 1080p resolution and a 60hz refresh rate. No fancy WebOS or Smart TV functionality here either. For what it lacks in flash, it makes up for in operation. The OSD is very quick and responsive, along with its low input lag numbers when set to “Game” picture mode. Which, by the way, clocks in at a very low 27ms, putting it very close to some of Sony’s faster displays! Two HDMI inputs are present, along with an old school component/composite connection, for those still rocking analog devices. The real star of the show is its price tag. Here’s a hint: it’s well under $500, making it the perfect impulse purchase for any gamer. Click here for reviews and current pricing from Amazon


LG 32LB560B  title=

With the emphasis on 3D, 240hz, 4K resolution, curved screens, and everything in between, sometimes we tend to forget about the little guy, like this tiny 32″ LG HDTV I recently came across. Don’t expect anything crazy here; you’re getting 720p resolution, 60hz refresh rate, no Smart TV functions, and two HDMI ports. With that said, it meets two important criteria worth mentioning: low price and low input lag. Specifically, a low input lag of 30ms. It can also be found for under $300, which warrants consideration if you’re on a strict budget. Click here for reviews and current pricing from Amazon

Want something even cheaper? The 2012 Samsung UN32EH4003 is still one of the best values found in budget-priced HDTVs, and features an input lag of 26ms. I’m sure one of these two displays will fulfill the gaming needs of those unwilling to break the bank.

This concludes our top gaming choices for fall 2014. Hopefully this article helped towards narrowing down the perfect gaming display for your needs!

The post Low Input Lag HDTVs for Gaming: Holiday 2014 Edition appeared first on DisplayLag.

CES 2015: BenQ unveils new XL, RL, graphic design monitors

$
0
0

If you’ve been following our Twitter and Facebook social media channels, you may have seen our coverage live from CES 2015 that’s currently ongoing in Las Vegas. One of my first stops this year was BenQ’s new exhibit area, which was a noticeable upgrade from the small room used during CES 2014. BenQ had five monitors on display, including some we’ve already reviewed such as the XL2430T. Two of these monitors are new additions to their existing library, and will be arriving for sale as soon as late January.


  • BenQ XL2730Z

The BenQ XL2730Z is a WQHD 144z monitor that supports AMD’s FreeSync.

The main attraction for BenQ’s new gaming monitors is the XL2730Z. This monitor supports a maximum refresh rate of 144hz, and features the bells and whistles you’d come to expect from a serious gaming monitor: 1ms GTG response time, TN panel, and low input latency. The main selling point of this monitor is the support of Adaptive-Sync technology, which is AMD’s answer to Nvidia’s G-SYNC module. For those unaware, G-SYNC and FreeSync are an absolute must for PC gaming, replacing vertical sync to provide stutter-free gaming experiences, without the drawbacks. The XL2730Z features a WQHD 2560 x 1440 resolution, which is quickly replacing 1080p as the standard resolution in higher-end monitors. It features the redesigned S. Switch that was first implemented in the XL2430T: a circular device that sits on the base of the monitor’s stand to allow faster control of the OSD. A host of inputs are available too, including dual HDMI inputs, D-Sub, DVI, and DisplayPort. It’ll be releasing quite soon too, expected to hit retail around late January-early February.


  • BenQ RL2755HM

The BenQ RL2755HM is a 1080p 60hz monitor designed for console gamers. It’s the successor to the RL2455HM.

Finally, a size upgrade to the popular RL2455HM! Several of our readers have purchased the RL2455HM for its low price, low input lag, and 1ms GTG response time. In many ways, the RL2455HM is a great entry level monitor for those that wish to experience low latency without breaking the bank. BenQ have decided to unveil a 27″ version of the RL2455HM at CES 2015, now known as the RL2755HM. It’s primarily designed as a monitor for console gamers, capped at a 60hz refresh rate and 1080p resolution. Upgrades have been made to the monitor’s aesthetics, including a brand new stand made of sturdier plastic, when compared to the previous RL2455HM. One cool feature about the stand is the ability to rest a console controller on it’s groove, a small but useful feature for those that suffer from cluttered desks. Dual HDMI inputs are present to hook up your PlayStation 4 and Xbox One gaming consoles. Expect the RL2755HM to start shipping later this month.


  • BenQ BL3201PH

The BenQ BL3201PH is meant to replace the BL3200PT, with an upgraded 4K UHD IPS display.

BenQ’s BL3201PH is the successor the BL3200PT CAD design monitor that we reviewed earlier this year. There haven’t been many changes to the overall design and feel of the monitor, however this newer model now utilizes a 4K UHD IPS display, instead of the previous WQHD VA panel. The IPS display should provide more accurate colors over the previous BL3200PT. It retains its massive 32″ frame, and features the same OSD controller used in the BL3200PT. It features a 4ms GTG response time, 60z refresh rate, and 100% sRGB support. Every major input connection is supported, including two HDMI, DisplayPort, and DVI. A USB 3.0 hub is included to support USB devices. This monitor recently hit retail last month in December 2014.


  • BenQ SW2401PT

The BenQ SW2401PT is rather captivating, lacking a large bezel and housing a 2560 x 1440 IPS display

BenQ’s SW2401PT is a very attractive monitor; it caught my attention rather quickly due to it’s minimalist bezel design. The SW2401PT is another monitor aimed at graphic design professionals, featuring support for 99% Adobe RGB with a 2560 x 1440 WQHD IPS display. It’s a 24″ monitor with support for 14-bit 3D LUT and Delta E<2. In terms of input connections, HDMI, DisplayPort, and DVI are available. It also features a USB 3.0 hub. A special black & white mode has been implemented to aid editing of black & white images. Like the BL3201PH, this monitor also features an OSD controller for quick operation, and was also released late last year with a MSRP of $499.

This wraps up our quick look at BenQ’s monitor offerings at CES 2015! Stay tuned for more CES coverage to be posted throughout the week.

The post CES 2015: BenQ unveils new XL, RL, graphic design monitors appeared first on DisplayLag.

BenQ XL2420G 144hz G-SYNC Gaming Monitor Review

$
0
0

About The Review:

This BenQ XL2420G gaming monitor was provided by BenQ for review purposes. I will be reviewing the build construction, picture quality, and overall technical performance of the XL2420G, including input lag performance.


Display Details

Size: 24″ Max Brightness: 350 cd/m²
Resolution: 1920 x 1080 Dynamic Contrast Ratio: 12M:1
Aspect Ratio: 16:9 Panel Type: TN
Response Time: 1ms GTG Viewing Angle: 170/160
Display Colors: 16.7 Million Color Gamut: 72% NTSC


Inputs, Features, & MSRP

Inputs/Outputs: HDMI x2 DisplayPort 1.2 DVI -
Inputs/Outputs (Cont.): Headphone Jack USB 2.0 x2 - -
Features & MSRP: under $599 on Amazon - - -


BenQ XL2420G on Amazon


  • The BenQ XL2420G: At A Glance

Last month, we reviewed BenQ’s latest 24″ offering at the time, the XL2430T. The XL2430T was one of BenQ’s premier offerings within the 24″ size range, offering a native 144hz refresh rate and an aluminum stand. Even though the XL2430T performed admirably in its own right, one key feature was missing: the inclusion of a G-SYNC module. For those that aren’t aware, G-SYNC is Nvidia’s solution to tackle the shortcomings of vertical sync. The XL2420G is actually not a new monitor; it’s a revision of the company’s previous XL2420Z monitor that launched last year. The key difference with this version of the monitor is the inclusion of a G-SYNC module.


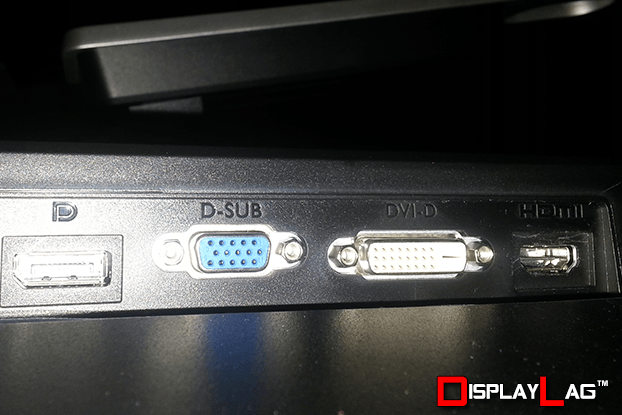
Unlike most G-SYNC monitors, the BenQ XL2420G has more than just DisplayPort available.


The XL2420G carries an all-digital interface, with no analog inputs in sight. You will find the standard array of digital connectivity, however: DVI, DisplayPort, and a pair of HDMI inputs. A USB passthrough is present in order to utilize the two USB 2.0 ports located on the side of the monitor. A mini-USB input is available to connect the S. Switch, a special OSD controller included with several of BenQ’s latest XL gaming monitors, including the XL2420G. Like the XL2430T and XL2420Z before it, the XL2420G does not feature built-in speakers of any kind. There is a headphone jack available on the side of the monitor to serve as your main source of audio, in the same vein as many of BenQ’s other monitors.


The S. Switch magnetically attaches to the base.


As the XL2420G is a refresh of the XL2420Z, it carries over the same S. Switch design that was featured in the XL2420Z and XL2720Z gaming monitors. The recent XL2430T S. Switch featured a new rounded design that was able to sit into a specialized groove built into the stand. The XL2420G’s S. Switch utilizes the previous design, a triangular shaped device that blends seamlessly with the XL2420G’s base. The side of the S. Switch has a groove that magnetically locks onto the base, preventing usage from moving the S. Switch around. It’s a clever design that avoids being part of the clutter that plagues our desks. The S. Switch features a scroll wheel, a back key, and three shortcuts to access the three ‘Gamer’ profiles available on the XL2420G. The scroll wheel also acts as a button to confirm OSD operation and changes. An interesting note: while the S. Switch works beautifully in regular operation, it does not function while under the monitor’s G-SYNC mode. It’s unfortunate that the S. Switch ceases to function under the most important mode featured on this monitor, perhaps due to the nature of G-SYNC’s direct operation with an Nvidia GPU. It would be great to see this resolved in a firmware update, if possible.


There is a headphone hook available to hang your favorite headphones.


Speaking of stands, the XL2420G’s foundation is identical to the XL2720Z’s durable plastic design. While not as attractive as the XL2430T’s aluminum base, it’s functionally adequate. Full height adjustment, tilting, swivel, and pivot allow you to set the monitor optimally in any environment. There wasn’t any noticeable give when I tried to shake my desk around, so it should be quite sturdy in most locations. There is a cable management hole present to route your cables through, and a headphone holder placed behind the stand to hang your favorite set of cans. Like most of BenQ’s monitors, I had no major issues with the build quality of the monitor during my time with the XL2420G.


  • Panel Specs:

The BenQ XL2420G features a 24″ 1920 x 1080 (1080p) TN panel with a 144hz refresh rate. It features an advertised 1ms GTG response time to reduce ghosting during fast scenes. The native contrast ratio is stated to be 1000:1, with a dynamic contrast ratio of 12M:1. The 1080p resolution is a 16:9 aspect ratio, which is suitable for most high-definition content including movies, video games, and other miscellaneous media. The XL2420G comes equipped with a classic BenQ OSD mode, as well as the brand new G-SYNC mode to sync with compatible Nvidia G-SYNC graphics cards.


  • Buttons:

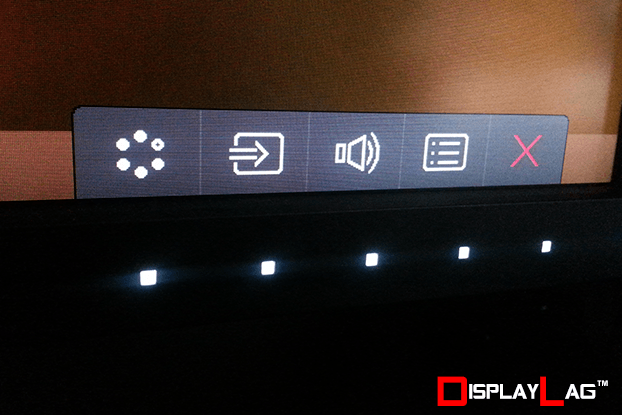
There aren’t any old school physical buttons present here, with touch-sensitive capacitive buttons taking the reign as the main input method on the XL2420G. The buttons stay hidden until you hover your hand closer to them, triggering their illumination. Like most of BenQ’s other monitors, the buttons do not correspond to locked menu choices, and can be configured to trigger specific settings according to your own preference. I didn’t notice any glaring issues when using the capacitive buttons to navigate the OSD, and if they really aren’t your thing, you can always utilize the included S. Switch as an alternative form of OSD control.


The capacitive buttons light up when you bring your hand towards them.


  • Menu Items and Features (OSD)

The XL2420G is one of the only G-SYNC monitors on the market to feature a dual-OSD implementation, depending on what kind of input source you are planning to use. The responsiveness of the OSD also varies depending on which mode is selected. When utilizing the classic BenQ OSD, there is a slight amount of latency when navigating the menus, similar to most of BenQ’s other monitors. It doesn’t detract much from the user experience, but it is noticeable when compared to the G-SYNC mode within the XL2420G. Under G-SYNC mode, the OSD performs noticeably snappier, with no input delay when browsing through the menus. As far as features are concerned, you can expect to configure Brightness, Contrast, Low Blue Light, Black eQualizer, Blur Reduction, Color Temperature, Hue, Saturation, AMA, Instant Mode, Sharpness, and Gamma controls. An advanced picture menu allows you to configure various scaling options, dynamic contrast, and aspect ratio settings. Under the G-SYNC engine, some configuration options such as Hue, Saturation, and Instant Mode are unavailable, however you are able to configure the Ultra Low Motion Blur mode, specifically labeled as ULMB within the OSD settings. This mode cannot be used in conjunction with G-SYNC, and only supports refresh rates of 85hz, 100hz, and 120hz. There should be enough configuration options within both classic and G-SYNC modes for both kinds of users.


The OSD features BenQ’s standard assortment of customization options available in most of their monitors.


  • Viewing Angles & Uniformity:

Viewing angles and uniformity drastically vary depending on the type of panel used, with TN panels typically offering lesser viewing experiences over VA and IPS displays. The XL2420G features a TN panel, ideal for low input lag and fast response times. The horizontal viewing range of the XL2420G is very good, with no major variance in gamma unless you move your head to the very edges of the screen. The vertical viewing angles exhibit a natural darkening of the screen when tilted, making it imperative to use the stand to find the optimal viewing angle for your specific location. Thankfully, the stand is more than capable of accomplishing this. The measurements below were conducted under DisplayPort using the G-SYNC mode of this monitor, instead of the standard BenQ classic mode.


BenQ XL2420G luminance results. Click to enlarge.


I calibrated the XL2420G to achieve approximately 120cd/m² luminance, as the default brightness of 350cd/m² was far too bright for most viewing environments. Once calibrated to this brightness level, the XL2420G showcased some impressive uniformity for a TN panel, with a maximum deviance of -20cd/m² on the top left portion of the screen. You shouldn’t notice severe differences in backlighting on this screen.


BenQ XL2420G white point results. Click to enlarge.


The white point did show a noticeable deviance from the center of the screen, with a maximum deviance of -212k on the top left portion of the screen, the same area where we saw the largest deviance in luminance. The XL2420G overall is a very solid performer without the introduction of an ICC profile, as I managed to get very close to the 6500 K target utilizing only the OSD controls under G-SYNC mode.


  • Black, White, and Color Output:

There are two sets of picture modes available on the XL2420G, depending on whether you’re using the original classic BenQ OSD, or the G-SYNC compatible OSD on the monitor. The classic mode features the standard assortment of picture modes available on most BenQ monitors, including: Standard, Movie, Photo, sRGB, Eco, FPS1, FP2, RTS, Gamer1, Gamer2, and Gamer3. Meanwhile, the G-SYNC mode features only four main picture modes: Standard, sRGB, Gaming, and Fast Gaming options. Depending on which mode you select, some options may not be available for configuration. When calibrating under G-SYNC mode, I decided to stick to the default Fast Gaming picture mode, as it gave me the most configuration options with the exception of gamma control, which I can tailor using an ICC profile instead.

Under G-SYNC mode, I was available to resolve all black level squares in the Lagom black level test after calibrating to a brightness level of approximately 120cd/m². Due to the nature of TN panels, black level perception can vary if you moved your head too far vertically from the center point of the monitor, so it is important to maintain eye level with the screen. Similarly, all white squares on Lagom’s white level test could be resolved as well using the default contrast setting of 50, and a brightness setting of 17.

I was able to achieve a color temperature of 6485 K using the OSD controls for RGB configuration, without an ICC profile. This color temperature was achieved under the Fast Gaming picture mode when using G-SYNC mode. In order to achieve this, I set the green and blue values to their maximum of 100, and set the red value to 98. Colors looked really good for a TN panel, so I was eager to see how it would look once the ICC profile was created. Once applying the ICC profile, I managed to get a perfect 6500 K color temperature, as well as a static contrast ratio of 865:1 using the Fast Gaming preset under G-SYNC mode.


  • Picture Settings:

    Brightness: 17
    Contrast: 50
    Low Blue Light: 0
    Black eQualizer: 0
    Color Temperature: User Mode (R:98, G:100, B:100)
    AMA: High

    Picture Advanced:

    Picture Mode: Fast Gaming
    ULMB: N/A (Unavailable with 144hz refresh rate)

    Measured Black Level (Brightness 0): 0.07 cd/m²
    Measured Black Level (Brightness 100): 0.43 cd/m²
    Measured Black Level (Brightness 17): 0.14 cd/m²
    Measured Contrast Ratio: 865:1
    Measured White Point (without ICC profile): 6485 K
    Measured White Point (BenQ XL2420G G-SYNC ICC Profile): 6500 K

    Download BenQ XL2420G ICC Profile (G-SYNC)

    Note: These settings were achieved using an i1 Display Pro, along with X-Rite i1 Profiler and BasICColor software. The GPUs used on the test computer are Nvidia GTX 970s running in SLI configuration, using stock settings. These settings require an additional ICC profile for accuracy. Use these settings at your own discretion, as they may look different on your display.

BasICColor validation results after applying ICC profile (G-SYNC mode)


For those that intend to use this monitor in its Classic mode, I also calibrated the monitor under the Standard picture preset via HDMI to achieve the best color accuracy. The settings for Classic mode can be found below:


  • Picture Settings:

    Brightness: 6
    Contrast: 50
    Low Blue Light: 0
    Blur Reduction: OFF
    Color Temperature: User Mode (R:100, G:100, B:97)
    AMA: High
    Instant Mode: ON
    Sharpness: 5
    Gamma: Gamma 3

    Picture Advanced:

    Picture Mode: Standard
    Overscan: OFF
    Display Mode: Full
    HDMI RGB PC Range: RGB (16~235)

    Measured Black Level (Brightness 0): 0.11 cd/m²
    Measured Black Level (Brightness 100): 0.42 cd/m²
    Measured Black Level (Brightness 6): 0.13 cd/m²
    Measured Contrast Ratio: 953:1
    Measured White Point (without ICC profile): 6535 K
    Measured White Point (BenQ XL2420G Classic Mode ICC Profile): 6518 K

    Download BenQ XL2420G ICC Profile (Classic Mode)

    Note: These settings were achieved using an i1 Display Pro, along with X-Rite i1 Profiler and BasICColor software. The GPUs used on the test computer are Nvidia GTX 970s running in SLI configuration, using stock settings. These settings require an additional ICC profile for accuracy. Use these settings at your own discretion, as they may look different on your display.

BasICColor validation results after applying ICC profile (Classic mode)


  • Scaling:

The presence of scaling options can greatly vary depending on which mode is used on the XL2420G. Like most other BenQ monitors, a variety of scaling options are available when utilizing the classic OSD, including the ability to resize your desktop into specific screen sizes. The user is able to emulate 4:3, 16:9, and 16:10 aspect ratios, ranging from 17″ all the way to 23″ in size. The standard assortment of Full, Aspect, and 1:1 scaling is also available under classic mode. Under G-SYNC mode however, there are absolutely no scaling options available. The monitor assumes that all scaling will be handled through your GPU instead under G-SYNC mode.


  • Measured Input Lag:

Like BenQ’s other gaming monitors reviewed on this site, the XL2420G stays true to BenQ’s legacy of providing extremely low input lag for optimal gaming. The XL2420G, like the XL2430T, offers a native 144hz refresh rate, which drastically reduces the amount of input lag felt during gaming (assuming you are able to utilize the refresh rate natively via a gaming PC). Even under 60hz operation however, the XL2420G is definitely an excellent monitor for games that require speedy response.

Due to the dual-OSD implementation on the XL2420G, I managed to test two separate inputs for latency. The first input is the traditional HDMI input that uses BenQ’s classic OSD, similar to other BenQ monitors we’ve tested. The classic OSD is available through the HDMI and DVI inputs. In addition, this monitor also features “Instant Mode”, a mode designed by BenQ to reduce input lag processing even further. The results of “Instant Mode” can be seen below:

Instant Mode disabled:

  • Top: 19.3ms
  • Middle: 27.0ms
  • Bottom: 34.6ms

Instant Mode enabled:

  • Top: 2.4ms
  • Middle: 10.1ms
  • Bottom: 17.3ms

If you read our previous review on the XL2430T, the numbers presented by the XL2420G are nearly identical to the XL2430T’s extremely low input lag numbers. If you’re planning to use an HDMI-based sources under classic mode, rest assured that the monitor performs among the very best gaming displays tested within our input lag database. These results were conducted using a native 1920 x 1080 signal under 60hz. If you’re planning to utilize the higher refresh rates that this monitor is capable of, you can expect even lower input lag values than what was reported above.


In addition to HDMI testing, I also went ahead and took the liberty of testing out DisplayPort for input lag, as it is the primary reason to own this monitor over monitors that don’t support G-SYNC capabilities. In order to do this, I acquired an active HDMI to DisplayPort converter made by StarTech. This converter is one of the only ones on the market that allows a real conversion of an HDMI signal to work on DisplayPort devices. I first tested to make sure the converter itself wasn’t presenting any additional latency, so I connected the active converter to my existing ASUS PA248Q monitor. This monitor features DisplayPort as well as HDMI connectivity. The converter returned identical values under both HDMI and DisplayPort, which was good news.

I proceeded to connect our lag testing device to the XL2420G using the StarTech converter, and to my surprise, the numbers actually weren’t identical to the low numbers returned using a pure HDMI connection. While the converter may not be adding additional latency, it’s possible that these measurements don’t convey the whole picture, as DisplayPort on the XL2420G is specifically designed to work with an Nvidia GPU directly. Nonetheless, I feel that providing some context is better than none at all:

Input lag using HDMI to DisplayPort active converter:

  • Top: 9.5ms
  • Middle: 13.9ms
  • Bottom: 18.2ms

If these numbers are a real indication of DisplayPort having higher latency over HDMI, it’s still not a drastic difference to where it would affect most gamers. HDMI presented an average input lag rating of 10ms, whereas DisplayPort presents an average input lag rating of 14ms. This test was also conducted at 60hz, which results in higher input lag when compared to higher refresh rates, such as 120hz or 144hz. If you are planning to connect a device that operates at 60hz without G-SYNC, such as an Xbox One or PlayStation 4, then stick to using the native HDMI ports on the monitor to achieve the lowest possible input lag for those devices.


  • Gaming Performance: HDMI

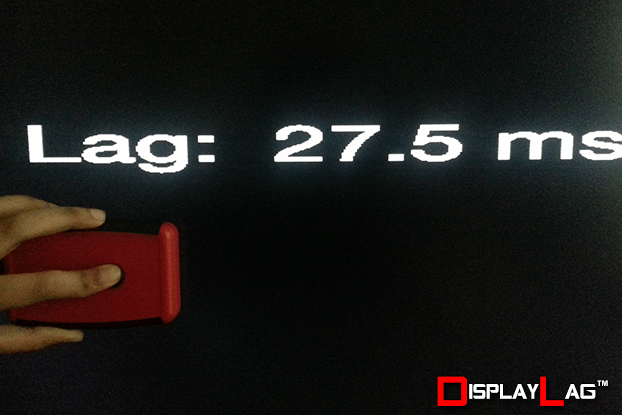
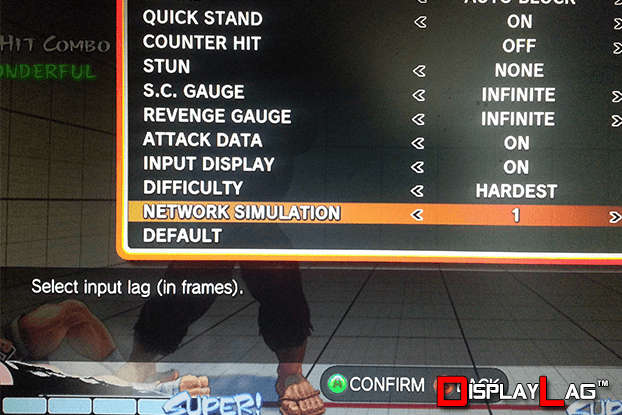
The HDMI connection on the XL2420G feels just as good as other top gaming monitors on the market, such as the RL2455HM and XL2720Z. To get a feel for the amount of latency present, I prefer to use Ultra Street Fighter IV on the Xbox 360 as my preferred benchmark for input lag testing. Actively switching between the XL2420G and the RL2455HM yielded no noticeable differences in timing, with the input lag numbers being close to identical across both monitors. If you’re planning to get a G-SYNC capable monitor that also supports HDMI for other devices, such as the Xbox One and PlayStation 4, you won’t have to worry about any noticeable input latency from the HDMI ports of this monitor. When using the StarTech HDMI to DisplayPort conversion box, it was really hard to notice any jump in latency when compared to a native HDMI connection. This is probably due to the fact that the jump in latency is well under 10ms (one frame at 60hz is approximately 16.67ms).


Ultra Street Fighter IV features an incredibly useful lag simulation mode, allowing frame-by-frame testing of input lag.


  • Gaming Performance: DisplayPort & G-SYNC

G-SYNC was specifically created to remove the downfalls of traditional V-Sync. Vertical sync has been employed by thousands of games over the past three decades as a means to remove screen tearing during gaming. By locking the game’s refresh rate to the native refresh rate of the display, a fluctuation in frame rate wouldn’t cause tearing to appear on the screen, a phenomenon that is extremely distracting to lots of gamers. However, there are costs to using vertical sync in gaming, which include the following:

  • Enabling vertical sync noticeably increases input lag over keeping it disabled. This is a nuisance to serious gamers as latency detracts from the fluidity of a game.
  • Minor drops in frame rate can result in severe frame drops with V-Sync enabled. Triple buffering can reduce the severity of frame drops, however it has to be natively supported by game developers unless a tool like D3DOverrider is used.

G-SYNC overcomes these issues by communicating with your graphics card directly. You get the benefits of no screen tearing, extremely low input lag (very similar to V-Sync off), and no major stuttering. Instead of dropping to a set frame rate (such as 60 FPS all the way down to 30 FPS), frame drops are much less noticeable when utilizing G-SYNC, giving you the benefits of triple buffering without the drawbacks. G-SYNC is also supported in SLI configurations. It’s one of the few technologies to come out that improves gaming noticeably without any major drawbacks, other than requiring a specialized display and Nvidia hardware.

So, how does it work in practice? Amazingly. The main benefits of G-SYNC can be seen in games that are able to push your hardware to the limit. In normal scenarios, employing V-Sync in the most intensive games can create noticeable stutters or massive frame drops when the action gets heavy. Most PC gamers have probably experienced this phenomenon. Even if your rig is capable of handling games at fluid frame rates, there will be times where a stutter tanks your frame rate, detracting from the enjoyment of the game. G-SYNC allows a gradual handling of frame rate in a way that doesn’t hamper your gaming experience, and the overall reduction of input latency over V-Sync allows better responsiveness, even at lower frame rates.

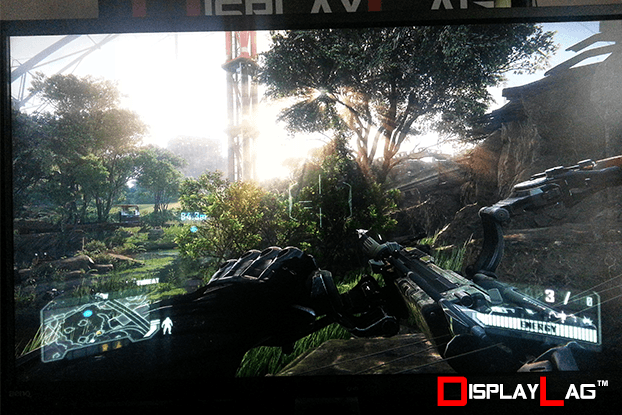
To better illustrate the benefits of G-SYNC, I picked a spot within a jungle of Crysis 3 and panned the camera around, while recording 60 FPS video with V-Sync on, off, and G-SYNC enabled. V-Sync off didn’t suffer from input lag, however when the frame rate exceeded the monitor’s refresh rate, tearing was extremely evident during the pans, which can be a very distracting experience for many gamers. I disabled anti-aliasing for demonstration purposes in order to achieve higher frame rates, and thus capture tearing on video more easily. For the V-Sync and G-SYNC tests, I bumped up the anti-aliasing setting within Crysis 3 to SMAA High (4x) to tax the video hardware further. V-Sync on completely removes tearing, however any degradation in frame rate showcases noticeable hitching and stuttering. On top of that, input lag is increased significantly when compared to V-Sync off in all circumstances. G-SYNC fixes all previous issues with V-Sync by removing tearing, hitching, stuttering, and input lag caused by V-Sync on. The differences between V-Sync and G-SYNC are far more noticeable when viewed in person. These videos were recorded at 60hz to showcase the differences easier, though it is recommended to use the maximum refresh rate of the XL2420G, which is 144hz.

First up, a video of Crysis 3 running with V-Sync off at 60hz. Anti-aliasing was disabled. This video shows the tearing associated with the lack of V-Sync. Set the video to 1080p60:


The next video shows V-Sync enabled at 60hz, with anti-aliasing bumped up to SMAA High (4x). Notice the slight stutter as the camera pans around. It’s easier to see when looking at the sky. Input lag is also noticeably increased when compared to V-Sync off. Set the video to 1080p60:


Finally, this is the G-SYNC demonstration at 60hz. SMAA High (4x) was retained from the V-Sync test. Notice the smoother camera pans by looking in the same areas as the V-Sync test. Input lag was decreased considerably when compared to V-Sync enabled, resulting in similar latency to V-Sync off. Set the video to 1080p60:


  • Motion Blur:

One great thing about owning an Nvidia G-SYNC monitor is that you are practically guaranteed to get some of the best response times in the business. The XL2420G’s 144hz TN panel does an excellent job cutting down on motion blur in multiple ways (by LCD standards), depending on what you have hooked up to the monitor. The XL2420G natively supports 60, 85, 100, 120, and 144hz refresh rates, though it is recommended to stick to the highest refresh rate possible, to get the smoothest motion clarity and lowest input lag from the monitor. The monitor includes a special mode labeled ULMB, short for Ultra Low Motion Blur. This mode can only be engaged when G-SYNC is disabled and you select a refresh rate lower than 144hz (except 60hz, via DisplayPort). ULMB is a special strobing backlight incorporated into the XL2420G, which is very similar to the LightBoost hack used widely last year. Only this time, it’s not a hack and is natively featured into the monitor’s functionality. Engaging ULMB will sacrifice the peak brightness of the monitor, however it will noticeably increase motion clarity at higher refresh rates. Additionally, the XL2420G features the traditional AMA function in both classic and G-SYNC modes, which is BenQ’s method of reducing motion blur/ghosting through panel overdrive. BenQ’s own ‘Blur Reduction’ mode is also available under ‘Classic’ mode for those that don’t utilize G-SYNC, which also engages the strobing backlight on the monitor.

With the AMA function disabled, the XL2420G exhibits significantly more ghosting, however you are presented without artifacts that can result from engaging AMA. For these videos, set it to 1080p60, and pause the video when the UFO appears on the screen:


Setting the AMA function to its High setting yields a great balance between Off and Premium, and I recommend keeping the monitor in this state. Ghosting is noticeably reduced over AMA Off, and motion artifacts aren’t really noticeable when viewing fast-moving content:


The Premium AMA setting isn’t one that I recommend, as motion artifacts significantly increase when set to this maximum setting. Like most BenQ monitors, I feel that the High AMA setting is the perfect balance, and engaging the Premium mode is largely unnecessary. Notice how the trailing UFOs exhibit a bluish hue:


BenQ XL2420G on Amazon


  • Verdict:

The post BenQ XL2420G 144hz G-SYNC Gaming Monitor Review appeared first on DisplayLag.

ASUS ROG Swift PG278Q G-SYNC Monitor Review

$
0
0

About The Review:

This ASUS PG278Q gaming monitor was provided by ASUS for review purposes. I will be reviewing the build construction, picture quality, and overall technical performance of the PG278Q.


Display Details

Size: 27″ Max Brightness: 350 cd/m²
Resolution: 2560 x 1440 Contrast Ratio: 1000:1
Aspect Ratio: 16:9 Panel Type: TN
Response Time: 1ms GTG Viewing Angle: 170/160
Display Colors: 16.7 Million (8-Bit) Speakers: No


Inputs, Features, & MSRP

Inputs/Outputs: DisplayPort 1.2 (1) USB 3.0 (2) - -
Features & MSRP: Check Amazon G-SYNC: Yes 3D Support: Yes -


ASUS PG278Q on Amazon


  • The ASUS PG278Q: At A Glance

The ASUS PG278Q needs little introduction to those following the development of G-SYNC displays. Launched in the latter half of last year, the PG278Q was the world’s first WQHD (2560 x 1440) G-SYNC monitor. The high resolution combined with the benefits of G-SYNC really showcased what the technology was capable of. I first came across this monitor at CES 2014 last year, and was really impressed with the overall design and feature list. How does it fare under real-world usage? Read on to find out.


The PG278Q carries a singular DisplayPort connection, as well as USB 3.0.


The PG278Q follows the tradition of most G-SYNC monitors introduced onto the market, featuring a single digital input. That’s right, the only input present on the PG278Q is a lone DisplayPort 1.2 connection. It’s also very picky about the types of connections it accepts, so if you’re looking to convert HDMI sources using an active converter, I recommend abandoning the idea. The PG278Q was designed mainly for G-SYNC usage, though you may be able to utilize certain devices capable of outputting a signal via DisplayPort 1.2.


The PG278Q features a gray color scheme, along with a fully adjustable stand.


The overall build of this monitor is quite modern. Fitted with a slim bezel, the gray color scheme is a welcome change from the regular black casings featured on most monitors on the market. The monitor features a fully-adjustable stand, complete with height, tilt, and pivot functionality. The monitor can be placed into portrait orientation for those that need it. Two USB 3.0 ports are located underneath the monitor, adjacent to the DisplayPort connection. Unfortunately, there doesn’t seem to be a 3.5mm port either, to connect a pair of headphones. This monitor assumes that you have an audio solution already in place (such as a sound card).


  • Panel Specs:

The ASUS PG278Q features a 2560 x 1440 8-bit TN panel, capable of displaying approximately 16.7 million colors. Its native contrast ratio is pegged at 1000:1, a standard number among most TN panels on the market today. It supports a maximum refresh rate of 144hz, which is benefited by the inclusion of the Nvidia G-SYNC module for smooth frame rates. The TN panel also packs a 1ms GTG response time, along with ULMB technology to achieve low motion blur.


  • Buttons:

The buttons on the PG278Q are classic hard buttons with a new triangular design. The buttons operate very simply and efficiently, however they will require some memorization in order to avoid pressing the wrong button for the wrong function. There is no lag time when using them, thanks to the extremely responsive OSD that is featured on the PG278Q. A circular nub has also been included to serve as a quick navigation tool to browse through menus with ease. It also acts as a button that essentially works like an enter key to confirm OSD choices.


The buttons feature a triangular-shaped design, and respond instantly upon touch.


  • Menu Items and Features (OSD)

The ASUS PG278Q has a fully redesigned on-screen display that differs from typical ASUS monitors. The new black OSD also trimmed down on the number of customization options available. There are three menus present: Color, Image, and System Setup. The Color menu allows brightness and contrast adjustment, as well as color temperature configuration. The Image menu allows you to enable panel overdrive (to reduce ghosting), as well as ULMB (Ultra Low Motion Blur) when using a refresh rate other than 144hz. The System Setup menu has options to configure language, OSD position, transparency, OSD timeout, information, and light in motion. One great thing about G-SYNC monitors is their lagless OSD operation. Most monitors on the market have a certain amount of delay when navigating the menu system, but none of that latency exists in the PG278Q. The OSD responds as soon as you touch the button.


The OSD features a new black color scheme, and lagless navigation.


  • Viewing Angles & Uniformity:

Viewing angles and uniformity differ drastically depending on panel type. Those critical about viewing angles will want to typically gravitate towards IPS and VA panels, as TN panels typically cannot match them in this regard. This doesn’t mean that TN panels are horrible, though you will need to typically fixate yourself at a certain vertical height to avoid drastic gamma shifts. The PG278Q is fitted with a 8-bit TN panel, which will darken (or lighten) depending on your eye level.


ASUS PG278Q luminance results. Click to enlarge.


Out of the box, the PG278Q comes impressively close to the 6500K standard, requiring no major adjustments when the color temperature is set to “User”. After calibrating the brightness to approximately 120cd/m², I measured all main areas of the monitor to see maximum backlight deviance. The highest amount of deviation measured from the center was approximately -15cd/m², on the top left, top right, and bottom right portions of the screen.


ASUS PG278Q white point results. Click to enlarge.


Without an ICC profile, the default “User” setting on the PG278Q measured approximately 6508 K on the center of the screen. The maximum deviation from the center white point occurred at the top left portion of the screen, losing approximately -179 K.


  • Black, White, and Color Output:

The PG278Q may be scarce on calibration controls, however that doesn’t stop the monitor from achieving optimal picture quality. Unlike most monitors on the market, the PG278Q doesn’t have several picture modes to choose from. While the picture quality controls are limited to brightness, contrast, and color temperature, the black level is set correctly with the factory default settings. Using the Lagom black level test, I was able to discern the darkest squares. It is important to maintain correct eye level, as the TN panel has natural gamma shifting dependent on viewing angle. Similarly, contrast at the default setting of 50 is good enough to maintain whites without clipping.


The default average gamma of the PG278Q’s user mode is 2.17


Out of the box, the PG278Q does a great job at nailing close to 6500 K color temperature using the default values of the “User Mode” color temperature setting. Even without an ICC profile, it comes very close to the recommended 2.2 gamma setting, with an average gamma of 2.17. Some brightness adjustment was necessary however, as the default brightness setting out of the box was too bright for most environments. I reduced the brightness setting to 21 in order to achieve close to 120cd/m² luminance. For a TN panel, the PG278Q is certainly a looker. At a brightness level of 21, the PG278Q manages an impressive black level of 0.12cd/m², which is quite low for a TN panel. On top of that, after creating an ICC profile, the measured contrast ratio was 1036:1, which is even greater than the 1000:1 contrast ratio specified by ASUS!


  • Color:

    Brightness: 21
    Contrast: 50
    Color Temperature: User Mode (R: 99, G: 100, B: 100)

    Image:

    OD: Normal
    ULMB: N/A

    Measured Black Level (Brightness 0): 0.05 cd/m²
    Measured Black Level (Brightness 100): 0.36 cd/m²
    Measured Black Level (Brightness 21): 0.12 cd/m²
    Measured Contrast Ratio: 1036:1
    Measured White Point (without ICC profile): 6508 K
    Measured White Point (ASUS PG278Q ICC Profile): 6513 K

    Download ASUS PG278Q ICC Profile

    Note: These settings were achieved using an i1 Display Pro, along with X-Rite i1 Profiler and BasICColor software. The GPUs used on the test computer are Nvidia GTX 970s running in SLI configuration, using stock settings. These settings require an additional ICC profile for accuracy. Use these settings at your own discretion, as they may look different on your display.

BasICColor validation results after applying ICC profile


  • Scaling:

There are absolutely no scaling options offered for non-native resolutions on the PG278Q. This monitor assumes that you are connecting a computer graphics card, so all scaling will be handled directly from the GPU.


  • Gaming Performance:

The PG278Q is a tough monitor to measure input latency. As the monitor only contains a singular DisplayPort connection, there isn’t a way to connect our lag testing device to retrieve accurate measurement data. To get around this limitation, I typically utilize an HDMI > DisplayPort active converter, however it was also rejected by the PG278Q, presumably due to the nature of the G-SYNC module within the monitor. Without a reliable way measure input latency, I decided to compare the monitor to our BenQ RL2455HM monitor by feel. The BenQ RL2455HM is one of the fastest 60hz monitors available, with an average input lag of 10ms.


Utilizing Ultra Street Fighter IV as my preferred testing benchmark, I compared the PG278Q to the RL2455HM under 60hz operation. I was unable to detect any real difference in terms of input latency between the two monitors. Hitting 1-frame links was a breeze, and in some cases, felt even better than the RL2455HM due to G-SYNC utilization. When utilizing refresh rates greater than 60hz, the input lag will cut down even further. It was a joy to play Ultra Street Fighter IV on the PG278Q, especially with G-SYNC active. For those that enjoy playing Ultra Street Fighter IV on PC that are planning to purchase the PG278Q, I highly recommend setting the refresh rate of the game to 120hz (which can be set within the game’s configuration file, located under Documents\CAPCOM\SUPERSTREETFIGHTERIV\config), disable V-Sync within the game, and enable 120/144hz refresh rate and G-SYNC under the Nvidia Control Panel. This will yield the lowest possible input latency for Ultra Street Fighter IV on PC.


  • G-SYNC Overview:

G-SYNC was specifically created to remove the downfalls of traditional V-Sync. Vertical sync has been employed by thousands of games over the past three decades as a means to remove screen tearing during gaming. By locking the game’s refresh rate to the native refresh rate of the display, a fluctuation in frame rate wouldn’t cause tearing to appear on the screen, a phenomenon that is extremely distracting to lots of gamers. However, there are costs to using vertical sync in gaming, which include the following:

  • Enabling vertical sync noticeably increases input lag over keeping it disabled. This is a nuisance to serious gamers as latency detracts from the fluidity of a game.
  • Minor drops in frame rate can result in severe frame drops with V-Sync enabled. Triple buffering can reduce the severity of frame drops, however it has to be natively supported by game developers unless a tool like D3DOverrider is used.

G-SYNC overcomes these issues by communicating with your graphics card directly. You get the benefits of no screen tearing, extremely low input lag (very similar to V-Sync off), and no major stuttering. Instead of dropping to a set frame rate (such as 60 FPS all the way down to 30 FPS), frame drops are much less noticeable when utilizing G-SYNC, giving you the benefits of triple buffering without the drawbacks. G-SYNC is also supported in SLI configurations. It’s one of the few technologies to come out that improves gaming noticeably without any major drawbacks, other than requiring a specialized display and Nvidia hardware.

So, how does it work in practice? Amazingly. The main benefits of G-SYNC can be seen in games that are able to push your hardware to the limit. In normal scenarios, employing V-Sync in the most intensive games can create noticeable stutters or massive frame drops when the action gets heavy. Most PC gamers have probably experienced this phenomenon. Even if your rig is capable of handling games at fluid frame rates, there will be times where a stutter tanks your frame rate, detracting from the enjoyment of the game. G-SYNC allows a gradual handling of frame rate in a way that doesn’t hamper your gaming experience, and the overall reduction of input latency over V-Sync allows better responsiveness, even at lower frame rates.


  • Motion Blur:

Continuing the tradition of most TN panels, the PG278Q offers some of the best LCD motion clarity in the business. The 1ms GTG panel on its own does a great job at cutting down on motion blur. Utilizing the ULMB (Ultra Low Motion Blur) technology, however, will forfeit activation of G-SYNC, as well as the 144hz refresh rate. ULMB is strobing backlight technology that will also limit the peak brightness of the monitor. In most cases, there shouldn’t be a need to engage ULMB unless you must have the best motion clarity from the monitor. When running games at refresh rates higher than 60hz, the default panel overdrive setting does a good job at cutting down on motion blur.

This video showcases the OD setting set to OFF, running at 60hz. This creates an image free from potential artifacts, however the motion blur significantly increases. Set the video to 1080p60 and pause when the UFO appears:


Testing samples courtesy of TestUFO


Setting the OD setting to Normal yields the best balance of overdrive and clarity, and is the default setting out of the box. I recommend using this setting as it yields the overall best motion clarity from the monitor:


The Extreme OD setting causes some noticeable artifacts, that can be seen in the video below. There isn’t really a need to engage this setting, unless you have a specific purpose in mind:


The benefits of engaging ULMB are significant. Engaging ULMB results in a CRT-level of motion clarity, where a moving object is still perfectly visible without any blurring or smearing that is typically present in LCD panels. I highly recommend engaging it with the 120hz refresh rate if you wish to have the best image clarity from the PG278Q. Keep in mind that engaging ULMB will result in a significant brightness reduction, and is mainly ideal for dimly-lit environments.


ASUS PG278Q on Amazon


The post ASUS ROG Swift PG278Q G-SYNC Monitor Review appeared first on DisplayLag.

BenQ RL2755HM Gaming Monitor Review

$
0
0

About The Review:

This BenQ RL2755HM gaming monitor was provided by BenQ for review purposes. I will be reviewing the build construction, picture quality, and overall technical performance of the RL2755HM.


Display Details

Size: 27″ Max Brightness: 300 cd/m²
Resolution: 1920 x 1080 Contrast Ratio: 1000:1
Aspect Ratio: 16:9 Panel Type: TN
Response Time: 1ms GTG Viewing Angle: 170/160
Display Colors: 16.7 Million Speakers: 2W x 2


Inputs, Features, & MSRP

Inputs/Outputs: D-Sub (1) DVI (1) HDMI (2)
Features & MSRP: Check Amazon G-SYNC: No 3D Support: No


ASUS PG278Q on Amazon


  • The BenQ RL2755HM: At A Glance

The BenQ RL2455HM was my first formal monitor review on this website. Designed mainly as a monitor for console gamers, the monitor did exactly what it needed to: provide a low latency gaming experience at an affordable price. The RL2755HM continues the RL2455HM’s legacy, with a larger screen size and redesigned stand. Lets see how it holds up once we put it through its paces.

RL2755HM-Inputs RL2755HM-Front RL2755HM-Base RL2755HM-Back


Input connectivity is similar to the previous RL2455HM, offering a single D-Sub, DVI, and two HDMI inputs. This should be more than enough for most gamers, although DisplayPort is absent. Considering this is a 1080p monitor, the higher bandwidth of DisplayPort is largely unnecessary. There are two 2W speakers provided for basic stereo sound, as well as headphone and line-in jacks for your audio equipment. The most noticeable improvement to the RL2755HM’s aesthetics is the brand new stand. It’s considerably wider and heftier than the flimsy one that was fitted onto the RL2455HM, and is a welcome change. The stand is capable of tilting vertically, however pivot, rotation, and height adjustment are not possible. It is therefore necessary to find an optimal position for the RL2755HM to maintain eye level with the center of the screen. A clip for cord management is attached behind the stand to route all of your cables neatly. The RL2755HM retains a matte-black aesthetic throughout the monitor, which allows the monitor to blend into almost any environment.


  • Panel Specs:

The BenQ RL2755HM features a 1920 x 1080 (1080p) native resolution, as well as a 60hz refresh rate. The panel used in the RL2755HM is an AUO M270HTNO TN panel, which is mainly designed to achieve the lowest response and latency timings. The response time is advertised to be 1ms GTG, a standard among most gaming monitors on the market. The 16:9 aspect ratio displays widescreen content without cropping or overscan. The native contrast ratio is stated to be 1000:1, with a dynamic contrast ratio of 20M:1. Finally, the panel is capable of producing 16.7 million colors, with a color gamut of 72% NTSC.


  • Buttons:

The BenQ RL2755HM features a classic set of physical buttons that have now become standard on most of BenQ’s monitors. They can be reassigned via the OSD to serve different functions, and are perfectly acceptable for night time usage, as the functions are displayed on the screen itself. I encountered absolutely no issues using the buttons on the RL2755HM; they provided a consistent experience.


RL2755HM-Buttons


  • Menu Items and Features (OSD):

Not much has changed regarding the menu system within the RL2755HM. Pressing any of the buttons brings up a selection menu that accesses your custom keys, as well as the menu settings. The menu settings contain various options to configure your display. The “Picture” menu allows you to configure Brightness, Contrast, Sharpness, Color Vibrance, Black eQualizer, Low Blue Light, Gamma, Color Temperature, Hue, Instant Mode, and AMA. The “Picture Advanced” menu allows configuration of Picture Mode, Senseye, Dynamic Contrast, Overscan, Display Mode, Smart Scaling, Color Format, HDMI RGB PC Range, and Smart Focus. The “Audio” menu allows you to set the volume and mute functionality of the built-in speakers. Finally, the “System” menu allows you to configure OSD layout, set custom keys, change inputs, and acquire various information about the signal being sent to the monitor.


RL2755HM-Menu


  • Viewing Angles & Uniformity:

The BenQ RL2755HM houses a TN panel, which is best suited for low response times and input lag, however it can fall short when it comes to viewing angles and color reproduction. When compared to other TN panels however, the RL2755HM offers an overall great viewing experience. I calibrated the RL2755HM to a luminance of approximately 120 cd/m², which is a comfortable backlight level for darker rooms. The RL2755HM showed the highest deviance in backlight on the top left and right parts of the screen, with a maximum deviance of -17 cd/m² on each corner. In terms of white point, the largest deviance from the center of the screen is on the bottom left, with a color temperature rating of 6635 K, over the measured center white point of 6497 K. This difference is not noticeable to the eye, and overall, the RL2755HM keeps a rather uniform picture across the screen. It is important to note that the white point listed in this screenshots was achieved without the use of an ICC profile. The RL2755HM does a great job at achieving close to 6500 K color temperature without the use of one.


BenQ RL2755HM Luminance BenQ RL2755HM White Point
Click to enlarge


  • Black, White, and Color Output:

The BenQ RL2755HM has a host of picture modes to choose from, including: Standard, Movie, Photo, sRGB, Eco, FPS, Fighting, RTS 1, RTS 2, and three Gamer profiles for further customizations. Featuring several picture presets is a standard practice for most monitor companies, however the majority of them will feature various inaccuracies that will degrade the overall picture quality. I found that the “Standard” picture mode was the best one for the RL2755HM, as it allowed enough customization to tweak to my liking. I was also able to calibrate this picture mode to achieve 6500 K color temperature. The brightness setting was reduced to 27 in order to achieve close to 120 cd/m² for dimly-lit environments. The contrast setting required no adjustment, and was left at its default value of 50, and I was able to discern all squares on the black level and contrast tests featured on Lagom’s calibration site.


RL2755HM Gamma Curve (No ICC Profile)


Once properly calibrated, the BenQ RL2755HM looks excellent for a TN panel. The default gamma value of the RL2755HM using the “Gamma 3″ setting (without ICC profile, pictured above) is approximately 2.13, which is very close to the 2.2 gamma standard used by mainstream media. The adjustments made by the ICC profile result in an average gamma of 2.48, which is more preferable for general monitor usage. Using the ICC profile below, I was able to achieve a very low black level of 0.11 cd/m², as well as a contrast ratio of 1100:1! This actually exceeds BenQ’s advertised contrast ratio, which was 1000:1. As long as you maintain proper eye level with the monitor, the RL2755HM offers a very enjoyable picture for a 27″ TN monitor.


  • Picture:

    Brightness: 27
    Contrast: 50
    Sharpness: 5
    Color Vibrance: 10
    Low Blue Light: 0
    Gamma: Gamma 3
    Color Temperature: User Mode (R:97, G:98, B:97)
    Instant Mode: ON
    AMA: High

    Picture Advanced:

    Picture Mode: Standard
    Overscan: OFF
    Display Mode: Full
    HDMI RGB PC Range: RGB (0~255)
    Smart Focus: OFF

    Measured Black Level (Brightness 0): 0.03 cd/m²
    Measured Black Level (Brightness 100): 0.28 cd/m²
    Measured Black Level (Brightness 27): 0.11 cd/m²
    Measured Contrast Ratio: 1100:1
    Measured White Point (without ICC profile): 6497 K
    Measured White Point (BenQ RL2755HM ICC Profile): 6501 K

    Download BenQ RL2755HM ICC Profile

    Note: These settings were achieved using an i1 Display Pro, along with X-Rite i1 Profiler and BasICColor software. The GPUs used on the test computer are Nvidia GTX 970s running in SLI configuration, using stock settings. These settings require an additional ICC profile for accuracy. Use these settings at your own discretion, as they may look different on your display.


BasICColor validation results after applying ICC profile


  • Scaling:

The BenQ RL2755HM offers all of BenQ’s signature scaling options made famous in their RL and XL monitor lines. Not only can you select from Full, Aspect, and 1:1 scaling, but you are also able to emulate various screen sizes, simulating 17″-24″ screen sizes, as well as a variety of aspect ratios such as 4:3 and 16:10. For most users, engaging the screen size emulation will be largely unnecessary, but it’s a good implementation by BenQ regardless, for those that are picky about their scaling options.


  • Measured Input Lag (HDMI):

BenQ’s RL and XL gaming monitors have been known for their very fast input lag ratings, allowing the quickest input response possible from a LCD-based display. The previous RL2455HM fared excellent in this regard, offering an average 10ms input lag, which made it a formidable gaming display. The only downside to that monitor was its screen size, requiring you to sit rather close to fully enjoy it. The RL2755HM tackles this with its significantly larger screen size. But does it offer the same low input lag ratings as other BenQ monitors? Yes, it does.

Using a 1080p/60hz testing signal, I tested the RL2755HM to measure the amount of input lag present in the display. Input lag numbers didn’t change at all when utilizing different picture modes, and also did not change by changing the “Instant Mode” setting. Typically, this setting can reduce input lag, though I’ve found it to make no difference in some of BenQ’s models. The RL2755HM is one of those models that don’t require “Instant Mode” to achieve the lowest possible input lag. The input lag measured on the BenQ RL2755HM is as follows:

  • Top: 3.0ms
  • Middle: 10.2ms
  • Bottom: 17.7ms

As expected, the BenQ RL2755HM continues to offer low latency similar to previous RL and XL monitors. The average input lag of the BenQ RL2755HM is approximately 10ms. This is fast enough to serve any gaming activity, including competitive gaming at the highest level.


  • Gaming Performance: HDMI

To further test out the gaming performance of the BenQ RL2755HM, I booted up my copy of Ultra Street Fighter IV, my preferred latency testing benchmark. I switched back and forth between the older RL2455HM and the RL2755HM, and couldn’t detect any difference in terms of input response. I was able to perform the hardest combo links, and my timings felt identical across both monitors. The use of a TN panel also helped in keeping motion blur to a minimum, thanks to the 1ms GTG response time featured on the RL2755HM. Once set to calibrated settings, it was a joy to play on the RL2755HM.


  • Motion Blur:

The use of a TN panel allows the RL2755HM to achieve very fast response times, which consequently reduces the appearance of blur trailing moving objects. The majority of BenQ’s monitors I’ve come across benefited by keeping the AMA setting set to “High”. The RL2755HM is no different in this regard. Setting the AMA to “OFF” results in noticeable motion blur that is quite distracting. The default setting of “High” removes most blurring and does a good job at maintaining a balanced picture. Setting the AMA to “Premium” results in the most overdrive to remove blur, however it creates very noticeable artifacts that degrade picture quality. I’d recommend staying away from “Premium” unless you really need the extra clarity, as it comes with a noticeable cost. The videos below showcase the differences between all three AMA modes.

Testing samples courtesy of TestUFO

AMA set to OFF:

AMA set to High:

AMA set to Premium:


ASUS PG278Q on Amazon


The post BenQ RL2755HM Gaming Monitor Review appeared first on DisplayLag.

Console Latency: Exploring Video Game Input Lag

$
0
0

Time sure does fly. The PlayStation 4 and Xbox One have firmly cemented themselves as an integral part of our living rooms, bringing forth new console experiences for over a year. Many of you have visited this website to find the best gaming display for your needs, and I’m very thankful towards every person that continues to utilize and share our display input lag database to achieve this goal.

With the new generation of gaming in full effect, I feel that it’s a good time to start exploring video game latency. Multi-platform game releases are more common now than they have ever been, which tends to spark debates on which version is superior. Graphical performance is usually the focal point of these discussions, however I also feel that controller latency is equally important. The amount of time it takes for your button press to register onto the screen is more than just display latency; it also encompasses your controller’s transmission speed, console and game engine. Controller latency is directly tied to frame rate, which is why it’s important to maintain a constant frame rate in order to achieve optimal controller response. For example, fighting games are almost always locked at 60 frames per second to achieve the fastest controller response on a 60hz display, which also enables the highest quality of competitive gameplay and visual fidelity. A reduction or shift in frame rate causes variable timing in anything that requires a set timing to perform, so the effect of frame rates are more than just visual. On top of that, different versions of the same game can have variable input timings! A good example of this is Ultra Street Fighter IV, which has different input timings between the Xbox 360 and PlayStation 3 versions. The Xbox 360 version tends to process inputs faster than the PlayStation 3 version, which is why it’s currently utilized as the tournament standard.

A game that feels “heavy” or “weighty” usually feels that way due to latency between your controller and an action within the game. A responsive game is simply enjoyable. Regardless of genre, having your game respond near-instantaneously to your button press is always a positive outcome. It can allow for deeper gameplay experiences, whether you’re trying to beat the final boss of a game or win the world championship in Mortal Kombat X. Starting today, I will be launching our brand new video game input lag database. The database currently offers a limited assortment of games, however you can expect it to grow at a rapid pace. It will primarily focus on the PlayStation 4 and Xbox One, however I will definitely upload certain PlayStation 3 and Xbox 360 games if time permits. I am hoping that this information will prove useful to everyone, including game developers to help create better gaming experiences. Keep on reading to see how it works.


  • Testing Equipment:

Measuring the latency of a video game is a little trickier than measuring display latency, mainly due to the additional variables involved. There are differences in timing between controller chipsets, USB poll rates, and the consoles themselves. Most video game latency tests involve capturing your controller movement on camera while the game is running, and subtracting the difference between the button press and display response. While I am adopting this testing method, I wanted to do something a bit more accurate than estimating when I actually pressed the button. This is where the XIM4 comes into play.


XIM4


The XIM4 is a unique device that allows you to use a PC mouse and keyboard on game consoles. It currently supports the PlayStation 3, PlayStation 4, Xbox 360, and Xbox One. One of the USB ports on the XIM4 requires you to connect the controller of the console you wish to use it on, to bypass the authentication requirements of the console. The XIM4 allows me to use a single input method across all devices, which can potentially reduce the variability of four different controller chipsets. You can manage specific game profiles if you connect a XIM4 via Bluetooth to your phone, which serves as the configuration tool to map your keyboard and mouse to specific actions. As I have no need for a mouse, I only use the XIM4 to use my keyboard on each console.


Ducky-Shine-4


My keyboard of choice is the Ducky Shine 4 with blue Cherry MX switches. Ducky makes some of the best mechanical keyboards on the market, and this particular one has several lighting options. One of the lighting options responds to each key press, which serves as the basis for our input lag testing. By recording a key press with the game running, I am able to calculate the exact difference between the key lighting up and the first action that appears in-game. The keyboard supports a 1000hz/1ms reporting rate, which is far greater than what these consoles currently support.


Casio-EX-ZR800


To record this whole process, I am utilizing a Casio Exilim EX-ZR800 high speed camera. This camera is capable of shooting up to 1000 frames per second, however recording at such a high frame rate results in an extremely small resolution of 224×64 with reduced brightness. Outside of gunshots, it becomes rather difficult to recognize the exact frame of an action occuring. Console games are limited to 60hz, so instead I chose to capture at 120 frames per second, which presents a much more usable 640 x 480 resolution. Capturing 120 FPS footage ensures none of the 60hz frames are lost. In the event I need more FPS, the camera also supports 240 FPS, 480 FPS, and the aforementioned 1000 FPS recording modes.


BenQ-RL2755HM


Of course, we need a display to play the game. The display I utilized for these input lag tests is the BenQ RL2755HM, which we reviewed just over a month ago. This monitor has an average input lag of approximately 10ms, and is one of the fastest monitors in our display input lag database. Considering the fact that CRT televisions are practically extinct on the mass market, a fast LED monitor will be your best bet at achieving low latency gaming. I personally find the BenQ RL2755HM very comparable to any fast 60hz LED display currently on the market.


  • Results:

I tested several games on the PlayStation 4 and Xbox One, a few of them being multi-platform titles such as Destiny and Mortal Kombat X. To serve as a reference point, I also tested the dashboards of both consoles to serve as a baseline for measurements. The dashboards operate at 60 FPS and don’t stress the console, so you can typically hope to achieve the fastest controller response while sitting there (though this isn’t always the case!). Sometimes, a game’s frame rate doesn’t tell the whole story either. A game running at 30 FPS can sometimes process an input just as fast as a 60 FPS game, depending on how the the game engine handles inputs. In most cases though, a game running at 60 FPS will process inputs quicker than a game running at 30 FPS.

Here are the results of video games I have tested so far for input lag. These results are an average of ten button presses, and they include display latency. You can subtract 10ms from these results to get an idea of true game latency:


PlayStation 4 Results:

Dashboard 76ms
Destiny 107ms
Driveclub 116ms
Guilty Gear Xrd -SIGN- 89ms
Killzone: Shadow Fall 119ms
Mortal Kombat X 107ms
The Last of Us: Remastered 111ms


Xbox One Results:

Dashboard 87ms
Destiny 96ms
Forza Horizon 2 149ms
Halo 1: Master Chief Collection 84ms
Halo 2: Master Chief Collection 84ms
Halo 3: Master Chief Collection 106ms
Halo 4: Master Chief Collection 93ms
Killer Instinct 81ms
Mortal Kombat X 105ms
Sunset Overdrive 128ms


So what can we take away from this? Based on this small sampling, most 30 FPS games are going to hover around 100ms of controller latency, whereas games running at 60 FPS can go below this threshold. However, some 60 FPS games can exhibit controller latency similar to games running at 30 FPS. For example, Mortal Kombat X exhibits an average controller latency around 107ms, which explains why the game feels a bit more “weighty” than a game like Killer Instinct, even though both games run at the same 60 frames per second. Whether or not it’s a design choice is up to the developers to answer. Generally speaking, a game running at 60 FPS should strive for a controller latency around 67ms, whereas a game running at 30 FPS should shoot for 100ms. These will typically be the best case scenarios a 60hz game can hope to achieve. When consoles become capable of utilizing refresh rates higher than 60hz, we can all enjoy even lower input latency than what is measured here. PC gamers have been experiencing the benefits of 120hz+ gaming for several years now.

Below is the test I performed on the PlayStation 4’s dashboard. You can find videos for every game I’ve tested so far (including the ones listed above) on our YouTube channel, so be sure to check it out!


  • Variables:

Nothing is perfect, so there are a few variables that need to be taken into account. First is the latency from the XIM4 itself. The team behind the XIM4 decided to normalize its USB polling rate in order to prevent compatibility issues among different consoles. Natively, the Xbox One and Xbox 360 have an 8ms polling rate. The PlayStation 3 is 10ms, while the PlayStation 4 can be as fast as 4ms. The XIM4 processes PlayStation 4 inputs at 8ms instead of the console’s native 4ms polling rate. Personally, I couldn’t detect any difference while using the XIM4, even when performing strict timing links on the Xbox 360 version of Ultra Street Fighter IV and the PlayStation 4 version of Mortal Kombat X. If the XIM4 adds any delay at all, I can’t imagine it being any more than a standard licensed controller. Even official controllers have variable delay among each other depending on the manufacturing process. I personally feel confident using the XIM4 for latency testing.

Frame rate is also important. All of my testing was performed during stable parts of the game, where the frame rate remains relatively constant. If a game has an erratic frame rate, you can expect your controller response to fluctuate while playing the game. This is why it’s important for developers to achieve locked frame rates, to help normalize controller response throughout the game. Frame drops can happen for various reasons, so I felt the best course of action was to record inputs while the game was running at a stable frame rate. A good example of this is Destiny. Destiny on the Xbox One exhibited an impressive 96ms controller latency when compared to the PlayStation 4 version clocking in at 107ms, however the Xbox One version tends to suffer with more stuttering, resulting in a more consistent experience on the PlayStation 4. The game engine also plays a role, including factors such as V-Sync implementation. Different actions in-game may also take variable timing before animating on-screen. As a result, I am going to do latency testing based on the action that would typically require the quickest response, such as shooting a gun, braking a car, or jumping a platform.

Input lag can vary based on display, but you already knew that! The BenQ RL2755HM, as mentioned earlier, is one of the fastest displays in our display input lag database for 60hz operation, so I feel comfortable using it for latency testing. If you primarily game on a HDTV, you can expect anywhere from 10-100ms added on top of the base game latency. Try to game on a low latency display, if you are able to do so!

_______________

I hope that the introduction of our new video game input lag database will prove useful to gamers and developers worldwide. While asking for 60 FPS in every game is an unrealistic expectation, I do hope that developers do what they can to normalize their frame rates to achieve optimal controller response in their games. Remember, don’t forget to check out our YouTube channel to see videos of our testing. As far PC gamers are concerned… stay tuned for our next article!

The post Console Latency: Exploring Video Game Input Lag appeared first on DisplayLag.

Reduce Input Lag in PC Games: The Definitive Guide

$
0
0

We all know that PC games offer a myriad of customization options that aren’t found on traditional game consoles, allowing you to tweak the experience to your liking. Did you know it’s possible to change the latency of a PC game as well? Our last article explored console latency, explaining how your controller’s responsiveness is largely tied to the developer’s vision of their game. Due to PC being open architecture, it’s possible to tweak the latency of a PC game using a variety of options in your graphic card’s control panel, as well as third party programs.

A game that requires this level of tweaking is Ultra Street Fighter IV. The game was mainly designed for Nvidia architecture, which resulted in the PC, PlayStation 3, and arcade versions being similar to each other in terms of latency. However, the fighting game community started to notice that the Xbox 360 version of the game had lower input lag over other versions. I measured this difference in latency when I wrote my last article, and the difference is quite noticeable: the Xbox 360 version of USFIV averaged approximately 85ms of controller latency, whereas the PlayStation 3 version averaged approximately 107ms (check out our video game input lag database). While technically not “arcade perfect”, most players preferred the lower latency inherent within the Xbox 360 version, which may have been a result of it using an AMD-based GPU. For years, the PC version at stock settings felt very similar to the PlayStation 3 version, which I personally didn’t enjoy due to increased latency. It felt awkward and unnatural after playing on the Xbox 360 version for so long. However, after plenty of experimentation, it’s possible to match and/or exceed the speed of the Xbox 360 version! It’s important to note that all of the tweaks mentioned below can work on any current PC game, and not just Ultra Street Fighter IV. Experiment and see what feels best to you!


    Testing Setup:

Display: BenQ RL2755HM 60hz Gaming Monitor
Display (G-SYNC): Acer XB240H 144hz G-SYNC Gaming Monitor
Display (FreeSync): BenQ XL2730Z 144hz WQHD FreeSync Gaming Monitor
Operating System: Windows 8.1 64-bit
Motherboard: MSI Z77A-GD65
Processor: Intel Core i5 3570K Ivy-Bridge Quad Core
Graphics Card (Nvidia): EVGA GeForce GTX 970 Superclocked (2)
Graphics Card (AMD) ASUS Radeon R7 260X OC (2)
RAM: 4x4GB Samsung DDR3-1600 MV-3V4G3
Hard Drives: Crucial M4 128GB SSD, Western Digital Caviar Black 2TB
Keyboard: Ducky Shine 4
Camera: Casio Exilim EX-ZR800
Nvidia GeForce Driver: 350.12
AMD Radeon Driver: 15.4 (Beta)
Third-Party Programs: D3DOverrider, RadeonPro


    Testing Methodology:

Input lag in video games is a result of two main things: frame rate and V-Sync implementation. On consoles, it usually isn’t possible to customize these options, resulting in a static controller response that is set forth by the developer. PC gaming doesn’t adhere to this restriction. In the following examples, Ultra Street Fighter IV is utilized as our preferred testing benchmark. Latency is measured after applying various configurations detailed in this article. Ultra Street Fighter IV is capped at 60 frames per second, so we utilize our Casio Exilim EX-ZR800 to capture footage at 120 frames per second. Our Ducky Shine 4 keyboard features a lighting mode that illuminates on each key press. To measure latency, we calculate the amount of frames between the first key press and the first action on-screen. The average of ten button presses is used as our final result.


  • V-Sync OFF:

To achieve the lowest possible controller latency, the best option is to completely disable vertical sync. V-Sync is a function that allows the game to synchronize it’s frame rate with the refresh rate of the display. Disabling it removes the frame rate cap, which also causes massive amounts of screen tearing. The screen tearing exhibited by the lack of V-Sync can be very distracting to most gamers. If reducing input lag is your primary concern, then this is your best option. Ultra Street Fighter IV achieves an ultra-low 59ms (3.6 frames) of controller latency with all V-Sync options disabled on our Nvidia GPU, and 61ms (3.7 frames) of controller latency on our AMD Radeon GPU.


  • In-Game V-Sync:

Every PC game on the market comes shipped with it’s own V-Sync option that can be toggled in the configuration menu of the game itself. Most of the time, this is the only option you’ll need for a smooth experience. However, it may not be the option with the lowest input lag. The stock V-Sync option in Ultra Street Fighter IV provides a base latency of 103ms (6.2 frames) of input lag, which is very similar to the PlayStation 3 version that measured 107ms (6.4 frames). Enabling V-Sync synchronizes the game with the refresh rate of the display to remove screen tearing, however it also adds around 2 frames of input lag in most cases. Enabling V-Sync in-game results in a controller latency of 103ms (6.2 frames) on our Nvidia GPU, and 102ms (6.1 frames) on our AMD Radeon GPU. In-game V-Sync under CrossFireX resulted in 103ms (6.2 frames) of input lag, though make sure frame pacing is set to ON within Catalyst Control Center. Disabling frame pacing results in an extremely high input lag of 143ms (8.6 frames), so you definitely want to avoid that scenario!


USF4 Graphic Settings


  • Control Panel V-Sync:

If a game suffers from poor V-Sync implementation, it is possible to force V-Sync through the GPU control panel itself, which may sometimes offer a better experience. Both Nvidia and AMD allow forced V-Sync via control panel, however only Nvidia’s forced V-Sync option worked in Ultra Street Fighter IV. The game presents slightly higher controller latency when forcing V-Sync via the control panel, with a controller latency of 109ms (6.6 frames). Forcing V-Sync on our GTX 970 SLI setup increased input lag over a singular GPU, bringing the latency up to 114ms (6.9 frames) However, it is possible to reduce latency further by configuring maximum pre-rendered frames (explained below).


  • V-Sync + Maximum Pre-Rendered Frames / Flip Queue:

This setting is buried under the “Manage 3D Settings” page in the Nvidia control panel. Maximum pre-rendered frames is a setting that governs the amount of frames the CPU is able to process before handing it off to the GPU. The default value is set to 3, which typically achieves the best balance between input lag and a smooth image. If you have a particularly powerful GPU, you can reduce this value in order to achieve significantly lower input lag, without any noticeable downsides. Setting it to 1 prevents the CPU from processing more frames than it needs to, allowing the GPU to do most of the grunt work. In Ultra Street Fighter IV, combining control panel V-Sync with a maximum pre-rendered frames (1) setting results in 95ms (5.7 frames) of controller latency, whereas keeping in-game V-Sync enabled with the maximum pre-rendered frames (1) setting resulted in 101ms (6.1 frames) of controller latency. On AMD Radeon GPUs, this setting is known as flip queue. You can configure this option by downloading the RadeonPro application, which allows deeper tweaking of your Radeon GPU. Forcing a flip queue setting of 1 resulted in an average input lag of 97ms (5.8 frames). Both AMD Catalyst Control Center and RadeonPro were unable to force V-Sync in Ultra Street Fighter IV. In-game V-Sync was used along with flip queue (1) setting within RadeonPro in order to achieve lower input lag for our Radeon GPU.


Click to enlarge picture

RadeonPro Flip Queue

Nvidia Maximum Pre-Rendered Frames


  • Smooth V-Sync (Nvidia SLI Only):

The Smooth V-Sync option is largely overlooked since Nvidia introduced it in 2013, though its importance in a multi-GPU setup shouldn’t be underestimated. Smooth V-Sync attempts to keep the frame rate at the most sustainable level. If your game constantly fluctuates between 30 and 60 FPS, there is a good chance that enabling Smooth V-Sync will lock you to 30 FPS throughout your gaming session, in order to provide the most consistent experience. There will be times where you will encounter an area of the game entirely in 30 FPS, then have it switch back to a higher frame rate when nothing is taxing your GPUs. The importance of Smooth V-Sync lies within games your SLI setup completely dominates. Ultra Street Fighter IV can be comfortably maxed out at 4K resolution on our singular GTX 970, so why bother enabling a secondary GPU? Because Smooth V-Sync allows for dramatic input lag reduction! Running Ultra Street Fighter IV on our Nvidia GTX 970 SLI setup with Smooth V-Sync active resulted in an average input latency of 87ms (5.2 frames), offering the lowest amount of input lag when compared to every other Nvidia V-Sync solution (with the exception of V-Sync OFF and G-SYNC).


Nvidia Smooth V-Sync


  • Windowed V-Sync:

It is possible to completely bypass control panel and in-game V-Sync options to utilize Windows’ native V-Sync implementation, which is also triple-buffered. By running the game in a window or borderless window, Windows handles the vertical synchronization, which can lead to smoother gameplay and lower input lag. Make sure you disable V-Sync in all other areas before doing so. Running Ultra Street Fighter IV in a window reduces input lag over both in-game and stock control panel V-Sync, with a controller latency of 98ms (5.9 frames) on our Nvidia GPU, significantly higher than AMD Radeon’s 81ms (4.9 frames) of latency under the same scenario. It’s also possible to utilize windowed V-Sync in both SLI and CrossFireX setups. On Nvidia’s SLI setup, we measured 95ms (5.7 frames) of controller latency, which is still higher than CrossFireX’s measured latency of 87ms (5.2 frames). Utilizing Windows’ built in V-Sync may not always be smooth sailing however, and can sometimes cause stuttering that is absent when running the game in fullscreen mode.


  • Direct3D Overrider:

Direct3D Overrider is a popular application that has been used for many years as a way to force V-Sync and triple buffering into DirectX games. Games that tend to fluctuate frame rates with standard V-Sync can appear much smoother when allowing Direct3D Overrider to handle this task. Ultra Street Fighter IV presented varying results depending on which modes were utilized. Using only Direct3D Overrider’s V-Sync option resulted in 115ms (6.9 frames) of latency on our Nvidia GPU, and 106ms (6.4 frames) on our Radeon GPU. Enabling triple buffering on top of Direct3D Overrider’s V-Sync resulted in 120ms (7.2 frames) of latency on our Nvidia GPU, and 109ms (6.5 frames) on our Radeon GPU.


D3DOverrider Panel


    G-SYNC & FreeSync (Adaptive Sync):

It gets even better. In 2013, Nvidia announced a complete V-Sync replacement known as G-SYNC. G-SYNC provides the benefits of V-Sync’s tear-free image, without the stuttering and input lag associated with traditional V-Sync. The technology allows the display to directly communicate with the GPU, bypassing the ruleset of traditional V-Sync entirely. Shortly after, AMD announced its own variable refresh rate technology known as Adaptive-Sync/FreeSync. The only catch to these technologies is the requirement of a newer display tailored for your specific GPU. I managed to test the benefits of both G-SYNC and Adaptive-Sync, and the results are simply incredible.


G-SYNC-Image


Bypassing all other forms of V-Sync, enabling G-SYNC within Nvidia’s control panel resulted in an enormous reduction of input lag. In most cases, connecting your Nvidia GeForce GPU to a G-SYNC monitor will automatically enable G-SYNC, though this setting can be enabled manually and tailored to specific games via the control panel. After connecting the GTX 970 to our Acer XB240H G-SYNC monitor, we measured a ridiculously-low input lag rating of 60ms (3.6 frames), which is essentially identical to V-Sync OFF! This is significantly lower than even the lowest recorded values from our V-Sync tests above. Nvidia also allows SLI users to partake in the G-SYNC ceremony. Running Ultra Street Fighter IV with G-SYNC active on our SLI setup resulted in a slightly higher latency measurement of 63ms (3.8 frames).

What if you bleed red? AMD Radeon users shouldn’t worry, as these benefits are present on FreeSync monitors as well! We hooked up our AMD Radeon GPU to our shiny new BenQ XL2730Z FreeSync monitor, and measured an equally-low 59ms (3.6 frames) of input lag with FreeSync enabled via Catalyst Control Center. Unfortunately, AMD doesn’t allow CrossFireX and FreeSync to be enabled together. AMD is scheduled to launch a driver update to enable this functionality in the future. This technology has proven to be a real game changer since its inception, and it’s great to see the benefits across a wide variety of games.


    Other Methods:

There are a few other methods that can reduce input lag within PC games. One of them involves using a frame limiter to set your maximum frames per second below the refresh rate of your display. You can cap your game at 59 frames per second on a 60hz monitor to reduce input lag considerably, however this will more than likely cause some stuttering in games that run best at a locked frame rate. Ultra Street Fighter IV requires a steady 60 FPS, and limiting it below this frame rate can cause some issues. Another way to reduce input latency is by enabling a higher refresh rate. While Ultra Street Fighter IV is capped at 60 FPS due to its gameplay mechanics, many other genres such as first person shooters are able to go above and beyond 60 FPS. Running a game at 120hz or 144hz can reduce input lag by over 50%, as long as your hardware is powerful enough to handle it! On top of reduced latency, motion will appear silky smooth, which can ruin your perception of 60hz if that’s all you’re used to!


Nvidia GeForce Input Lag Results (60hz):

Measurements below rounded up to nearest millisecond/frame. All measurements were calculated using Ultra Street Fighter IV as the preferred benchmark. Results may vary by game and hardware used.

Configuration Latency (MS) Latency (Frames) Test Link
V-Sync OFF 59ms 3.5 frames YouTube
G-SYNC 60ms 3.6 frames YouTube
SLI + G-SYNC 63ms 3.8 frames YouTube
Xbox 360 Version 85ms 5.1 frames YouTube
SLI + Smooth V-Sync ON (Control Panel) 87ms 5.2 frames YouTube
V-Sync (Control Panel) + Max Pre-Rendered Frames (1) 95ms 5.7 frames YouTube
SLI + Windowed V-Sync 95ms 5.7 frames YouTube
Windowed V-Sync 98ms 5.9 frames YouTube
V-Sync ON (Game) + Max Pre-Rendered Frames (1) 101ms 6.1 frames YouTube
V-Sync ON (Game) 103ms 6.2 frames YouTube
PlayStation 3 Version 107ms 6.4 frames YouTube
V-Sync ON (Control Panel) 109ms 6.5 frames YouTube
SLI + V-Sync ON (Control Panel) 114ms 6.8 frames YouTube
V-Sync ON (D3DOverrider) 115ms 6.9 frames YouTube
V-Sync ON + Triple Buffering (D3DOverrider) 120ms 7.2 frames YouTube


AMD Radeon Input Lag Results (60hz):

Measurements below rounded up to nearest millisecond/frame. All measurements were calculated using Ultra Street Fighter IV as the preferred benchmark. Results may vary by game and hardware used.

Configuration Latency (MS) Latency (Frames) Test Link
FreeSync (Adaptive-Sync) 59ms 3.5 frames YouTube
V-Sync OFF 61ms 3.7 frames YouTube
Windowed V-Sync 81ms 4.9 frames YouTube
Xbox 360 Version 85ms 5.1 frames YouTube
CrossFireX Frame Pacing OFF + Windowed V-Sync 87ms 5.2 frames YouTube
CrossFireX Frame Pacing ON + Windowed V-Sync 88ms 5.3 frames YouTube
V-Sync ON (Game) + Flip Queue (1) 97ms 5.8 frames YouTube
V-Sync ON (Game) 102ms 6.1 frames YouTube
CrossFireX Frame Pacing ON + V-Sync ON (Game) 103ms 6.2 frames YouTube
V-Sync ON (D3DOverrider) 106ms 6.4 frames YouTube
PlayStation 3 Version 107ms 6.4 frames YouTube
V-Sync ON + Triple Buffering (D3DOverrider) 109ms 6.5 frames YouTube
CrossFireX Frame Pacing OFF + V-Sync ON (Game) 143ms 8.6 frames YouTube


    Conclusion:

There are several ways to change the feel of your favorite PC game by employing the methods detailed above. While the results can vary by game, it is important to try these options if you are unsatisfied with the latency associated with default settings. One thing is clear, however: the absolute best way to reduce input latency while keeping a tear-free image is to acquire a G-SYNC or FreeSync display. For those on a budget, be sure to try the tweaks listed above and report your experiences in the comments below!


The post Reduce Input Lag in PC Games: The Definitive Guide appeared first on DisplayLag.


BenQ XL2730Z Review: 144hz AMD FreeSync Monitor

$
0
0

About The Review:

This BenQ XL2730Z gaming monitor was provided by BenQ for review purposes. I will be reviewing the build construction, picture quality, and overall technical performance of the XL2730Z.


Display Details

Size: 27″ Max Brightness: 350 cd/m²
Resolution: 2560 x 1440 Native Contrast Ratio: 1000:1
Aspect Ratio: 16:9 Dynamic Contrast Ratio: 12M:1
Response Time: 1ms GTG Viewing Angle: 170/160
Display Colors: 16.7 Million Refresh Rate: 144hz
Panel Type: TN FreeSync: Yes
Inputs/Outputs: D-Sub x1
DVI-DL x1
HDMI x2 (1.4, 2.0)
DisplayPort x1 (1.2)
Price: Check Amazon


ASUS PG278Q on Amazon


  • The BenQ XL2730Z: At A Glance

For a while now, Nvidia’s G-SYNC technology has changed the entire PC gaming landscape. Prior to G-SYNC, gamers had to deal with the issues associated with traditional V-Sync, including stuttering and input lag. The main downside to G-SYNC was the requirement of an Nvidia graphics card, which fragmented the userbase of adaptive refresh rates. AMD has been a little slow to respond, however this is the year where FreeSync is finally available to Radeon GPU users. One of the first monitors to support this technology is BenQ’s latest XL2730Z gaming monitor. We put it through a test drive to see how it performs.

 XL2730Z-Inputs 

A huge drawback when choosing a G-SYNC monitor is the complete lack of multiple inputs. Some monitors, such as BenQ’s XL2420G, implemented a dual-OS to compensate for this, however most G-SYNC monitors on the market only come fitted with a singular DisplayPort. Input variety is one of the strong suits of AMD FreeSync monitors, with the XL2730Z being no slouch in this department. It comes fitted with D-Sub, DVI-DL, dual HDMI inputs, as well as DisplayPort 1.2 to handle all of your sources. One of the HDMI inputs on this monitor is 2.0, fully supporting the latest graphics cards.

 XL2730Z-Switch 

The build quality of the XL2730Z is nothing short of premium. The design concept of the monitor borrows heavily from BenQ’s XL2430T monitor (reviewed by us last year), featuring a full aluminum stand that is cool to the touch. The monitor is incredibly sturdy, and can be tilted, rotated, and lifted as deemed necessary. The XL2730Z also comes with BenQ’s signature S. Switch device, allowing for more precise control of the monitor’s OSD and functionality. The S. Switch retains its circular redesign from the XL2430T, and can be seated onto the groove present on the monitor’s base.

 XL2730Z-USB 

In terms of specifications, the XL2730Z features a 27″ TN panel with a 2560 x 1440 resolution. This panel allows for a maximum refresh rate of 144hz, and also supports AMD’s FreeSync technology to reap the benefits of adaptive refresh rates. The panel is AUO’s M270DTN0 1.0, and also features a REALTEK 2796B scaler, presumably to handle lower resolution content. The native contrast ratio is 1000:1, a standard number amongst TN panels on the market. Unfortunately, no speakers are present on this monitor, though it does include microphone and headphone jacks to compensate for this omission. Audio performance of the headphone jack was tested with my V-Moda M-100 headphones; I’d recommend skipping it entirely. The M-100’s have a rated impedance of 32 Ω (which is quite low), and even with the volume setting maxed out, it doesn’t drive them well. Stick to an external solution such as a sound card to handle your audio needs. To complete the kitchen sink, two USB 3.0 ports are present on the side of the monitor.


  • Buttons:

Several of BenQ’s recent monitors have gone back to good ol’ physical buttons, and this trend is present on the XL2730Z. If you’ve used any of BenQ’s monitors before, these buttons should be rather familiar to you. The five buttons initially have static menu options, however they can be configured to handle other functions. The buttons are very responsive, allowing for quick menu operation. As mentioned earlier, you can connect the included S. Switch to handle OSD control if you choose to.

 XL2730Z-Buttons


  • Menu Items and Features (OSD):

Being one of BenQ’s premium gaming monitors, you can expect tons of functionality within the OSD. A variety of controls to modify picture quality are available, along with gaming-centric features such as Black eQualizer to brighten dark spots. BenQ have done some cleaning up to their traditional OSD, separating the gaming functions from the picture calibration controls. Check the pictures below to see the functionality present within the XL2730Z:

XL2730Z-Game-Settings XL2730Z-Picture-Settings XL2730Z-Display-Settings XL2730Z-System-Settings


  • Viewing Angles & Uniformity:

The XL2730Z features a TN panel manufactured by AUO, which quite honestly looks better than most TN panels at first glance. To get an idea of how accurate it can be, I measured the overall uniformity and color accuracy after doing some OSD calibrations without an ICC profile. I calibrated the monitor to approximately 120 cd/m², and measured the panel uniformity to check for variances in brightness. The largest deviations from the center of the screen (on my sample) were the top right and bottom right corners of the screen, with a deviation of -10% from the center luminance. Considering that the corners are mostly ignored under a wide variety of applications, this is a pretty good uniformity result. Without applying an ICC profile, I was also able to achieve a near-perfect 6500 K center white point. I measured a center white point of approximately 6491.38 K. The largest kelvin deviation from the center was -118.459 K, on the bottom left of the screen. Click the pictures below to view the results:


XL2730Z Luminance XL2730Z White Point
Click to enlarge


  • Black/White Level & Gamma:

BenQ monitors typically provide the most configuration options under the ‘Standard’ picture mode, and it’s no different here. The ‘Standard’ picture mode allows full configuration of individual RGB levels. Out of the box, the gamma was set 3, which resulted in a gamma very close to 2.2 after tweaking RGB values. Without the use of an ICC profile, you’re going to be looking at fairly decent color reproduction, though they still won’t match the fidelity of an IPS or VA panel. In order to achieve a 120 cd/m² brightness level, the brightness setting was adjusted to 15, with the contrast setting left at the default 50. Before applying an ICC profile, I was able to achieve a contrast ratio of 897:1, as well as a black level of 0.13 cd/m². The detailed report can be seen below:

 XL2730Z Before ICC Profile 

Most monitors are unable to achieve optimal settings using just the OSD controls, and require an additional ICC profile to achieve proper color accuracy. Creating an ICC profile for the BenQ XL2730Z managed to correct the color balance and pass the BasICColor validation test. Contrast ratio was raised slightly to 903:1, still under the specified 1000:1. However, the image looked significantly better with the ICC profile in place. It is highly recommended that you apply it to get the most out of the monitor. The changes can be seen in the image below:

 XL2730Z After ICC Profile 

  • Game Settings:

    Blur Reduction: OFF
    Black eQualizer: 0
    Color Vibrance: 10
    Low Blue Light: 0
    Instant Mode: ON
    Auto Game Mode: OFF

    Picture:

    Picture Mode: Standard
    Brightness: 15
    Contrast: 50
    Sharpness: 5
    Gamma: Gamma 3
    Color Temperature: User Define (R:94, G:100, B:99)
    AMA: High
    Dynamic Contrast: 0

    Display:

    Display Mode: Full
    HDMI RGB PC Range: 0~255

    Measured Black Level (120 cd/m²): 0.13 cd/m²
    Measured Contrast Ratio (No ICC Profile): 897:1
    Measured Contrast Ratio (BenQ XL2730Z ICC Profile): 903:1
    Measured White Point (without ICC profile): 6511 K
    Measured White Point (BenQ XL2730Z ICC Profile): 6523 K

    Download BenQ XL2730Z ICC Profile

    Note: These settings were achieved using an i1 Display Pro, along with X-Rite i1 Profiler and BasICColor software. The GPU used on this monitor was the ASUS Radeon R7 260X, using stock settings. These settings require an additional ICC profile for accuracy. Use these settings at your own discretion, as they may look different on your display.


  • Measured Input Lag (60hz):

The XL2730Z surprised me in this regard, and not in a good way. Generally speaking, most TN monitors on the market tend to keep input lag at the bare minimum, including most of BenQ’s lineup. The XL2730Z is an odd duckling, because it only exhibits this higher latency when operating under 60hz mode. Toggling ‘Instant Mode’ didn’t really affect my 60hz measurements, which makes me wonder if the function is operating correctly in its present state. These are the measurements recorded from our lag testing device:

  • Top: 18.5ms
  • Middle: 22.5ms
  • Bottom: 26.1ms

The above test was conducted at 1080p resolution. One could argue that having the monitor upscale the image to 1440p is the reason for the extra delay, but I don’t think that’s the case. Averaging out the numbers above results in an input lag of 22ms under 60hz. Most of BenQ’s monitors that I have tested have not exhibited any additional latency when fed a non-native resolution, and would typically upscale without any additional latency. The increased latency should be imperceptible to most gamers unless you’re playing a game that requires frame-perfect accuracy. This latency is not present at higher refresh rates, or when utilizing the FreeSync capabilities of this monitor. This is only an issue for bare-bones 60hz users.


ASUS PG278Q on Amazon


  • Gaming Performance (FreeSync):

The big draw towards the XL2730Z is its FreeSync functionality. For those unaware, FreeSync is AMD’s answer to Nvidia’s G-SYNC technology, which largely provides the same benefits: greatly reduced input lag, no stuttering, and an overall smoother gaming experience. It’s hard to go back to regular V-Sync when you have experienced adaptive refresh rate technology. The great thing about FreeSync is that there are no licensing costs, nor does it force a monitor to only have a singular input (unlike G-SYNC). Nvidia is sticking to G-SYNC entirely, and have not provided support for Adaptive-Sync/FreeSync through their drivers. This will unfortunately fragment the market.

So how did the XL2730Z fare? Quite well, however there is a serious bug that users need to know about. XL2730Z units manufactured earlier this year have a bug under DisplayPort that prevents AMA from being utilized. This makes a rather big difference in terms of response time, where things appear blurrier than they should. Simply connecting the XL2730Z to a FreeSync-capable GPU under DisplayPort is enough to trigger the issue. It doesn’t occur when utilizing HDMI or DVI inputs. BenQ is currently accepting affected XL2730Z units to perform a firmware upgrade that fixes the issue. Outside of this bug, the monitor performs excellent. I mentioned earlier that there is latency present when utilizing the monitor under 60hz, howevever this isn’t an issue when using the higher refresh rates this monitor is capable of. To showcase this, I booted up Ultra Street Fighter IV while enabling FreeSync and disabling in-game V-Sync. The benefits can be seen in the video below:


The test above showcases the latency reduction while FreeSync is active: 3.5 frames of input latency, which is almost identical to V-Sync OFF! Anyone that considers themselves a serious gamer will greatly benefit from enabling FreeSync. Lowered input latency can boost reaction times, improve movement, as well as combo timings. Without FreeSync, input lag in a game like Ultra Street Fighter IV can go as high as 7 frames when compared to FreeSync/V-Sync OFF.


  • Motion Blur:

The XL2730Z is definitely a contender when it comes to handling fast motion. By default, we all know that setting the monitor to higher refresh rates will reduce motion blur. The AMA function of the XL2730Z allows for lower response times through panel overdrive. Additionally, BenQ’s ‘Blur Reduction’ mode enables a strobing backlight which cuts down on ghosting even further. I don’t recommend enabling the ‘Blur Reduction’ function on refresh rates below 120hz, as it will cause noticeable issues (such as flickering and stuttering). There are several combinations to use with this monitor, though I recommend a few:

For 60hz operation: AMA set to High, Blur Reduction OFF
For 120hz operation: AMA OFF, Blur Reduction ON
For 144hz operation: AMA OFF, Blur Reduction ON
For FreeSync operation: AMA High

There is a trade off you have to make, unfortunately. FreeSync and Blur Reduction cannot be combined, so you will have to make a choice between them. If you value no stuttering and lower input lag, enable FreeSync and set AMA to High (on upgraded XL2730Z units with the bug removed). If a ghost-free image is most important, then increase your refresh rate to at least 120hz and enable ‘Blur Reduction’ to significantly reduce motion blur. Keep in mind that your peak brightness will be capped if you choose to do this.

Ghosting test courtesy of TestUFO


The post BenQ XL2730Z Review: 144hz AMD FreeSync Monitor appeared first on DisplayLag.

New 2015 4K HDTVs Tested for Input Lag: Samsung, Sony, LG, & Sharp!

$
0
0

It’s been a while since our last major update, though I’m happy to report that our input lag database has been updated with several 2015 models, and now features a staggering 422 displays tested! Most of our testing revolves around Samsung’s latest HDTVs, including their new S-UHDTV line. To achieve the lowest latency, it is important to update your HDTV to the latest firmware, as some of the firmwares shipping with these HDTVs have slightly higher latency until updated. Outside of Samsung, Sharp has made a huge improvement this year. Their brand new OS available in the 70″ 4K LC-70UH30U brings input lag down to a very low 32ms! Here is the list of new displays added to our database:


Brand Res Size + Model Lag Rating Price
Samsung 4K 65″ UN65JU7500 17ms Excellent Check Amazon
Samsung 4K 78″ UN78JU7500 20ms Excellent Check Amazon
Samsung 4K 55″ UN55JU7500 20ms Excellent Check Amazon
Samsung 4K 65″ UN65JS9500 21ms Great Check Amazon
Samsung 4K 65″ UN65JS9000 22ms Great Check Amazon
Samsung 4K 55″ UN55JS9000 22ms Great Check Amazon
Samsung 4K 65″ UN65JU6700 27ms Great Check Amazon
Samsung 4K 65″ UN65JU6500 27ms Great Check Amazon
Samsung 4K 40″ UN40JU6700 27ms Great Check Amazon
Samsung 4K 40″ UN40JU6500 27ms Great Check Amazon
Samsung 4K 55″ UN55JU6700 27ms Great Check Amazon
Samsung 4K 48″ UN48JU6500 27ms Great Check Amazon
Samsung 4K 55″ UN55JU6500 27ms Great Check Amazon
Samsung 4K 48″ UN48JU6700 27ms Great Check Amazon
LG 1080p 42″ 42LF5600 28ms Great Check Amazon
Samsung 720p 32″ UN32J4000 28ms Great Check Amazon
Sony 1080p 24″ PlayStation 3D Monitor 31ms Great Check Amazon
Sharp 4K 70″ LC-70UH30U 32ms Great Check Amazon
Samsung 1080p 40″ UN40J5500 35ms Great Check Amazon
Samsung 4K 55″ UN55JS8500 36ms Great Check Amazon
Samsung 4K 65″ UN65JS8500 36ms Great Check Amazon
Sony 1080p 65″ KDL-65W850C 36ms Great Check Amazon
Samsung 4K 75″ UN75JU6500 37ms Great Check Amazon
LG 4K 79″ 79UF7700 44ms Okay Check Amazon
Samsung 1080p 75″ UN75J6300 46ms Okay Check Amazon
LG 4K 65″ 65UF7700 47ms Okay Check Amazon
LG 4K 65″ 65UF8500 47ms Okay Check Amazon
LG 1080p 55″ 55LF6300 49ms (PC) Okay Check Amazon
LG 4K OLED 65″ 65EG9600 56ms Okay Check Amazon
LG 4K 55″ 55UF7600 60ms Okay Check Amazon
LG 4K 49″ 49LF6300 63ms Bad Check Amazon
Sharp 1080p 65″ LC-65LE645U 112ms Bad Check Amazon


Be sure to compare these displays to others within our input lag database!

The post New 2015 4K HDTVs Tested for Input Lag: Samsung, Sony, LG, & Sharp! appeared first on DisplayLag.

E3 2015: Street Fighter V Is Worth The Wait

$
0
0

Yesterday kicked off the first official day of E3 2015, which so far has proven to be a monumental event for gamers. Over the years, we’ve seen E3 attempt to focus on multiple avenues to pique public interest, however it is very clear that E3 2015 is strictly for gamers. One of the most important titles at this year’s E3 is none other than Street Fighter V, the long awaited sequel to Street Fighter IV. I was able to see Street Fighter V unveiled live for the first time at Capcom Pro Tour last year in San Francisco, and was eager to finally get my hands on it. The game has made so much progress since its initial debut; it’s hard to draw any comparisons to the rough build I saw last year.

 20150616_120802 

I managed to get an extended amount of time with the game, having played several strong players, along with some newcomers on the big stage. If you’re a Street Fighter fan, then you probably know that some of the world’s strongest players are in attendance here to try out the game, including big names such as Daigo Umehara, Tokido, Xian, Justin Wong, Momochi, and many others.


  • Graphics:

Right off the bat, you will notice that Street Fighter V is leaps and bounds above its predecessor in terms of visual fidelity. Animations have been completely redone, and almost nothing from this game borrows from Street Fighter IV in terms of how it looks. One of the strongest complaints towards Street Fighter IV was the semi-cartoony nature of the characters. While detailed for their time, some animations didn’t seem to live up to the pedigree that the iconic Street Fighter III series established prior to Street Fighter IV. The animations present within Street Fighter V are quite simply a joy to experience. Several moves now have dedicated hit and block animations, instead of using a single animation for both instances. A good example is Ryu’s sweep, which doesn’t do a full rotation if blocked. Move animations just seem to have that satisfying feel that I personally felt was lacking in the previous game. Every hit conveys a sense of impact due to more detailed animations, something you’d expect when you hit somebody with Ryu’s dominating Shoryuken.

 20150616_120737 

Characters also look much more detailed across the board in terms of their design. The move to the current-generation PlayStation 4 definitely showcase the benefits of a new platform. The game runs at a smooth 60 frames per second with absolutely no frame drops with a sharp 1080p resolution, a must for a competitive fighting game made in this day and age. One look at Ryu’s new character model is enough to see the difference. For the first time, it really feels like Ryu is a veteran martial artist. His gi shows signs of age in a way that signifies just how much he has gone through to get to his current skill level. Chun-Li exudes confidence in her movement and attacks in a way that I haven’t really seen since Street Fighter III: Third Strike. Cammy’s new character model conveys her military training in a much more convincing manner. The keyword here is confidence. Each fighter seems to really bring out their resolve with their new animations. The game is a visual upgrade in every sense of the word, and it is simply too hard to go back to Street Fighter IV‘s dated visuals.


  • Gameplay:

The real difference with Street Fighter V is the brand new gameplay engine that borrows almost nothing from Street Fighter IV. Focus attacks, ultra combos, and crouch-techs are nowhere to be found, which drastically changes the mental approach to Street Fighter V. Damage has also been buffed across the board to resemble Super Street Fighter II Turbo‘s level of urgency. A simple jump in combo into an EX move can easily remove nearly 35% from your health bar, something that wasn’t really possible in Street Fighter IV outside of a few characters. Whiff punishing with a crouching medium kick canceled into fireball super is guaranteed 50%. With ultra combos moves removed from the game, the importance of utilizing your super bar for big damage is a key factor within Street Fighter V‘s metagame, which resembles older entries in the series.


So what ends up replacing focus attack and ultra combos? The new V-Gauge meter. V-Skills are attacks unique to each character, and can be activate at any time using the medium attack buttons. For Ryu, using the medium buttons resulted in a parry animation, that is capable of stopping almost any attack when timed properly. This creates a small window to achieve a punish, depending on how many recovery frames the incoming attack had. V-Trigger can be activated by pressing both heavy attack buttons when the V-Gauge is completely filled. Ryu enters his Denjin mode that significantly improves his gameplay. His fireballs become faster, and he is also able to charge his regular fireballs to create delays that aren’t possible without the use of Denjin mode. Critical Arts (super combos) also receive improvements when used in V-Trigger. Activating V-Trigger essentially unlocks your character’s true potential by improving their special attacks and moveset across the board. Certain characters like Cammy become much safer when V-Trigger is active. Finally, V-Reversal is an old-school defensive mechanic that has made its way to Street Fighter V. By pressing forward + three punches during blockstun, you will be able to counter an opponent’s attack and essentially reset the neutral game, at the cost of meter. This stops your opponent from being too predictable in their approach.


20150616_120747


To elaborate on the current game flow, the game just feels much more active than Street Fighter IV ever did. I’m sure part of the reason is due to everyone’s ignorance with this new title, however the redesigned gameplay system just makes so much sense. With the removal of crouch-teching, it is now possible to create offensive mixups that put serious pressure on the opponent. You can still tech throws while crouching, however it simply results in a standing throw animation when activated. By the way, the throw whiff animation is huge. If you guess wrong on your throw tech, please be prepared to eat a ton of damage as a result. The animation is very pronounced. Simply moving back and forth within the opponent’s immediate proximity can create a new layer of mind games that hasn’t been experienced for quite a while, as crouch-teching would simply cover too many options in Street Fighter IV. Throw ranges have also been nerfed, being eerily similar to Street Fighter X Tekken ranges. Hard knockdowns have mostly been removed as well, as you are now able to tech-roll backwards. I personally love this decision as it forces the player to make a choice: are you going to sit there and eat a potential mixup, or roll backwards closer to the corner? It seems like a much more sensible fix than the delayed wakeup system implemented into Ultra Street Fighter IV.


Playing Ryu was far more fun in Street Fighter V than any previous version of Street Fighter to me. The range on his crouching medium kick is significantly lower, however his dashing speed and overall movement is improved. He can now cancel his far light kick into special moves, which allows him to whiff punish attacks that were simply too hard to punish with crouching medium kick. You are also able to cancel light attacks into special moves immediately, without putting a small delay, unlike Street Fighter IV. The removal of focus attack allows pure footsies to become an integral part of Street Fighter V, so you really have to work to make your buttons count.

The decision to make damage higher across the board results in a game that forces you to think carefully about your decisions, without making the match take far too long. I’m feeling incredibly optimistic about Street Fighter V after my hands-on time with it, and that the majority of Street Fighter IV players should really enjoy what Capcom has accomplished with Street Fighter V. The game is set to launch early 2016, although the closed beta is going to be available this July as long as you pre-order the game!

The post E3 2015: Street Fighter V Is Worth The Wait appeared first on DisplayLag.

AOC G2460PQU 144hz Gaming Monitor Review

$
0
0

About The Review:

This AOC G2460PQU gaming monitor was provided by AOC for review purposes. I will be reviewing the build construction, picture quality, and overall technical performance of the G2460PQU.


Display Details

Size: 24″ Max Brightness: 350 cd/m²
Resolution: 1920 x 1080 Native Contrast Ratio: N/A
Aspect Ratio: 16:9 Dynamic Contrast Ratio: 80M:1
Response Time: 1ms GTG Viewing Angle: 170/160
Display Colors: 16.7 Million Refresh Rate: 144hz
Panel Type: TN Adaptive Refresh Rate: No
Inputs/Outputs: (1) D-Sub
(1) DVI-DL
(1) HDMI
(1) DisplayPort
(4) USB 2.0
Price: Check Amazon


ASUS PG278Q on Amazon


  • The AOC G2460PQU: At A Glance

AOC has been manufacturing monitors for quite a while. The G2460PQU is one of their latest additions to their lineup, being a full-fledged 144hz display to handle your gaming needs. Competing with some of ASUS and BenQ’s top monitors, the G2460PQU hits the right notes off the bat: it features a solid stand with plenty of weight for stability, as well as a unique brushed design along the casing itself. The monitor certainly doesn’t feel cheap, maintaining a minimal profile on your desk.


AOC G2460PQU USB Ports


In terms of input connectivity, most users shouldn’t have any complaints. The G2460PQU comes fitted with VGA, DVI-DL, HDMI, and DisplayPort inputs. While only one HDMI input is present, the inclusion of the other ports should be more than enough for most users. Keep in mind that refresh rates higher than 60hz will require DVI-DL or DisplayPort connection. The monitor also features four USB 2.0 ports, which may prove useful for those running out of USB ports on their desktop. A headphone jack and line-out are supported for your aural needs, though I’d assume most users will be using their own external solutions to handle game audio. The specifications of the G2460PQU are quite standard. This monitor is capable of up to 144hz refresh rate, utilizing a 1080p resolution and TN panel type. The reported 1ms GTG response time ensures that your fast-moving images are relatively blur-free by LCD standards.


AOC G2460PQU Inputs


  • Buttons:

The buttons featured on the G2460PQU do their job admirably. Like most other monitors, each button has a predetermined function attached to it, which requires memorization in order to hit the right settings. I wish AOC implemented a way to see your selections on the screen itself, as it would aid darkroom usage significantly. Once you get past memorization quirks, the OSD handles quite well. The buttons are made of hard plastic, so don’t expect any surprises there.


AOC G2460PQU Buttons


  • Menu Items and Features (OSD):

The menu system on the G2460PQU functions quite well, with no noticeable lag time between button presses. The monitor features several customization options that will satisfy the needs of most users. Some of these options include typical contrast, brightness, and gamma adjustments. Dynamic contrast ratio as well as panel overdrive can also be customized within these menus. To see all of the options available for configuration, please check the screenshots below:

AOC-Color-Setup AOC-Extra AOC-Luminance AOC-OSD-Setup AOC-Picture-Boost


  • Viewing Angles & Uniformity:

Being one of AOC’s gaming displays, we’re looking at a relatively standard TN panel incorporated into the G2460PQU. While primarily marketed towards hardcore PC gamers, the inclusion of several inputs begs the use of multiple sources. Before creating an ICC profile, I wanted to check how well the screen performed using only OSD calibrations. Brightness was calibrated to approximately 120 cd/m² for optimal darkroom usage. I managed to achieve a color temperature of 6441 K, very close to the 6500 K standard. In terms of white point, we’re looking at the largest deviations occuring on the corners of the screen, with the largest deviation occuring on the top left portion of the display. In terms of panel luminance, we see a 16% reduction of brightness on the top left corner. You can view the screen captures below to check overall panel uniformity of our G2460PQU review sample:


AOC G2460PQU Luminance AOC G2460PQU White Point
Click to enlarge


  • Black/White Level & Gamma:

To achieve the best color accuracy, it is necessary to set the monitor’s color temperature to the “User” setting in order to unlock the RGB controls. Without the use of an ICC profile, I was able to calibrate the monitor using the stock “Gamma1” setting in order to achieve a gamma close to the 2.2 standard. Static contrast ratio after configuring OSD controls yielded an impressive 1066:1, along with a black level of 0.11 cd/m², which is quite good for a TN panel! The results after using OSD controls for color calibration can be seen in the chart below:

 G2460PQU Before ICC Profile 

As you can see, there is still a lot of work to do before this monitor achieves optimal color accuracy. The customized OSD settings along with our ICC profile yielded the most out of this monitor. Contrast ratio was boosted slightly to 1078:1:

 G2460PQU After ICC Profile 

The image quality became much better once the ICC profile was applied. Keep in mind that traditional TN limitations still apply, including color/gamma shifts when viewed from different angles. It is important to maintain eye level with the monitor for an optimal viewing experience.

  • Luminance:

    Contrast: 50
    Brightness: 11
    Eco Mode: Standard
    Gamma: Gamma 1
    DCR: Off
    Overdrive: Light
    i-Care: Off
    DPS: Off

    Color Setup:

    Color Temperature: User (R: 47, G: 47, B: 42)
    DCB Mode: Off
    DCB Demo: Off

    Picture Boost:

    Bright Frame: Off

    Extra:

    Image Ratio: Wide

    Measured Black Level (120 cd/m²): 0.11 cd/m²
    Measured Contrast Ratio (No ICC Profile): 1066:1
    Measured Contrast Ratio (AOC G2460PQU ICC Profile): 1078:1
    Measured White Point (without ICC profile): 6441 K
    Measured White Point (AOC G2460PQU ICC Profile): 6464 K

    Download AOC G2460PQU ICC Profile

    Note: These settings were achieved using an i1 Display Pro, along with X-Rite i1 Profiler and BasICColor software. The GPU used on this monitor was the NVIDIA GeForce 980 TI, using stock settings. These settings require an additional ICC profile for accuracy. Use these settings at your own discretion, as they may look different on your display.


ASUS PG278Q on Amazon


  • Measured Input Lag (60hz):

The main purpose of purchasing a TN panel like the G2460PQU is to benefit from low latency gaming. Unfortunately, the G2460PQU disappoints with 60hz operation. While most TN gaming monitors hover around an average of 10ms input latency under 60hz, the G2460PQU has slightly more input lag under the same conditions. Connecting our dedicated lag testing device to the G2460PQU yielded the following measurements, using a 1080p/60hz signal:

  • Top: 21ms
  • Middle: 29.3ms
  • Bottom: 33.9ms

Averaging out the measurements above yields an average input lag of 28ms. While the G2460PQU’s latency is low enough to be a non-issue to the majority of gamers, it’s higher than average for a budget TN panel. Keep in mind that this latency is for 60hz operation only. When utilizing 120hz or higher refresh rates, you can expect this number to cut in half.


  • Gaming Performance:

To follow up on the latency tests above, I booted up my copy of Ultra Street Fighter IV to get an idea of how the additional latency actually feels in play. Using my BenQ RL2455HM gaming monitor as the preferred low latency display, there was a small difference between both monitors in terms of timing. As the game runs at a locked 60 frames per second, the difference I personally felt was approximately 1 frame of additional latency over the BenQ RL2455HM. Those looking to achieve the lowest input latency may not be satisfied with the 60hz operation of the G2460PQU. It is possible to reduce this latency by utilizing a higher refresh rate, such as 120hz. Unfortunately, our review sample wasn’t able to correctly display a 144hz refresh rate over DisplayPort connection, which resulted in an “Input Not Supported” message to appear on screen. This issue has reportedly been fixed in models produced during 2014 and newer. 144hz functions correctly when utilizing a dual-link DVI cable on our review sample.

Utilizing a higher refresh rate was as pleasant as you’d expect. The aforementioned latency was much harder to detect, and it’s unlikely that most users will have any issues when using this monitor for 120hz+ gaming. I tested out the 144hz refresh rate using dual-link DVI on Crysis 3; the game performed as smooth as ever. There are downsides, however, towards utilizing traditional V-Sync when compared to new technologies such as G-SYNC & FreeSync, including stuttering and increased input lag.


Ultra Street Fighter IV features an incredibly useful lag simulation mode, allowing frame-by-frame testing of input lag.


  • Motion Blur:

The AOC G2460PQU offers multiple overdrive settings in order to compensate for LCD motion blur. This is a key area where TN panels still have an advantage over higher end IPS and VA panels, as it’s not currently possible to get those panel types into 1ms GTG territory. The G2460PQU’s five overdrive presets include off, weak, light, medium, and strong settings. Using the ghosting test provided by TestUFO, utilizing any setting above ‘light’ will create noticeable artifacts that trail fast moving objects. You will want to avoid disabling overdrive entirely, as it will create a noticeable amount of blur that can be considered distracting. Most modern TN panels require some overdrive enabled in order to look their best. Overdrive configuration is only available at lower refresh rates, such as 60hz. When utilizing a 120hz refresh rate on our review sample, the overdrive setting was blanked out, unable to be changed. This was a non-issue however, as it passed the UFO test without any noticeable artifacts.


The post AOC G2460PQU 144hz Gaming Monitor Review appeared first on DisplayLag.

BenQ XR3501 Curved 144hz Gaming Monitor Review

$
0
0

About The Review:

This BenQ XR3501 gaming monitor was provided by BenQ for review purposes. I will be reviewing the build construction, picture quality, and overall technical performance of the XR3501.


Display Details

Size: 35″ Max Brightness: 300 cd/m²
Resolution: 2560 x 1080 Native Contrast Ratio: 2000:1
Aspect Ratio: 21:9 Curvature: 2000R
Response Time: 4ms GTG Viewing Angle: 178/178
Display Colors: 16.7 Million Refresh Rate: 144hz
Panel Type: VA Adaptive Refresh Rate: No
Inputs/Outputs: (1) DisplayPort
(1) Mini-DP
(2) HDMI
Price: Check Amazon


ASUS PG278Q on Amazon


  • The BenQ XR3501: At A Glance

For years, most of the monitor market has been saturated with 16:9 displays, mainly due to modern media being designed to fit this aspect ratio. While 16:9 is significantly wider than the antiquated 4:3 aspect ratio, it’s quite common to see two or three monitors placed into modern setups to accommodate an even larger field of view. This isn’t perfect, as it still requires fiddling with multiple displays, and bezels between monitors can break the immersion, especially when it comes to gaming. Enter the newer 21:9 aspect ratio, which aims to replace a multi-monitor setup with a singular display. This aspect ratio is starting to see some serious support this year, with several top manufacturers on board for the ride. BenQ’s XR3501 not only offers a curved screen with a 35″ screen size, but also a 144hz refresh rate designed for fast-paced gaming.


BenQ XR3501 Front


The BenQ XR3501 has a very solid build. The monitor has a decent amount of heft to it, mainly due to the extra-wide screen size. The stand is built accordingly to manage this weight, which exudes a shiny metallic finish, complimenting the monitor’s looks quite nicely. There is no height adjustment, though the monitor can be tilted to accommodate eye level. Curved screens tend to be a personal preference with modern 16:9 displays, however it feels just right with a 21:9 aspect ratio. It creates a sense of envelopment that is hard to replicate with 16:9 displays.


BenQ XR3501 Inputs


There isn’t a shortage of necessary inputs here, as the XR3501 features the latest in terms of input connectivity. Two HDMI 1.4 (not 2.0) ports are present to handle most of your mainstream devices, though you’ll omit these ports if you want to bring out the true potential of this monitor. DisplayPort and mini-DisplayPort connections are necessary in order to utilize the 144hz refresh rate, along with the 2560 x 1080 resolution. Finally, line in/out ports and a headphone jack handle your aural needs. The display itself is a VA panel with a 4ms GTG response time. While it can’t compete with TN monitors in terms of motion resolution, it makes up for it with noticeably better image quality.


  • Buttons:

The XR3501 may have the best buttons I’ve utilized in a display yet. The giant footprint of the 35″ screen allowed BenQ to implement large circular buttons that feel very responsive to the touch. True to traditional BenQ standards, they work well in dimly-lit environments as the buttons display their functions on the screen itself. BenQ also made a smart decision to illuminate the power button, so that you don’t get confused with the rest of the buttons on the monitor. It looks quite sleek in darker environments.


BenQ XR3501 Buttons


  • Menu Items and Features (OSD):

BenQ have steadily evolved their on-screen display over the years, tuning its responsiveness and overall presentation. The XR3501 takes a stylish departure from several of BenQ’s previous monitors with a modified color scheme. While the smart scaling features from their XL/RL line of monitors have been removed, the majority of important functions are still intact on the XR3501. Check the screenshots below to see all of the functions available on the XR3501.

BenQ XR3501 Setting 1 BenQ XR3501 Setting 2 BenQ XR3501 Setting 3 BenQ XR3501 Setting 4 BenQ XR3501 Setting 5 BenQ XR3501 Setting 6 BenQ XR3501 Setting 7


  • Viewing Angles & Uniformity:

With modern LCD displays, a good portion of the image quality is dependent on panel uniformity. Having a large difference in luminance and white point across various portions of the screen can result in an uneven presentation. After calibrating the BenQ XR3501 to 120 cd/m² and a white point of 6500 K, I measured the variance between the center and corners of the display. The largest variance from the center luminance was a 17% reduction on the left side of the screen, with a recorded luminance of 97 cd/m². In terms of white point, the largest variance from the center was the bottom left corner, with a white point of 6712 K. Considering the fact that these screens are wider than traditional 16:9 displays, the panel uniformity is acceptable and shouldn’t cause too many concerns in daily usage.


BenQ XR3501 Luminance BenQ XR3501 White Point
Click to enlarge


  • Black/White Level & Gamma:

The BenQ XR3501 utilizes a VA panel type, which is known to achieve excellent contrast ratios with very low black levels, when compared to other panel types such as IPS. Traditionally, most monitors require some configuration in their OSD to achieve 6500 K color temperature. Surprisingly, the XR3501 already achieves this color temperature without tweaking RGB values. Simply set the color temperature to ‘User’, which defaults to approximately 6517 K right away. Additionally, the brightness setting was modified in order to achieve 120 cd/m² luminance, which is an ideal brightness setting for dark room usage. Setting the brightness to ’12’ achieves a black level of 0.06 cd/m² and a contrast ratio of approximately 1991:1. This is almost spot on with BenQ’s own reported static contrast ratio of 2000:1.


BenQ XR3501 no ICC Profile


While the color temperature is ideal, an ICC profile must be applied to obtain optimal color and gamma balance from the XR3501. Once calibrated, the XR3501 offers a uniform picture. Due to the large screen size of the XR3501 however, pixel density is a bit lacking due to the 2560 x 1080 resolution. Utilizing a higher 3440 x 1440 resolution would solve this problem. Sadly, a tradeoff has to be made at this point in time, due to 3440 x 1440 panels lacking the ability to display 144hz refresh rates.


BenQ XR3501 ICC Profile Calibration Results


  • Picture:

    Brightness: 12
    Contrast: 50
    Sharpness: 5
    Gamma: 3
    Color Temperature: User Define (R:100, G:100, B:100)
    AMA: Premium

    Picture Advanced:

    Picture Mode: Custom 1
    Black eQualizer: 0
    Color Vibrance: 10
    Low Blue Light: 0
    Super Resolution: 0
    Dynamic Contrast: 0
    Display Mode: Full

    Measured Black Level (120 cd/m²): 0.06 cd/m²
    Measured Contrast Ratio : 1991:1
    Measured White Point: 6464 K

    Download BenQ XR3501 ICC Profile

    Note: These settings were achieved using an i1 Display Pro, along with X-Rite i1 Profiler and BasICColor software. The GPU used on this monitor was the NVIDIA GeForce 980 TI, using stock settings. These settings require an additional ICC profile for accuracy. Use these settings at your own discretion, as they may look different on your display.


BenQ XR3501 on Amazon


  • Gaming Performance: Measured Input Lag (60hz):

BenQ has created several monitors with low input latency in the past. While TN panels have typically offered the lowest amount of input latency, IPS and VA panels have started to achieve equally low input lag values within the last couple of years. The XR3501 manages to keep input lag quite low for serious gaming, and should definitely be considered when choosing a 21:9 gaming display. I measured the XR3501’s input latency using our 1080p/60hz lag testing device; the measurements are listed below:

  • Top: 19.6ms
  • Middle: 23.3ms
  • Bottom: 26.7ms

Averaging out the above measurements results in an average input lag of 23ms, which is quite good for the majority of gamers. The XR3501 is capable of achieving even lower input lag than the numbers reported above, due to its 144hz refresh rate. Input lag reduces with higher refresh rates, so you can expect input lag to cut in half when using a refresh rate of 120hz+. If you’re only planning to use this monitor with higher than 60hz refresh rates, the input lag should be virtually undetectable with most games, making the XR3501 a formidable screen for gaming.


I booted up Ultra Street Fighter IV to get a feel for the input lag present within the XR3501 at 60hz. While switching back and forth between the XR3501 and BenQ RL2455HM gaming monitor, the difference felt to be approximately 1 frame, which is very good compared to most displays listed in our input lag database. With input lag being a non-issue at higher refresh rates, most users will be absolutely captivated with the large field of view the XR3501 provides, when compared to 16:9 displays. It’s essentially the same feeling most people received when transitioning from 4:3 boxed TVs into the current 16:9 widescreen format. The curvature of the screen envelops you into the experience, especially with open world games such as The Witcher 3: Wild Hunt. It’s hard to go back when you’re accustomed to the expanded field of view that 21:9 aspect ratio allows. Tread with caution, as lots of games don’t feature 21:9 support natively just yet. The big push has begun, and may take some time to become mainstream.


  • Motion Blur:

Outside of the slightly low resolution on the XR3501, the response time suffers a bit due to the VA panel type. The good news is, a lot of the blur can be reduced when using refresh rates above 60hz. I typically end up setting the AMA setting on most BenQ monitors to ‘High’, as it provides the best balance between overdrive and artifacts. However, the XR3501 doesn’t display artifacts as much as other BenQ monitors do, when using the ‘Premium’ setting. I think it’s a viable option for 60hz content, though I would stick to the ‘High’ setting when using 120hz or higher. I recorded 60 FPS videos comparing the ‘Off’, ‘High’, and ‘Premium’ settings on the XR3501 to illustrate the difference:

AMA Off:


AMA High:


AMA Premium:


ASUS PG278Q on Amazon


The post BenQ XR3501 Curved 144hz Gaming Monitor Review appeared first on DisplayLag.

Viewing all 126 articles
Browse latest View live